To install a shower valve rough-in, start by shutting off the water supply, removing the old valve, and cleaning the pipes. Then, attach the new valve to the wall and connect the water supply lines.
Finally, test for any leaks and make adjustments if necessary. Introducing a new shower valve rough-in can be a straightforward process if you follow the right steps. With a few basic tools and some careful planning, you can successfully replace your old shower valve and enjoy a renewed bathing experience.
We will guide you through the installation process, helping you understand the necessary tasks and precautions involved. From shutting off the water supply to testing for leaks, we will cover everything you need to know to ensure a smooth shower valve rough-in installation. So, let’s dive in and get started on enhancing your bathroom’s functionality and aesthetics.
Understanding The Concept Of Shower Valve Rough In
When it comes to installing a shower valve, one important step is to understand the concept of shower valve rough in. The shower valve rough in refers to the installation of the valve body, also known as the rough-in valve, which is responsible for controlling the flow and temperature of water in the shower. This crucial step sets the foundation for a properly functioning and efficient shower system.
Definition of Shower Valve Rough In
The shower valve rough in is the process of installing the valve body, which is the main control unit of the shower system. It is typically done during the construction or remodeling phase of a bathroom. The valve body is installed behind the shower wall and connects to the water supply pipes. Once installed, it allows the hot and cold water to mix and regulates the water flow, adjusting the temperature and pressure according to the user’s preferences.
Importance of Proper Shower Valve Rough In
Proper shower valve rough in is essential for a well-functioning shower system. Installing the valve body correctly ensures that the shower operates smoothly, providing the desired water temperature and pressure. It also allows for future maintenance and repairs without the need for major modifications to the existing plumbing system.
A proper rough in also eliminates common problems such as leaks, water temperature fluctuations, and inadequate water pressure. It sets the foundation for a reliable and efficient shower experience, enhancing both the functionality and durability of the shower system over time.
How it Affects the Overall Shower Performance
The shower valve rough in directly affects the overall shower performance in several ways. By accurately positioning the valve body according to the manufacturer’s instructions, you can optimize the water flow and temperature control. This ensures that you have a comfortable and enjoyable shower experience every time.
Additionally, the proper rough in allows for easy access to the valve body for maintenance or repairs. With a well-placed valve, you can easily replace worn-out parts, such as cartridges or seals, without having to tear down the shower wall.
To sum up, understanding the concept of shower valve rough in and executing it correctly is crucial for the proper functioning of a shower system. It establishes the foundation for a satisfying shower experience, eliminating common problems and facilitating future maintenance. Make sure to follow the manufacturer’s instructions and seek professional help if needed to ensure a successful shower valve rough in installation.

Necessary Tools And Materials For Shower Valve Rough In
Installing a shower valve rough in is an essential step in setting up a functional and efficient shower system. To ensure a smooth installation process, you need to gather the necessary tools and materials beforehand. In this section, we will go over the list of tools required for the job, the types of shower valve materials needed, and the safety equipment necessary for the process.
List of tools required for the job
Before you start the shower valve rough in, it is important to have the right tools on hand. This will make the installation process much easier and ensure that everything is done correctly. Here is a list of the essential tools you will need:
- Tape measure
- Adjustable wrench
- Plumber’s tape
- Hacksaw
- Phillips screwdriver
- Flathead screwdriver
- Pipe cutter
- Pliers
With these tools at your disposal, you’ll be well-equipped to tackle the shower valve rough in.
Types of shower valve materials needed
When it comes to the materials needed for the shower valve rough in, it is important to choose high-quality components that will stand the test of time. Here are the essential materials you will need:
| Material | Description |
|---|---|
| Shower valve | This is the main component that controls the flow and temperature of the water. Choose a valve that is compatible with your plumbing system. |
| Valve trim | The trim is the visible part of the valve and includes the handle, cover plate, and any additional features. Select a trim that matches the style of your bathroom. |
| Pipes | You will need pipes to connect the valve to the water supply and the showerhead. Copper or PEX pipes are commonly used for this purpose. |
| Fittings | Fittings such as elbows and adapters are necessary to create the proper connections between the valve and the pipes. Make sure to choose fittings that are compatible with your plumbing system and the chosen materials. |
| Flux and solder | If you are using copper pipes, you will need flux and solder to join the pipes and fittings together. |
| Plumber’s putty | Plumber’s putty is used to create a watertight seal between the valve trim and the wall. It is important to choose a high-quality putty that is suitable for wet environments. |
By using these materials, you can ensure the durability and functionality of your shower valve rough in.
Safety equipment necessary for the process
Completing the shower valve rough in also requires taking necessary safety precautions. To protect yourself during the installation, make sure to have the following safety equipment:
- Safety glasses
- Gloves
- Dust mask
Wearing safety glasses will shield your eyes from any potential debris or splashing water. Gloves will provide a good grip and protect your hands from sharp edges. Additionally, a dust mask will help filter out any harmful particles released during the installation process.
Now that you know the necessary tools, materials, and safety equipment needed for the shower valve rough in, you are ready to proceed with the installation process.

Preparation And Measurements
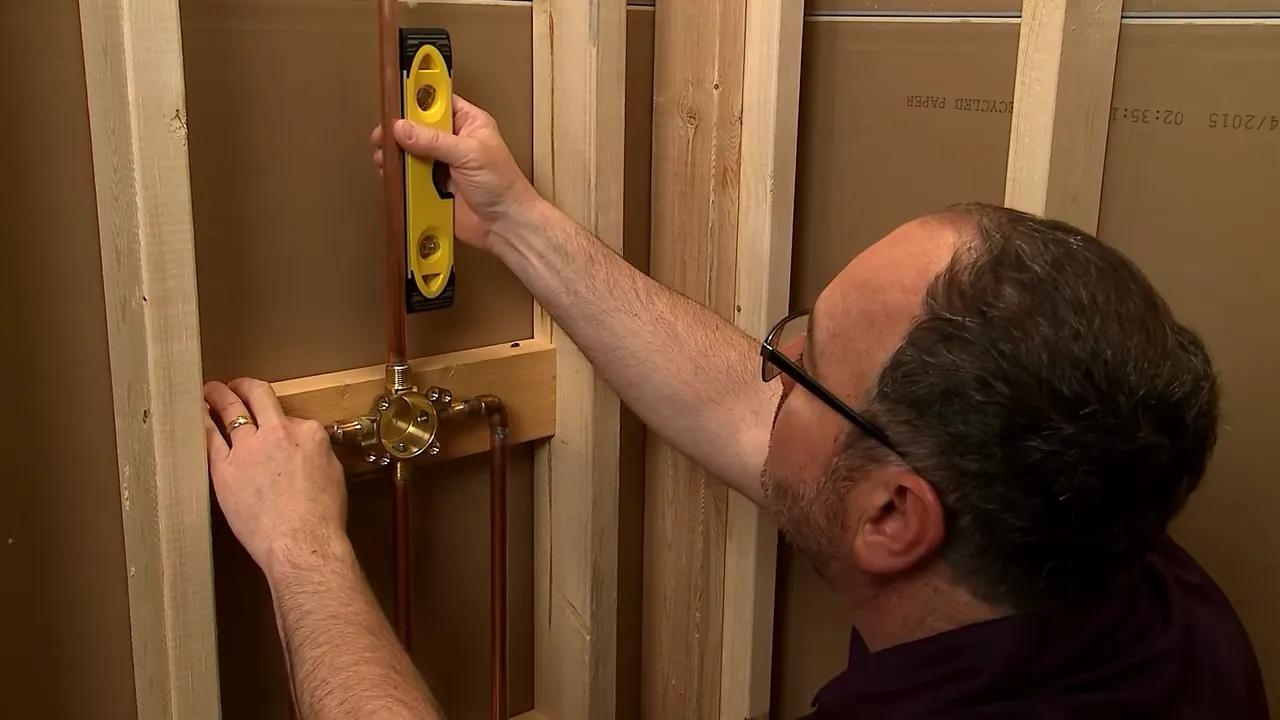
Before installing a shower valve rough-in, it is crucial to properly prepare and take accurate measurements. This ensures a smooth and successful installation process. In this section, we will guide you through the necessary steps to ensure you have all the information needed before beginning your project. We will cover taking correct measurements for the rough-in, identifying the ideal placement for the shower valve, and ensuring proper clearance and accessibility.
Taking Correct Measurements for the Rough-In
Taking accurate measurements is crucial to ensure the rough-in fits perfectly and functions properly. Here are the steps to take when measuring for the shower valve:
1. Measure the distance from the floor to the showerhead:
To determine the ideal placement of the shower valve, start by measuring the distance from the floor to the desired height of the showerhead. This measurement helps in deciding the valve’s position for optimal convenience and comfort.
2. Determine the width between the studs:
Locate the wall studs where the shower valve rough-in will be installed. Measure the width between the studs, as this will determine the maximum width allowance for the rough-in. It is essential to choose a valve that fits within this width range.
3. Measure the depth for the rough-in:
Measure the depth between the front of the wall studs to the desired location for the valve handle and trim kit. This measurement helps determine the appropriate rough-in depth required for seamless installation and proper functioning of the valve.
Identifying the Ideal Placement for the Shower Valve
The placement of the shower valve is critical for both functional and aesthetic reasons. Follow these guidelines to determine the ideal placement:
1. Consider user height:
When choosing the ideal placement for the shower valve, consider the average height of the individuals using the shower regularly. The valve handle should be easily accessible and at a comfortable height for users of varying heights.
2. Convenient distance from the showerhead:
Position the shower valve within an arm’s reach from the showerhead so that it can be easily adjusted while standing under the water. This ensures a seamless and comfortable showering experience.
Ensuring Proper Clearance and Accessibility
Proper clearance and accessibility around the shower valve ensure ease of maintenance, future repairs, and a comfortable showering experience. Consider the following:
1. Clear space for valve maintenance:
Allow enough space around the shower valve for future maintenance and repairs. This includes leaving ample room to access and remove the valve without causing damage to the surrounding walls.
2. Accessibility for individuals with mobility concerns:
Maintain proper accessibility for individuals with mobility concerns, such as elderly or disabled individuals. Ensure that the shower valve handle can be easily reached and operated without requiring excessive strength or dexterity.
By following these guidelines, you can properly prepare and measure for the shower valve rough-in, ensuring a successful installation that meets both functional and accessibility requirements. Before proceeding, double-check your measurements and ensure compliance with local plumbing codes and regulations to avoid any future issues.

Removing Old Shower Valve
When it comes to installing a new shower valve, the first step is to remove the old one. This can be a bit tricky, but with the right steps and precautions, you can safely remove the existing shower valve. In this section, we’ll cover the steps to safely remove the old shower valve, tips for dealing with different types of valves, and how to check for any damage or leaks in the process.
Steps to safely remove the existing shower valve
- Turn off the water supply:
- Remove the handle and trim:
- Disconnect the valve from the piping:
- Inspect for any remaining water or debris:
- Check for any leaks or damage:
Before starting the removal process, it’s important to turn off the water supply to your shower. Locate the shut-off valve for your shower and turn it clockwise to shut off the water flow. This will prevent any accidental leaks or water damage during the removal.
Once the water supply is turned off, you’ll need to remove the handle and trim of the old shower valve. This can usually be done by removing a set screw or unscrewing the trim counterclockwise. Use a screwdriver or Allen wrench to loosen and remove any screws or fasteners.
After removing the handle and trim, you’ll need to disconnect the valve from the piping. This can vary depending on the type of valve you have, but typically involves unscrewing or cutting the pipes connected to the valve. Use a pipe wrench or adjustable pliers to loosen and disconnect the pipes.
Once the valve is disconnected, it’s important to inspect for any remaining water or debris. Use a flashlight to check inside the valve housing and pipes for any obstructions or buildup. Remove any debris and ensure the area is clean before proceeding.
Before installing the new shower valve, take the opportunity to check for any leaks or damage in the surrounding area. Look for signs of water damage, such as discoloration or mold, and check the pipes for any wear or corrosion. It’s better to identify and repair any issues now, rather than later.
Tips for dealing with different types of valves
Different types of valves may require slightly different steps for removal. Here are some tips to keep in mind:
- Ball valves:
- Cartridge valves:
- Compression valves:
- Gate valves:
Ball valves typically have a handle that rotates 90 degrees to control the flow of water. To remove a ball valve, look for a retaining pin or screw and remove it before sliding the valve out.
Cartridge valves have a cartridge that can be pulled straight out to remove. Look for any retaining clips or screws that need to be removed before pulling out the cartridge.
Compression valves have a nut that compresses the valve against the pipe to create a watertight seal. To remove a compression valve, loosen the nut counterclockwise until the valve is free.
Gate valves have a gate or wedge that lowers into the pipe to control the flow of water. To remove a gate valve, unscrew the valve assembly counterclockwise until it is free.
Checking for any damage or leaks in the process
As mentioned earlier, it’s important to check for any damage or leaks during the removal process. In addition to inspecting the surrounding area for water damage and checking the pipes for wear, you can also perform a simple leak test before installing the new valve:
- Reconnect the water supply temporarily:
- Turn off the water supply and continue installation:
Before fully installing the new valve, reconnect the water supply temporarily to check for any leaks. Turn on the water supply and observe the connections for any signs of leaking water. If you notice any leaks, tighten the connections or replace any damaged components.
Once you’ve confirmed that there are no leaks, turn off the water supply again and continue with the installation of the new shower valve. Follow the manufacturer’s instructions for the specific valve you are installing to ensure a proper and secure installation.
By following these steps to safely remove the existing shower valve, tips for dealing with different types of valves, and checking for any damage or leaks in the process, you’ll be well-prepared for installing the new shower valve. Remember to always exercise caution and take your time during the removal to avoid any unnecessary complications.

Installing The New Shower Valve
When it comes to installing a new shower valve, it is important to choose the right type for your needs and follow the correct steps for a proper installation. This ensures that your shower functions effectively and prevents any potential water damage. In this section, we will discuss the process of installing the new shower valve, including choosing the right type of valve for your needs, the steps to properly install it, and connecting the valve to the water supply lines.
Choosing the right type of valve for your needs
Before proceeding with the installation, it is essential to choose the right type of valve for your specific shower requirements. To make this decision easier, consider factors such as the water pressure in your home, the number of showerheads or sprayers you plan to install, and any desired temperature control features. Here are some common types of shower valves:
- Pressure-Balancing Valve: This type of valve helps maintain a consistent water temperature by balancing the flow of hot and cold water. It is ideal for households with fluctuating water pressure.
- Thermostatic Valve: This valve allows you to set a specific temperature and maintain it throughout your shower, regardless of any fluctuations in hot or cold water supply. It is perfect for those who prefer precise temperature control.
- Manual Valve: This basic, standard valve allows you to control the water flow and temperature manually. It is a cost-effective option if you do not require advanced features.
Steps to properly install the new valve
Once you have chosen the right type of valve, it’s time to proceed with the installation process. Here are the steps to properly install the new shower valve:
- Turn off the water supply: Before you begin any plumbing work, always turn off the water supply to avoid any potential leaks or accidents.
- Remove the old valve: Start by removing the old valve, which may require a wrench or pliers, depending on the type of valve in place.
- Prepare the rough opening: Ensure that the rough opening is clean and free from any debris or obstructions. This ensures a smooth installation process.
- Fit the new valve: Carefully fit the new valve into the rough opening, making sure it is aligned correctly and securely in place.
- Secure the valve: Use screws or brackets provided with the valve to secure it firmly in the rough opening. Check for any movement or looseness.
- Test the valve: Before proceeding further, it is essential to test the newly installed valve for any leaks or functionality issues.
Connecting the valve to the water supply lines
After successfully installing the valve, the next step is to connect it to the water supply lines. Here are the necessary steps to complete this process:
- Prepare the water supply lines: Cut the water supply lines and ensure they are clean and free from any debris. Use a pipe cutter for a clean, even cut.
- Connect the supply lines: Attach the supply lines to the appropriate valves on the new shower valve, making sure they are tightly secured.
- Turn on the water supply: Once the supply lines are connected, turn on the water supply to check for any leaks. Make sure all connections are tight and properly sealed.
- Test the valve: Finally, test the valve again to ensure it is functioning correctly. Check for any leaks, and make any necessary adjustments or repairs.
By following these steps and carefully connecting the new shower valve to the water supply lines, you can ensure a successful installation process and enjoy a fully functional and efficient shower system.
Testing And Adjustments
Once you have successfully installed the shower valve rough-in, it’s essential to test and make necessary adjustments to ensure that everything is working correctly. This will help you avoid any unwanted surprises when you step into your newly installed shower. In this section, we’ll discuss how to test the newly installed shower valve, how to adjust water pressure and temperature, as well as troubleshooting common issues and leaks.
How to test the newly installed shower valve
To ensure that the newly installed shower valve is functioning properly, it’s crucial to perform a thorough test. Here’s a step-by-step guide on how to do it:
- Close the main water supply valve to the shower.
- Turn on the shower faucet to drain any remaining water in the pipes.
- Open the main water supply valve to the shower.
- Observe the flow of water from the showerhead. It should be steady and without any leaks.
- Check the temperature control by adjusting it to both hot and cold settings. Make sure the water temperature changes accordingly.
- Test the pressure by adjusting the showerhead flow. It should provide adequate pressure without any sudden drops or surges.
- Inspect the shower valve for any leaks. Ensure all connections are tight and secure.
Adjusting water pressure and temperature
If you find that the water pressure or temperature is not to your liking, you can make adjustments to improve your shower experience. Here’s how you can do it:
- To adjust the water pressure, locate the pressure regulator valve near the shower valve. Turning it clockwise will increase the pressure, while turning it counterclockwise will decrease it. Make small adjustments and test the water flow until you find the desired pressure.
- To adjust the water temperature, look for the temperature adjustment knob on the shower valve. Turning it clockwise will increase the temperature, while turning it counterclockwise will decrease it. Again, make gradual adjustments and test the water temperature until you achieve your desired level of comfort.
Troubleshooting common issues and leaks
Despite careful installation, you might encounter common issues or leaks with your newly installed shower valve. Here are some troubleshooting tips to help you resolve them:
- If you experience low water pressure, check for any blockages in the showerhead. Clean or replace it if necessary.
- If the water temperature fluctuates excessively, there might be an issue with the thermostatic valve. Consult a professional plumber to inspect and repair it if needed.
- In case of leaks, start by inspecting the connections for any loose fittings. Tighten them if required. If the problem persists, you might need to replace faulty parts or seek assistance from a professional plumber.
By following these testing and adjustment procedures, you can ensure that your newly installed shower valve provides you with the optimal water pressure, temperature, and a hassle-free showering experience.
Understanding Building Codes And Regulations
Knowing the Local Codes and Regulations for Rough In
When it comes to installing a shower valve rough in, understanding and adhering to local codes and regulations is crucial. Building codes vary from region to region, and it is essential to be aware of the specific guidelines in your area. These codes exist to ensure the safety and efficiency of plumbing systems, as well as to prevent potential hazards in the future.
Before beginning any rough in project, take the time to research and familiarize yourself with the applicable codes and regulations governing plumbing installations in your locality. This knowledge will help you plan and execute the installation process in a compliant and hassle-free manner.
| Why Knowing Local Codes is Important | Benefits of Compliance |
|---|---|
|
|
Compliance with Plumbing Standards and Guidelines
In addition to understanding local codes and regulations, it is equally important to ensure your shower valve rough in complies with plumbing standards and guidelines. These standards are established by professional organizations, such as the International Plumbing Code (IPC) and the National Plumbing Code of Canada (NPCC), to guarantee uniformity and quality in plumbing installations.
By following plumbing standards and guidelines, you can be confident that your rough in is structurally sound, properly sealed, and meets the necessary requirements. This level of compliance not only ensures the durability and functionality of your shower valve, but it also provides peace of mind knowing that industry-approved practices have been employed.
When it comes to installing a shower valve rough in, knowledge of local codes and compliance with plumbing standards are essential. By understanding and adhering to these regulations, you can ensure the safety, efficiency, and long-term reliability of your plumbing installation. Always consult with local authorities or a professional plumber if you have any questions or concerns during the rough in process.
Planning For Future Maintenance And Upgrades
When it comes to installing a shower valve rough in, it’s important to plan for the future. This means considering potential maintenance needs and leaving room for any future upgrades that may be desired. By taking these factors into account during the installation process, you can save yourself time, effort, and money down the line. In this section, we will explore how to identify potential issues for future maintenance, future-proof your shower valve rough in for upgrades, and provide tips for selecting a versatile valve that allows for easy replacements.
Identifying Potential Issues for Future Maintenance
Anticipating potential maintenance issues in advance can help you avoid costly repairs later on. It’s crucial to consider factors such as accessibility, durability, and potential wear and tear. By doing so, you can ensure that any future maintenance required can be easily carried out without causing unnecessary damage or inconvenience.
Here are a few potential issues to consider:
- Water leaks: Inspecting the valve and connections for potential leaks can help you identify any vulnerable points that may require future maintenance.
- Corrosion or rust: Checking for signs of corrosion or rust can help you address the issue early on and prevent further damage.
- Accessibility: Assessing the ease of access to the valve rough in can save you from hassles when maintenance is required. Make sure there is enough space to reach the valve and surrounding components.
Future-Proofing the Shower Valve Rough In for Upgrades
If you’re considering future upgrades to your shower, it’s important to install a shower valve rough in that can accommodate these changes. One way to future-proof your shower valve rough in is to opt for a valve with multiple outlets. This allows you to add features such as a handheld showerhead or body sprays without having to make significant alterations to the existing plumbing.
Another way to future-proof is to choose a valve with universal compatibility. This ensures that you can easily replace the valve with a similar model if it requires maintenance or upgrade in the future. Universal compatibility valves are readily available in the market, and their interchangeable design makes replacements a breeze.
Tips for Selecting a Versatile Valve for Easy Replacements
Selecting the right valve is crucial for future maintenance and upgrades. Here are a few tips to keep in mind when choosing a versatile valve:
- Look for valves with a standardized size and threading, such as a 1/2 inch NPT (National Pipe Thread). This makes it easier to find replacement valves that will fit seamlessly into your existing setup.
- Consider valves with cartridge-based designs. These valves allow for easy replacement of internal components without the need to remove the entire valve from the wall.
- Opt for valves with a reputation for longevity and durability. This helps minimize the need for frequent replacements and maintenance.
By following these tips, you can select a versatile valve that ensures easy replacements and future upgrades, saving you time, effort, and money in the long run.
Hiring A Professional Vs. Diy Approach
Factors to consider when deciding to hire a professional or do-it-yourself
When it comes to installing a shower valve rough-in, one of the biggest decisions you’ll have to make is whether to hire a professional plumber or tackle the project yourself. While both options have their advantages and drawbacks, there are several factors you should consider before making a final decision.
First and foremost, you need to assess your own plumbing skills and experience. If you’re an experienced DIY enthusiast and have successfully completed similar plumbing projects in the past, you may feel confident in your ability to handle the job. However, if you’re a novice when it comes to plumbing or if this is your first time attempting a project of this nature, it may be best to seek the expertise of a professional.
Another factor to consider is the complexity of the installation itself. Installing a shower valve rough-in involves precise measurements, cutting and soldering of pipes, and ensuring proper water flow and pressure. If you’re not familiar with these tasks or lack the necessary tools, it can quickly become a daunting and time-consuming project. Professionals, on the other hand, have the knowledge, experience, and specialized tools to complete the job efficiently and effectively.
Budget is also an important factor to consider. While the cost of hiring a professional plumber may be higher upfront, it can save you money in the long run. If you attempt the installation yourself and make mistakes along the way, you may end up spending more on repairs or even needing to hire a professional to fix the issues. Additionally, professionals often have access to industry discounts on materials, which can help offset the overall cost.
Pros and cons of each approach
There are both pros and cons to hiring a professional or taking the do-it-yourself approach when it comes to installing a shower valve rough-in. Let’s take a closer look:
| Professional | Do-It-Yourself |
|---|---|
| Pros | Pros |
| 1. Expertise and experience | 1. Cost savings |
| 2. Time-saving | 2. DIY satisfaction |
| 3. Access to specialized tools | 3. Flexibility in scheduling |
| Cons | Cons |
| 1. Higher upfront cost | 1. Possibility of mistakes |
| 2. Dependence on another person | 2. Potential for additional repairs |
When it’s best to hire a professional plumber
While taking the DIY approach can be rewarding, there are certain situations where hiring a professional plumber is the best course of action. Here are a few scenarios when you should consider bringing in the experts:
- If you lack plumbing knowledge and experience
- If the installation requires extensive pipe cutting and soldering
- If you’re dealing with complex plumbing systems or multiple fixtures
- If you’re pressed for time and need the job done quickly and efficiently
- If you’re unsure about local building codes and regulations
By hiring a professional plumber in these instances, you can ensure a smooth and hassle-free installation process while avoiding potentially costly mistakes.
In conclusion, the choice between hiring a professional or taking the DIY route for your shower valve rough-in installation ultimately depends on your plumbing skills, project complexity, and budget. Assessing these factors and considering the pros and cons of each approach will help you make an informed decision that best suits your needs and ensures a successful installation.
Frequently Asked Questions
What Is The Rough In On A Shower Valve?
The rough-in on a shower valve refers to the installation depth required for the valve inside the wall. It determines how far the valve protrudes from the finished wall surface. This measurement ensures that the valve is properly installed and aligned with other plumbing fixtures.
What Is The Standard Rough In Height For A Shower Valve?
The standard rough-in height for a shower valve is typically around 48 inches from the finished floor.
How Deep Should A Shower Valve Be Installed?
The shower valve should be installed at a depth of around 2. 5 to 3 inches from the finished wall surface.
Do You Have To Cut A Hole In A Wall To Replace A Shower Valve?
No, you don’t have to cut a hole in a wall to replace a shower valve. The valve can often be accessed from behind the shower wall or through an access panel. It’s best to consult a professional to determine the most suitable method for your specific situation.
Conclusion
Installing a shower valve rough-in is an essential step in creating a functional and efficient shower system. By following the steps outlined in this blog post, you can ensure a hassle-free installation process. From turning off the water supply to connecting the pipes and securing the valve, every detail has been covered.
Remember to always refer to the manufacturer’s instructions for specific guidance. With these tips, you’ll be able to enjoy a well-functioning shower for years to come.