To install a shower membrane, remove the old shower base, dry the floor, apply adhesive, lay the membrane, and secure it properly. Installing a shower membrane is an essential step in ensuring that your shower is properly waterproofed to prevent water damage.
During the installation process, you will need to remove the old shower base and ensure that the floor is dry before proceeding. Once the floor is ready, you will need to apply adhesive to the surface and securely lay the membrane.
By following these steps, you can effectively protect your shower from leaks and prolong its lifespan. We will provide you with a detailed guide on how to install a shower membrane properly.
Understanding Shower Membranes
Shower membranes are an essential component when it comes to waterproofing your shower installation. In this section, we will delve into what a shower membrane is, why it’s important, and the different types you can choose from.
What is a Shower Membrane?
A shower membrane is a water-resistant barrier that is applied beneath the tile or other flooring material in a shower area. It acts as a protective layer, preventing water from seeping through the surface and causing damage to the underlying structure. Essentially, it serves as a safeguard against leaks and moisture-related problems that can lead to expensive repairs in the future.
Types of Shower Membranes
Now that we understand the importance of a shower membrane, let’s take a look at the different types available:
- Sheet Membranes: Sheet membranes are the most common type of shower membrane used today. They are made of materials like polyethylene or PVC and come in rolls or sheets. Sheet membranes are relatively easy to install and provide excellent waterproofing capabilities.
- Liquid Membranes: Liquid membranes are applied as a liquid and allowed to dry, forming a continuous, waterproof layer. They are ideal for irregularly shaped shower areas or situations where a sheet membrane may be difficult to install. Liquid membranes offer flexibility and durability.
- Hydro Ban®: Hydro Ban® is a type of shower membrane that is widely recognized for its superior waterproofing properties. It is made of a thin, flexible sheet material that ensures excellent adhesion to the substrate, preventing water from penetrating the shower wall or floor.
Each type of shower membrane has its own advantages and considerations, so it’s essential to choose one that suits your specific installation needs and preferences.
Why is a Shower Membrane Important?
A shower membrane is vital because it effectively prevents water from seeping through the shower surface and into the underlying structure. Without a shower membrane, water can penetrate the walls, floor, or surrounding areas, leading to mold growth, deterioration of construction materials, and even structural damage.
By installing a high-quality shower membrane, you can enjoy peace of mind knowing that your shower area is adequately protected from water damage. A well-installed shower membrane ensures the longevity of your shower installation, saving you time, money, and hassle in the long run.

Preparing For The Installation
Gather the necessary tools and materials
Before you begin installing a shower membrane, it’s essential to gather all the necessary tools and materials to ensure a smooth and efficient installation process. Here is a list of items you will need:
| Tools | Materials |
|---|---|
|
|
Pre-installation checks and measurements
Before proceeding with the installation, you need to perform a few important checks and measurements to ensure everything fits perfectly. Here’s what you need to do:
- Check the shower area for any existing damage or leaks. Repair them before installing the membrane.
- Measure the dimensions of the shower area using a measuring tape. Take note of the length, width, and height.
- Ensure that the floor is level. If not, you may need to use a self-leveling compound to create a flat surface.
- Measure the position of the shower drain to ensure compatibility with the shower membrane.
- Check if the walls are plumb using a level. If not, consider using a shim or leveling compound to make them straight.
Preparing the shower area for installation
Now that you have gathered all the necessary tools and materials and performed the pre-installation checks, it’s time to prepare the shower area for the membrane installation. Follow these steps:
- Clear the shower area of any debris, old tiles, or fixtures. It’s crucial to start with a clean and empty space.
- If required, install a shower pan or base according to the manufacturer’s instructions. This will provide a solid foundation for the shower membrane.
- Apply a layer of thin-set mortar on the shower floor using a trowel. This will help create a secure bond between the floor and the membrane.
- Place the shower membrane over the thin-set mortar, ensuring it covers the shower floor and extends up the walls.
- Press the membrane firmly to remove any air bubbles and ensure proper adherence.
- Cut openings for the shower drain and any other fixtures using a utility knife.
- Apply a waterproofing adhesive to the seams and corners of the membrane to ensure a watertight seal.
- Allow the adhesive to dry completely before moving on to the next step.
By following these steps and properly preparing the shower area, you are now ready to move forward with the installation of the shower membrane. Next, we will discuss the steps involved in installing the membrane in detail.

Step 1: Remove Existing Shower Base
Step 1: Removing the old shower base
Before installing a shower membrane, the first step is to remove the existing shower base. This essential preparation ensures a clean and secure foundation for the new membrane to be installed. Follow the steps below to successfully remove the old shower base.
Inspecting the subfloor for damage
Once the old shower base has been removed, it’s crucial to thoroughly inspect the subfloor for any signs of damage. This step helps identify any underlying issues that may affect the installation of the shower membrane. To inspect the subfloor effectively, follow these guidelines:
- Examine the subfloor carefully, looking for any signs of rot, deterioration, or water damage. Pay close attention to areas near the drain as these are prone to potential leaks.
- Check for any sagging or uneven areas on the subfloor. Uneven subfloors can cause the shower membrane to buckle or fail, compromising the waterproofing of the shower stall.
- Inspect the joists and support beams to ensure they are structurally sound and free from any damage or decay. Any signs of weakness should be addressed before proceeding with the installation.
Repairing or replacing the subfloor if needed
If any damage or issues are detected during the inspection, it’s essential to address them promptly to ensure a solid foundation for the shower membrane. Depending on the extent of the damage, you may need to repair or replace the subfloor. Here’s what you should do:
- If the damage is minor, such as small areas of rot or decay, you can remove the affected sections and replace them with new plywood or OSB subflooring. Be sure to securely fasten the new sections to the existing subfloor for stability.
- In cases where the damage is extensive or the subfloor is severely compromised, it may be necessary to completely replace the subfloor. This involves removing the entire subfloor and installing a new one, following appropriate construction guidelines and codes.
By repairing or replacing the subfloor as needed, you are ensuring a strong and stable foundation for the shower membrane installation. This step is crucial for achieving a watertight shower that will stand the test of time.
Step 2: Install Drain Assembly
After choosing the right type of drain assembly, the next step in installing a shower membrane is to install the drain assembly. This crucial step ensures proper drainage and prevents any potential leaks in the future. In this section, we will guide you through the process of installing the drain assembly, which includes installing the drain flange and connecting the drain pipes.
Choosing the right type of drain assembly
When it comes to choosing the right type of drain assembly, there are a few factors to consider. Firstly, you need to decide between a traditional waterproofing membrane drain and a pre-formed integrated drain system. A traditional drain assembly requires a separate waterproofing membrane to be installed, while a pre-formed integrated drain system provides an all-in-one solution. Consider the specific needs of your shower installation and consult with a professional if needed to ensure you choose the right type of drain assembly for your project.
Installing the drain flange
Once you have selected the appropriate drain assembly, it’s time to install the drain flange. The drain flange is the part that attaches to the shower base or subfloor and provides a secure connection for the drain. Follow these steps to install the drain flange:
- Place the rubber gasket onto the drain flange, ensuring it fits tightly.
- Insert the drain flange into the drain hole, making sure it is centered and level.
- Tighten the screws on the drain flange evenly to secure it in place.
Ensure that the drain flange is securely attached and there are no gaps or spaces between the flange and the shower base or subfloor. A proper seal is essential to prevent any water leakage.
Connecting the drain pipes
After installing the drain flange, the next step is to connect the drain pipes. Follow these steps for a successful connection:
- Apply plumber’s putty or silicone sealant around the bottom side of the drain flange.
- Insert the drain pipe into the drain flange, ensuring a snug fit.
- Use a adjustable wrench to tighten the connections between the drain pipe and the drain flange.
- Attach the tailpiece to the drain pipe, securing it with a compression nut.
Make sure that all the connections are tight and free from any leaks. Testing the drain assembly by pouring some water into the drain will help identify any potential issues.
By following these steps to install the drain assembly, you are ensuring the proper functioning and longevity of your shower membrane. Taking the time to choose the right type of drain assembly and installing it correctly will help prevent any future problems related to drainage and leakage.
Step 3: Applying The Shower Membrane
Now that you’ve prepared the shower base and cut the membrane to size, it’s time to move on to the next crucial step: applying the shower membrane. This step involves carefully securing the membrane to the shower base to create a watertight barrier that prevents leaks and moisture damage. Here’s a detailed guide on how to apply the shower membrane:
Preparing the shower membrane
Before you begin applying the shower membrane, it’s essential to prepare it properly. Start by examining the membrane to check for any defects or damage. Look out for holes, tears, or weak spots that could compromise its effectiveness. If you notice any issues, consider replacing the membrane to ensure a reliable installation.
Once you’ve ensured that the shower membrane is in good condition, clean the shower base thoroughly. Remove any debris, dust, or dirt that may affect the adhesive’s ability to bond with the base effectively. A clean and dry surface is crucial for optimal adhesion, so take your time to make sure it’s completely free from any contaminants.
Cutting the membrane to size
Now it’s time to trim the shower membrane to fit the dimensions of your shower base accurately. Lay the membrane over the base and ensure it covers every corner and surface, allowing for appropriate overlaps. Use a utility knife or scissors to carefully cut the membrane, following the outline of the base to achieve precise measurements.
Keep in mind that you’ll need to create a slight slope to channel water towards the drain. To do this, trim the membrane at an angle, gradually increasing the height as you move closer to the drain area. This slope will direct water flow effectively and prevent any pooling or standing water.
Applying the membrane to the shower base
Once you have the shower membrane cut to size, it’s time to apply it to the base. Start by carefully peeling off a small section of the membrane’s backing to expose the adhesive side. Align this section with one end of the base and press it firmly into place.
Continue peeling the backing off in small sections, gradually pressing the membrane onto the base as you go along. Use a roller or a flat trowel to smooth out any air bubbles or wrinkles that may form during the process, ensuring proper adhesion and minimizing the risk of water seepage.
Remember to pay attention to the corners and edges, where the membrane may require additional care to adhere correctly. Take your time to ensure every part is securely in place, providing a seamless and watertight barrier.
Press the membrane firmly onto the drain area, ensuring there is a tight seal around the drain. This step is crucial to prevent water from seeping through any gaps or openings. Use a suitable sealant or waterproofing adhesive to further reinforce the seal if necessary.
Conclusion
By following these steps, you can successfully apply the shower membrane and create a watertight barrier that protects your shower and surrounding areas from moisture damage. Taking the time to prepare the membrane, cut it to size, and carefully apply it to the shower base ensures a professional and reliable installation that will keep your bathroom dry and leak-free for years to come.
Step 4: Sealing The Seams And Corners
Once you’ve properly installed the shower membrane, it’s time to ensure a watertight seal. This step is crucial in preventing any water leakage and protecting your shower walls from moisture damage. In this section, we will cover two important tasks: applying seam tape to the membrane and waterproofing the corners.
Applying Seam Tape to the Membrane
Seam tape is an essential component in creating a strong and secure seal for your shower membrane. It reinforces the connection between the overlapping seams and prevents water from seeping through. To ensure proper installation and maximize its effectiveness, follow these steps:
- Clean the seams: Before applying the seam tape, make sure the membrane’s surface is clean and free of dust or debris. This will ensure a better adhesion and a tighter seal.
- Cut the tape: Measure the length of the seams and cut the seam tape accordingly. Remember to add a little extra length to ensure full coverage.
- Apply the tape: Carefully place the tape over the seam, pressing down firmly to ensure proper adhesion. Smooth out any wrinkles or bubbles for a uniform application.
- Overlap the tape: If the seam is longer than the length of the tape, overlap the ends to create a continuous seal. Be sure to press down firmly along the entire length of the overlap.
- Inspect the tape: Once applied, visually inspect the seam tape to ensure there are no gaps or loose areas. The tape should be smooth and tightly secured to the membrane for optimal performance.
Waterproofing the Corners
The corners of your shower enclosure are critical areas prone to potential water penetration. It’s crucial to waterproof these corners to prevent any water leakage. Here’s how you can effectively waterproof the corners:
- Cut and apply corner guards: Measure the length of the corners and cut the corner guards to fit precisely. These guards provide additional reinforcement and protection against moisture.
- Apply waterproofing membrane: Using a paintbrush or roller, apply a layer of waterproofing membrane on both sides of the corner guards. Ensure that the entire surface is covered evenly.
- Smooth out any excess: Remove any excess membrane from the corners, ensuring a clean and tidy appearance.
- Check for gaps: Inspect the corners for any gaps or areas that might need additional waterproofing. If necessary, apply another layer of the membrane to ensure complete coverage and protection.
By following these steps, you can ensure proper sealing of the seams and corners, creating a watertight shower membrane. This will provide peace of mind, knowing that your shower walls are protected from potential water damage and leaks.
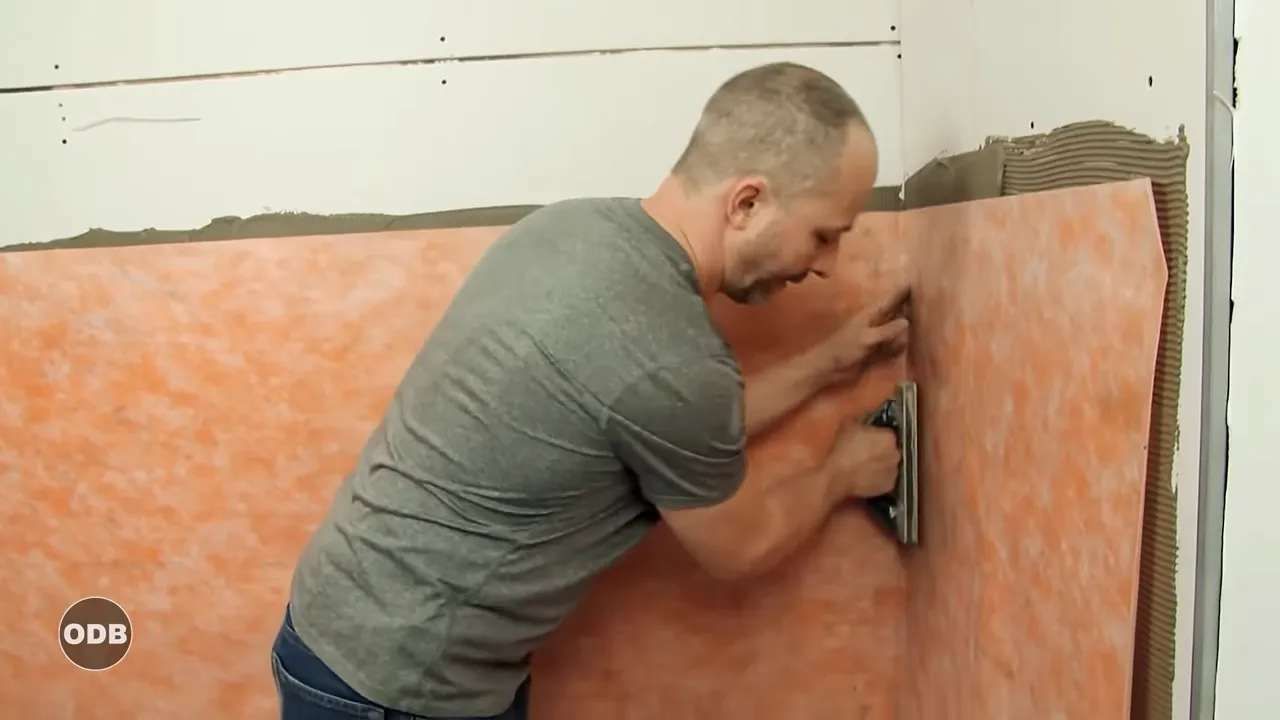
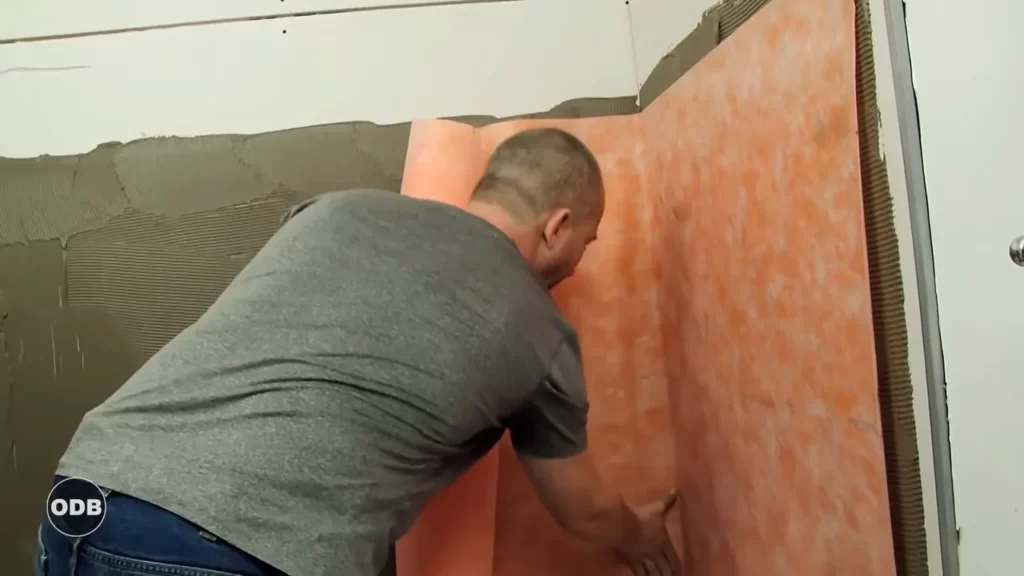
Step 5: Installing The Wall Membrane
Once you have prepared the shower base and installed the shower pan membrane, it’s time to move on to installing the wall membrane. This step is crucial in ensuring that your shower remains leak-free and protected against moisture damage. In this section, we will guide you through the process of preparing the wall surface, applying the wall membrane, and overlapping it with the shower base membrane to create a seamless and waterproof barrier.
Preparing the Wall Surface
The first step in installing the wall membrane is to prepare the wall surface. This involves ensuring that the walls are clean, dry, and free from any dust, dirt, or debris that could interfere with the adhesion of the membrane. Use a stiff brush to remove any loose particles and wipe the walls down with a damp cloth. If there are any cracks or gaps in the walls, fill them in with a waterproof sealant and allow it to dry before proceeding.
Applying the Wall Membrane
Once the wall surface is ready, it’s time to apply the wall membrane. There are different types of wall membranes available, such as sheet membranes, liquid-applied membranes, or peel-and-stick membranes. Choose the one that best suits your needs and follow the manufacturer’s instructions for application.
If you are using a sheet membrane, start by measuring the height of the shower walls and cut the membrane to size using a utility knife. Apply a thin layer of suitable adhesive to the back of the membrane, making sure to cover the entire surface. Press the membrane firmly against the wall, starting from the bottom and working your way up. Smooth out any bubbles or wrinkles using a membrane roller to ensure proper adhesion.
For liquid-applied or peel-and-stick membranes, follow the specific instructions provided by the manufacturer. Make sure to apply the membrane evenly and smoothly, paying close attention to corners and edges. Use a brush or trowel to spread the liquid membrane or peel off the backing and press the membrane onto the wall, ensuring it adheres completely.
Overlapping the Wall and Shower Base Membranes
To create a watertight seal, it is crucial to overlap the wall and shower base membranes. This ensures that any water that may seep through the walls will be directed towards the shower base and not behind it, preventing potential leaks and water damage.
Start by applying a layer of suitable adhesive or sealant to the top edge of the shower base membrane. Then, carefully position the wall membrane so that it overlaps the shower base membrane by at least a few inches. Press the two membranes together firmly, ensuring they are securely bonded.
Finally, use a membrane roller to smooth out any air bubbles or wrinkles along the seam where the two membranes overlap. Check for any gaps or loose areas that may compromise the waterproof seal and apply additional adhesive or sealant as needed.
By correctly installing the wall membrane and overlapping it with the shower base membrane, you are taking important steps to protect your shower from leaks and water damage. Following these steps ensures a secure and watertight shower enclosure that will provide years of reliable use.
Step 6: Installing Wall Tiles
Installing wall tiles is an exciting step in the process of installing a shower membrane. It not only adds aesthetic appeal to your shower area but also protects the underlying waterproof membrane from water damage. In this step, we will guide you on how to choose the appropriate tile adhesive, apply it to the wall, and install the wall tiles seamlessly.
Choosing the appropriate tile adhesive
Choosing the right tile adhesive is crucial to ensure the durability and longevity of your wall tiles. Here are some key factors to consider:
- Tile type: Different tile types require specific adhesives. For example, porcelain and natural stone tiles typically require a flexible adhesive, while ceramic tiles can be installed with a standard adhesive.
- Shower environment: Since the shower area is exposed to moisture, you will need a waterproof adhesive. Look for adhesives that are specifically designed for wet areas to prevent water seepage and mold growth.
- Tiling surface: Consider the material and condition of the wall surface. For smooth and non-porous surfaces, a standard adhesive will work fine. However, if the surface is rough or porous, you may need to use a primer or a specially formulated adhesive for better adhesion.
- Manufacturer’s recommendations: Always check the manufacturer’s instructions and recommendations for the specific tile adhesive. They will provide valuable information on suitability, application methods, and any special considerations.
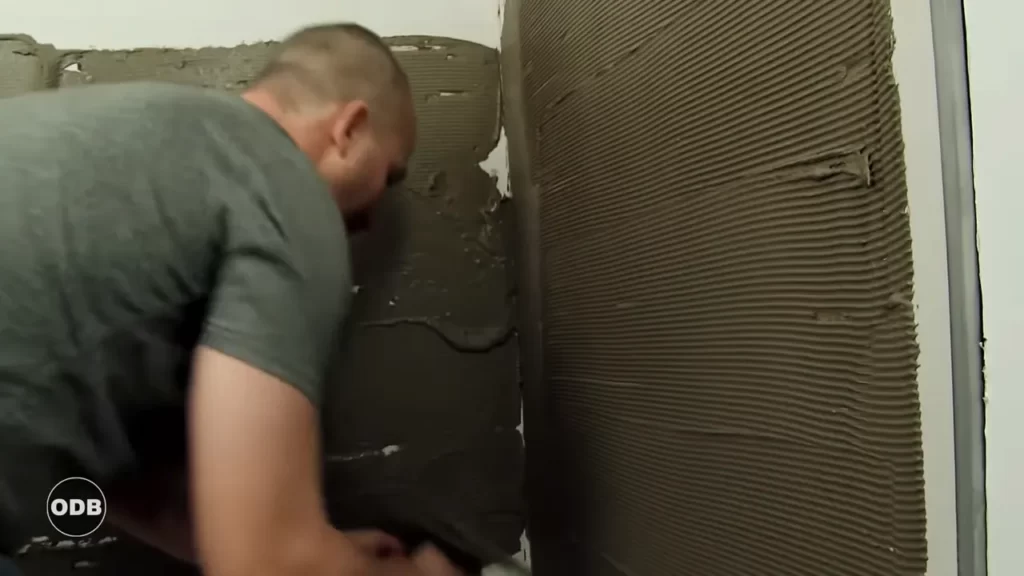
Applying the adhesive to the wall
Once you have chosen the appropriate tile adhesive, it’s time to apply it to the wall. Follow these steps for a successful application:
- Prepare the adhesive: Mix the adhesive according to the manufacturer’s instructions. Use a mixing paddle and a drill to achieve a smooth and lump-free consistency.
- Start from the bottom: Begin applying the adhesive at the bottom of the wall, using a notched trowel. Hold the trowel at a 45-degree angle to create grooves that will ensure proper tile adhesion.
- Work in small sections: Work on one small section at a time to prevent the adhesive from drying out before you can install the tiles. Aim for an area that you can comfortably tile within 15-20 minutes.
- Apply the adhesive: Spread the adhesive on the wall using the notched side of the trowel. Make sure to cover the entire surface evenly, leaving no gaps or ridges. Pay extra attention to corners and edges, where tiles may require additional support.
Installing the wall tiles
Now that the adhesive is applied, it’s time to install the wall tiles. Follow these steps to achieve a flawless tile installation:
- Position the first tile: Start by placing the first tile at the bottom of the wall, aligning it with the guidelines you set during the dry fit stage. Gently press and wiggle the tile to ensure it adheres firmly to the adhesive.
- Add spacers: Insert tile spacers between the tiles to maintain consistent grout lines. These spacers will be removed once the adhesive is cured.
- Continue tiling: Work your way up the wall, adding tiles one by one. Apply even pressure to ensure all tiles are securely attached to the adhesive. Check the alignment periodically using a level or straightedge.
- Cut tiles if necessary: To fit tiles around faucets, corners, or other obstacles, you may need to cut them to size using a tile cutter or wet saw. Take accurate measurements and use suitable safety precautions when cutting.
- Let the adhesive cure: Allow the adhesive to cure for the recommended time specified by the manufacturer. This will ensure proper bonding and prevent movement or displacement of the tiles.
- Remove tile spacers: Once the adhesive has fully cured, carefully remove the tile spacers by gently pulling them out. Wipe away any excess adhesive that may have oozed out from the grout lines.
Congratulations! You have successfully installed the wall tiles, transforming your shower area into a beautiful and functional space. In the next step, we will guide you through the process of grouting the tiles to complete your shower membrane installation. Stay tuned!
Step 7: Finishing Touches
As you near the completion of installing a shower membrane, it’s time to add those finishing touches that will make your shower both functional and visually appealing. This step involves grouting the wall tiles, installing shower fixtures and accessories, and testing the shower for leaks. Let’s take a closer look at each of these tasks:
Grouting the wall tiles
Grouting the wall tiles not only enhances the aesthetic appeal of your shower but also provides a protective barrier against water seepage. Follow these simple steps to ensure a professional grouting job:
- Carefully mix the grout according to the manufacturer’s instructions, ensuring a smooth and lump-free consistency.
- Using a grout float, apply the grout onto the joints between the tiles, making sure to fill them completely. Work in small sections to prevent the grout from drying too quickly.
- Wipe away excess grout from the tile surfaces using a damp sponge, being careful not to dislodge the freshly applied grout. Rinse the sponge frequently to ensure a clean finish.
- Allow the grout to cure for the recommended time specified by the manufacturer.
- Once the grout has cured, buff the tile surfaces with a clean, dry cloth to remove any remaining haze.
Installing shower fixtures and accessories
Installing the necessary shower fixtures and accessories is the next step to transform your shower into a fully functioning space. Here’s how you can do it:
- Start by carefully attaching the showerhead to the shower arm, ensuring a tight and secure connection. Use a wrench if necessary, but be cautious not to over-tighten.
- Install the shower controls according to the manufacturer’s instructions. This typically involves attaching the handles, trim plates, and other components as indicated.
- Mount any additional fixtures, such as a handheld showerhead or body jets, as desired. Consult the installation instructions for each specific accessory to ensure proper fitting.
- Before proceeding, double-check that all connections are secure and leak-free.
Testing the shower for leaks
Before you can declare your shower installation complete, it’s crucial to thoroughly test for any potential leaks that may compromise its functionality. Follow these steps to conduct a comprehensive leak test:
- Close the shower drain and fill the shower pan with water using a bucket or hose.
- Observe the surrounding areas, including the walls and floor, for any signs of water leakage. Pay extra attention to joints, seams, and corners.
- Visually inspect the shower fixtures and connections for any dripping or seepage.
- If you notice any leaks, troubleshoot and address them promptly. It might involve reapplying waterproof sealant or tightening connections.
- Once you are confident that your shower is leak-free, drain the water from the shower pan.
By following these steps and conducting thorough testing, you can ensure that your shower membrane installation is not only visually stunning but also fully functional and watertight. So go ahead, enjoy your newly installed shower knowing that it has been properly finished and tested.
Maintenance And Care Tips
Maintenance and care are essential to ensure the longevity and efficiency of your shower membrane. Regular cleaning, preventing mold and mildew growth, and conducting thorough inspections and repairs are key aspects of proper maintenance. In this section, we will discuss these maintenance and care tips in detail.
Cleaning and maintaining the shower membrane
To keep your shower membrane in optimal condition, regular cleaning is crucial. Here are some tips to help you in this process:
- Use mild cleaning agents: It is important to avoid harsh chemicals that can damage the membrane. Instead, opt for mild cleaners specifically designed for shower surfaces.
- Regularly wipe down the membrane: After each shower, use a soft cloth or sponge to wipe down the membrane. This helps prevent soap scum and mineral buildup from accumulating.
- Prevent hard water stains: Hard water can leave unsightly stains on your shower membrane. Consider using a water softener and regular descaling treatments to minimize the impact of hard water on your shower.
- Avoid abrasive scrubbing: While it’s essential to remove dirt and grime, be gentle when scrubbing the membrane. Avoid abrasive brushes or scourers that can scratch the surface.
Preventing mold and mildew growth
Mold and mildew thrive in moist environments, making your shower an ideal breeding ground. To prevent their growth, follow these tips:
- Ventilate the bathroom: Proper ventilation is key to reducing moisture levels in the bathroom. Ensure your bathroom has a well-functioning exhaust fan or windows that can be opened to allow proper airflow.
- Keep the shower area dry: After each use, dry the shower area with a squeegee or towel to remove excess moisture.
- Regularly clean grout and caulk: Mold and mildew can often take hold in the grout and caulk lines. Regularly inspect and clean them using a mold-inhibiting solution.
- Consider mold-resistant products: When choosing grout, caulk, or shower curtain, opt for mold-resistant varieties that are specifically designed to inhibit mold and mildew growth.
Regular inspections and repairs
To maintain the integrity of your shower membrane, regular inspections are necessary. Here are some key points to consider:
- Inspect for leaks: Periodically check for any signs of water leaks around the shower area. Look for damp walls, discoloration, or peeling paint that may indicate a leak behind the membrane.
- Check seals and joints: Inspect the seals and joints of your shower membrane to ensure they are intact and free from damage. Any visible cracks or gaps should be repaired promptly to prevent water intrusion.
- Address any damage: If you notice any tears, rips, or punctures in the membrane, it is important to repair them as soon as possible. Ignoring such damage may lead to further deterioration and compromised waterproofing.
- Consult professionals: If you are unsure about the condition of your shower membrane or need assistance with repairs, consider reaching out to professionals experienced in shower membrane maintenance.
By following these maintenance and care tips, you can ensure that your shower membrane remains clean, mold-free, and functions optimally for years to come.
Frequently Asked Questions
How Do You Install A Shower Membrane?
To install a shower membrane: 1. Prepare the surface by cleaning and leveling it. 2. Cut the membrane to fit the shower area. 3. Apply a thin layer of mortar or adhesive on the floor. 4. Lay the membrane, ensuring it covers the entire shower area.
5. Press it down firmly and smooth out any wrinkles or air bubbles.
What Adhesive Do You Use For Membrane In A Shower?
For the membrane in a shower, it is recommended to use a waterproof adhesive specifically designed for this purpose. It will ensure proper adhesion and prevent water leakage. Choose an adhesive that is compatible with the membrane material and follow the manufacturer’s instructions for best results.
Does Thinset Stick To Shower Pan Liner?
Yes, thinset does stick to shower pan liner. Thinset is a versatile adhesive that bonds well to various surfaces, including shower pan liners. It provides a strong and durable bond, ensuring that your shower pan stays securely in place.
How Do You Secure A Shower Liner To The Wall?
To secure a shower liner to the wall, follow these steps: First, clean the wall surface with rubbing alcohol. Then, apply adhesive or caulk evenly along the top edge of the liner. Press the liner firmly against the wall, ensuring proper alignment.
Finally, smooth out any air bubbles or wrinkles.
Conclusion
Installing a shower membrane is a crucial step in creating a watertight and durable shower space. By following the step-by-step guide outlined in this blog post, you can ensure that your shower is protected from leaks and water damage. Remember to gather all the necessary tools and materials, carefully measure and cut the membrane, and adequately seal all seams and corners.
With proper installation, you can enjoy a shower that not only looks beautiful but also functions flawlessly for years to come.