
To install a shower panel system, begin by measuring and marking the desired height and position on the wall. Then, use a drill to create holes for the mounting brackets and secure them in place.
Next, attach the water supply lines to the shower panel and connect the other end to the existing plumbing. Finally, mount the shower panel onto the brackets and test for any leaks or malfunctions. Introducing a shower panel system is a fantastic way to upgrade your bathing experience.
These systems combine multiple showering options into one sleek panel, offering features like rainfall showerheads, soothing body jets, and handheld sprayers. Installing a shower panel system might seem like a daunting task, but with a few simple steps, you can have a luxurious and spa-like shower right in your own bathroom. In this guide, we will explore the detailed process of installing a shower panel system to help you enjoy the ultimate showering experience.
Step 1: Gather The Necessary Tools And Materials
Before you begin installing a shower panel system, it is essential to gather all the required tools and materials. By ensuring you have everything you need upfront, you can streamline the installation process and avoid any unnecessary delays or interruptions. In this step, we will provide you with a complete list of tools and materials you will need for the installation.
List of Tools
- Adjustable wrench
- Screwdriver set
- Tape measure
- Pipe cutter or hacksaw
- Caulking gun
- Level
- Drill
- Hole saw
- Plumber’s tape
- Bucket
List of Materials
- Shower panel system
- Shower valve
- Pipes and fittings
- Mounting brackets
- Adequate screws and bolts
- Plumber’s putty or silicone caulking
- Waterproofing membrane
- Thread sealing tape
Make sure to gather all the tools and materials listed above to complete the installation process smoothly. It is recommended to double-check your inventory before starting the installation to ensure you have everything you need.
By having the necessary tools and materials ready, you’ll be able to proceed to the next step of the installation process without any hiccups. Stay tuned for our upcoming blog post sections to continue with the shower panel system installation.
Step 2: Prepare The Shower Area
Before installing the shower panel system, it is important to ensure that the shower area is clean and ready. This step is crucial to ensure a smooth installation process and optimal performance of the shower system. Follow these guidelines to prepare your shower area:
Ensure that the shower area is clean
Start by thoroughly cleaning the shower area. Remove any dirt, grime, or residues that may have accumulated on the walls, floors, and existing fixtures. It is recommended to use a mild cleaning solution and a soft sponge or cloth to prevent any damage to the surface. Rinse off the cleaning solution with clean water and dry the area completely.
Inspect the plumbing connections
Before proceeding with the installation, inspect the existing plumbing connections. Ensure that there are no leaks or damages that might affect the performance of the shower panel system. If you notice any issues, it is advisable to fix them before continuing with the installation to prevent any further complications.
Measure and mark the desired height
Measure and determine the height at which you want to install the shower panel system. Use a measuring tape and a level to ensure accuracy. Mark the desired height on the wall using a pencil or tape. This will serve as a guide during the installation process and help you achieve the desired placement of the shower panel system.
Clear the surrounding area
Clear the surrounding area of any obstructions or objects that may hinder the installation or access to the shower area. This includes removing any toiletries, bathroom accessories, or personal items that might be in the way. By clearing the area, you create a safe and convenient workspace for the installation process.
Protect the shower floor
To prevent any damage to the shower floor during the installation, consider using a drop cloth or protective covering. This will safeguard against any accidental scratches, spills, or debris that may occur during the installation process. It is always better to be proactive and take precautionary measures to maintain the integrity of your shower area.
Summary
By following these preparatory steps, you are ensuring that your shower area is clean, organized, and ready for the installation of the shower panel system. Taking the time to prepare the area beforehand will help streamline the installation process and ensure optimal functionality of your new shower system.
Step 3: Shut Off The Water Supply
In order to install your new shower panel system, it is essential to first shut off the water supply to the shower. This will prevent any potential leaks or water damage during the installation process. Follow these simple steps to turn off the water supply:
How to turn off the water supply to the shower
Turning off the water supply to your shower is a straightforward process. Here’s what you need to do:
- Locate the main water valve. This is usually located near the water meter or in the basement.
- Using a pair of pliers, turn the valve clockwise to shut off the water supply. Make sure to turn the valve firmly to ensure a tight seal.
- Once the water supply is shut off, open the shower faucet to release any remaining water in the pipes. This will prevent any potential water leaks when disconnecting the old shower head.
By following these steps, you will be able to safely shut off the water supply to your shower and proceed with the installation of your new shower panel system. It is important to double-check that the water supply is indeed turned off before proceeding with any further steps.
Step 4: Remove The Existing Shower System
Before you can install a new shower panel system, you need to remove the existing shower system. This may seem like a daunting task, but with the right steps, it can be accomplished smoothly. In this guide, we will walk you through the process of removing the current shower system, step by step. So, let’s dive in and get started!
Steps to remove the current shower system
- Turn off the water supply: Before you begin, it is crucial to turn off the water supply to your shower. Locate the shut-off valve, usually located near the shower or in your basement, and give it a quarter turn to close it.
- Remove the showerhead: Start by unscrewing the showerhead counterclockwise. You can use adjustable pliers or a wrench for better grip if it’s too tight to twist by hand. Set the showerhead aside once it is detached.
- Detach the shower arm: Once the showerhead is removed, you’ll need to detach the shower arm. This is the pipe that connects the showerhead to the wall. Unscrew it carefully using a wrench or pliers, turning counterclockwise until it comes loose.
- Take out the handles and trim: If your current shower system has handles and trim, it’s time to remove them. Look for small screws or covers that hide screws on the trim. Use a screwdriver to remove the screws and carefully pull off the handles and trim.
- Disconnect the water supply lines: At this point, you will want to disconnect the water supply lines. These are the pipes that provide water to your showerhead. Use a wrench to loosen the fittings, turning counterclockwise until they come loose. Be prepared for some water to spill out, so have a towel ready.
- Remove the valve body: The valve body is the main component of your shower system. It is responsible for regulating water temperature and pressure. To remove it, unscrew any remaining fittings that hold it in place, using a wrench or pliers as needed. Take your time and be careful not to damage any surrounding tiles or walls.
And there you have it! You’ve successfully completed the process of removing your existing shower system. With this step out of the way, you can now move on to the exciting part – installing your new shower panel system. In the next step, we will guide you through the installation process, so stay tuned!
Step 4.1: Disconnect The Water Supply
Disconnecting the water supply is an important step in the installation process of a shower panel system. This step ensures that water flow is stopped, allowing you to safely proceed with the installation without any leaks or accidents. Here’s how you can safely disconnect the water supply:
How to Safely Disconnect the Water Supply
To safely disconnect the water supply, follow these steps:
- Locate the main water shut-off valve: Before proceeding with the disconnection, it is crucial to locate the main water shut-off valve. This valve is typically found near the water meter or where the main water line enters your home. Once you find the valve, turn it clockwise to shut off the water flow.
- Release any water pressure: After shutting off the main water supply, it is essential to release any remaining water pressure. To do this, turn on a faucet or shower in another part of your home to drain the remaining water in the pipes. This step helps prevent any water from gushing out when you disconnect the supply lines.
- Prepare a bucket and towels: Before disconnecting the water supply lines, it is always a good idea to have a bucket and towels handy. These will help catch any water that might come out during the disconnection process, minimizing mess and potential damage.
- Disconnect the supply lines: Use an adjustable wrench or pliers to carefully loosen the supply line connections from both the hot and cold water pipes. Turn the connections counterclockwise until they are loose enough to be removed by hand. Place the bucket beneath the connections to catch any water that might be leftover in the pipes.
- Inspect and clean the supply lines: Once the supply lines are disconnected, take a moment to inspect them for any signs of damage or debris. If necessary, clean the connections using a cloth or brush to remove any dirt or grime that could affect the performance of your new shower panel system.
- Close the shut-off valves: After disconnecting the supply lines, it is important to close the shut-off valves on both the hot and cold water pipes. These valves can usually be found near the connections you just disconnected. Turning them clockwise will ensure that no water flows through the pipes while you install the new shower panel system.
- Proceed with the installation: With the water supply safely disconnected and shut-off valves closed, you can now proceed with the remaining installation steps for your shower panel system. Be sure to follow the manufacturer’s instructions carefully to ensure a successful and leak-free installation.
By following these steps, you can safely disconnect the water supply for your shower panel system and proceed with the installation process. Taking the time to properly disconnect the water supply will help prevent any water leaks or accidents, allowing for a smoother and more efficient installation experience.
Step 4.2: Remove The Shower Head And Handles
Now that you have successfully removed the shower panel cover, it’s time to move on to the next step – removing the shower head and handles. This step is crucial in order to install your new shower panel system effectively. Follow the instructions below to remove the shower head and handles without any hassle.
Detailed instructions on removing the showerhead and handles
1. Turn off the water supply: Before you begin the removal process, make sure to turn off the water supply to your shower. This will prevent any water leakage and ensure a smooth removal process.
2. Remove the showerhead: Start by unscrewing the showerhead from the shower arm. Most showerheads can be easily unscrewed by hand, but if yours is tightly secured, you may need to use an adjustable wrench. Turn the showerhead counterclockwise until it comes off.
3. Detach the shower handle: If your shower system has separate handles for hot and cold water control, you will need to remove them as well. Look for setscrews or small screws on the handles and use an appropriate screwdriver to loosen and remove them. Once the screws are removed, the handles should easily slide off.
4. Inspect the shower arm: Take a moment to inspect the shower arm where the showerhead was attached. Look for any signs of damage or corrosion. If necessary, clean the area or replace the shower arm before proceeding with the installation of your new shower panel system.
Summary:
To remove the shower head and handles, start by turning off the water supply. Then, unscrew the showerhead from the shower arm and remove the handles by loosening and removing the screws. Finally, inspect the shower arm for any damage or corrosion and make any necessary repairs or replacements. By following these instructions, you will be ready to move on to the next step of installing your new shower panel system.
Step 5: Install The Shower Panel System
Step-by-step Guide on Installing the New Shower Panel System
Installing a new shower panel system can elevate your showering experience and completely transform your bathroom. In this step-by-step guide, we will take you through the process of installing the shower panel system to ensure a seamless and successful installation.
1. Gather the necessary tools and materials
Before you begin the installation process, gather all the tools and materials you will need. Having everything prepared beforehand will save you time and make the installation process smoother. Here’s a list of the essentials:
| Tools | Materials |
|---|---|
|
|
2. Prepare the shower wall
Before installing the shower panel system, ensure that the shower wall is clean and free from any debris. It’s important to have a smooth surface to ensure proper installation and prevent any leaks.
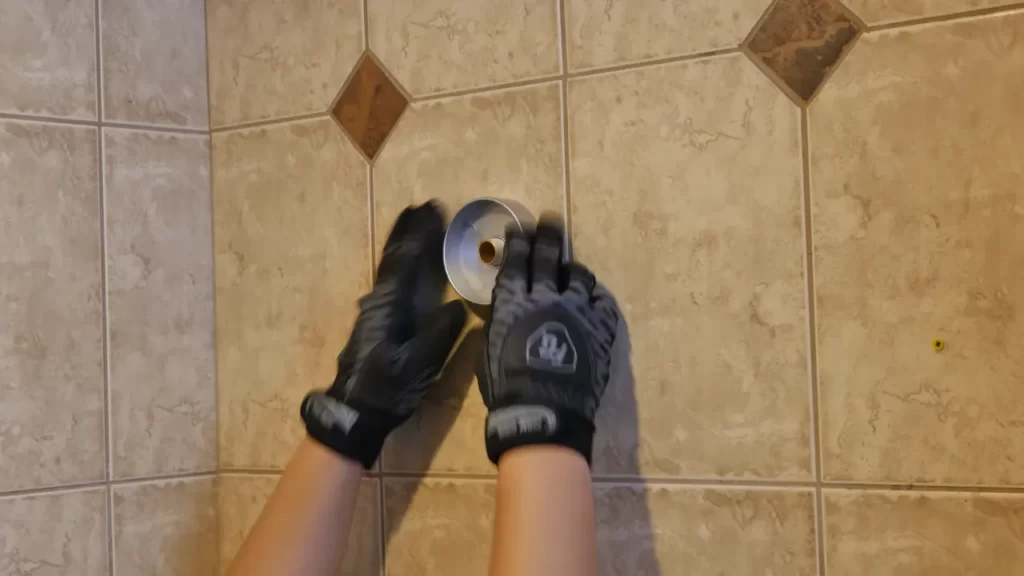
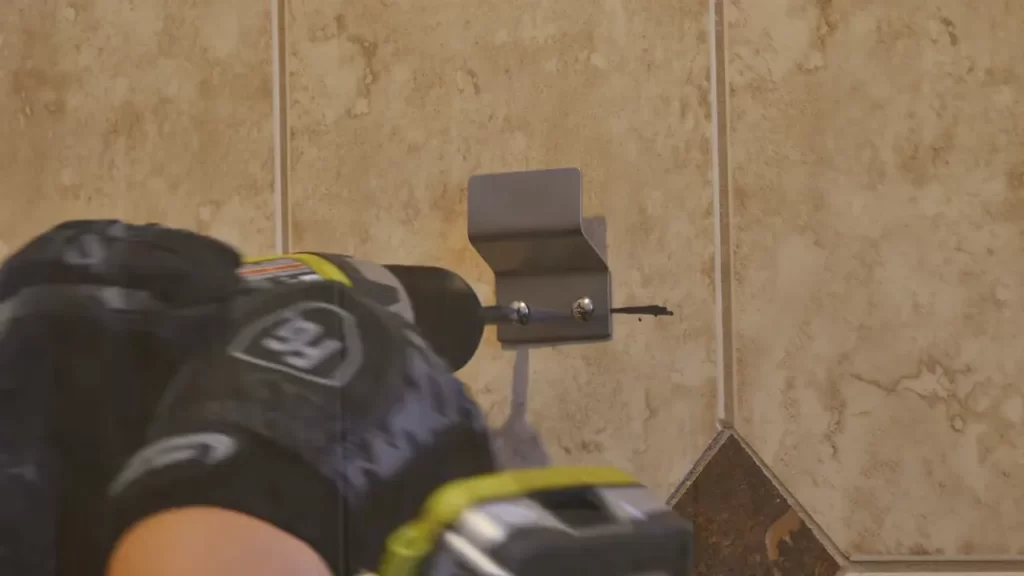
3. Install the mounting brackets
Start by measuring and marking the height where you want to install the shower panel system. Use a level to ensure that the brackets are perfectly straight. Then, using a drill or screwdriver, attach the mounting brackets securely to the wall. Ensure that they are positioned at the correct distance apart to accommodate the width of the shower panel system.
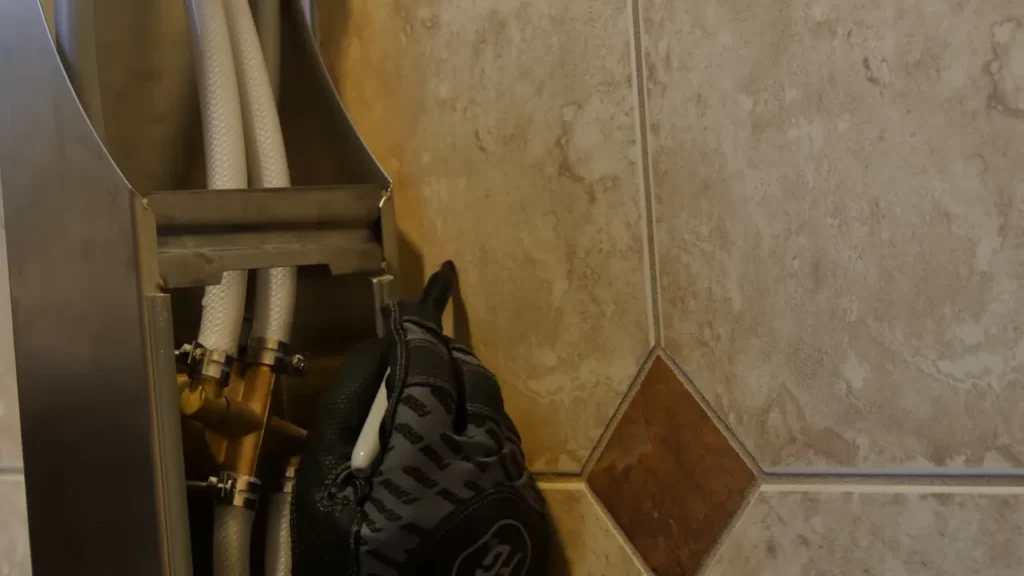
4. Connect the pipes
Once the mounting brackets are securely in place, it’s time to connect the pipes. Check the manufacturer’s instructions for specific details on how to connect the pipes and connectors. Use an adjustable wrench to tighten the connections, ensuring that they are secure and leak-proof. Apply Teflon tape to the threads for added protection against leaks.
5. Attach the shower panel system
Finally, it’s time to attach the shower panel system to the mounting brackets. Carefully lift the panel and slide it onto the brackets, ensuring a snug fit. Double-check that the panel is level and adjust if necessary. Secure the panel by tightening the screws or brackets as per the manufacturer’s instructions.
6. Seal the edges
To prevent water leakage, it’s important to seal the edges of the shower panel system. Apply a bead of sealant along the edges where the panel meets the wall and any gaps between the pipes and connectors. Smooth the sealant with a caulk smoother or your finger to create a neat and watertight seal.
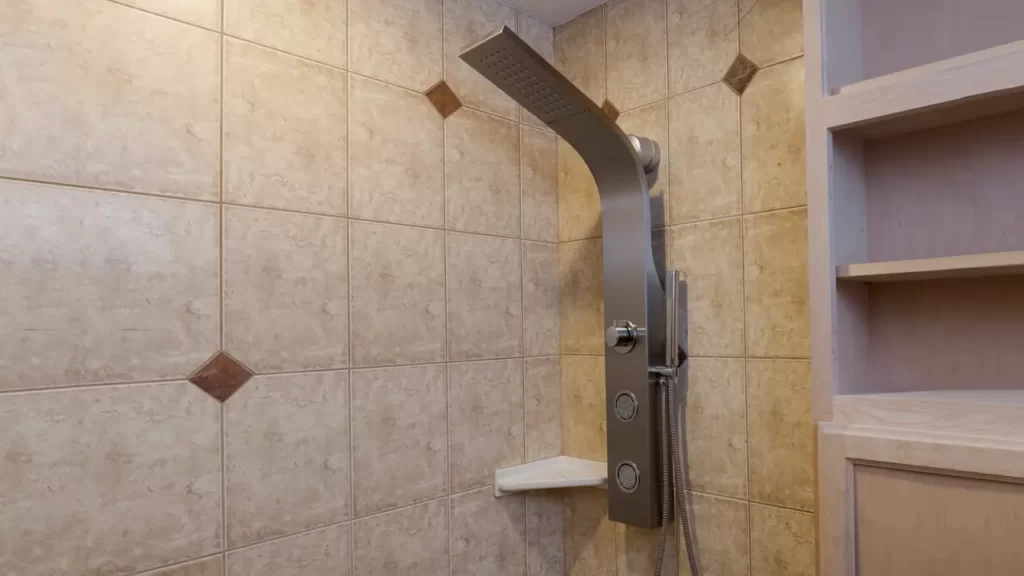
Congratulations! You have successfully installed your new shower panel system. With its sleek design and advanced features, your showering experience is now taken to the next level. Enjoy the luxurious sensation of a spa-like shower in the comfort of your own bathroom.
Step 5.1: Position The Shower Panel
Now that you have prepared the wall and completed the necessary plumbing work, it’s time to position the shower panel on the wall. Proper positioning is key to ensuring a seamless installation and an enjoyable showering experience. Let’s get started!
How to properly position the shower panel on the wall
Follow these simple steps to ensure you position your shower panel correctly:
- Measure the height: Start by measuring the distance from the shower base to the desired height of your shower panel. This will give you an idea of where to position it.
- Mark the spots: Use a pencil or marker to mark the spots where the mounting brackets will be installed. Make sure the marks are level and evenly spaced for a balanced look.
- Secure the brackets: Use a drill or screwdriver to secure the mounting brackets onto the marked spots. Make sure they are securely attached to the wall.
- Align the panel: Gently lift the shower panel and align the mounting holes with the brackets. Slowly lower the panel onto the brackets, making sure it is level and straight.
- Tighten the screws: Once the panel is in position, use a screwdriver to tighten the screws on the brackets. Make sure they are snug but not overtightened, as this may damage the panel or the wall.
- Check for stability: Give the panel a gentle shake to ensure it is securely attached to the wall. If there is any wobbling or instability, adjust the brackets and screws accordingly until the panel feels firmly in place.
And there you have it! By following these steps, you can properly position your shower panel on the wall. Now, you’re one step closer to enjoying a luxurious and refreshing shower experience. So go ahead, take your time, and make sure everything is just right before moving on to the next step.
Step 5.2: Connect The Water Supply
Now that you have successfully mounted your shower panel system to the wall, it’s time to connect the water supply. This step is crucial to ensure that your shower system functions properly and delivers a satisfying showering experience. In this section, we will provide you with detailed instructions on how to connect the water supply to your shower panel.
1. Locate the Water Supply Valve
The water supply valve is usually located behind the shower panel or in a nearby utility area. Begin by locating this valve, as you will need to access it in order to connect the water supply. Once you have found the valve, ensure that it is fully open to allow water to flow freely to the shower panel.
2. Connect the Water Supply Hoses
Take the water supply hoses that came with your shower panel system and connect them to the appropriate hot and cold water outlets on the back of the panel. These hoses are typically color-coded, with the blue hose indicating cold water and the red hose indicating hot water.
Note: It is recommended to use Teflon tape on the threaded connections to ensure a tight and leak-free seal. Wrap the tape around the threads in a clockwise direction before attaching the hoses.
3. Attach the Water Supply Hoses to the Water Supply Valve
Once the hoses are securely attached to the shower panel, you can now connect them to the water supply valve. Match the hot and cold hoses to their respective water supply outlets and tighten the connections using a wrench or pliers. Ensure that the connections are tight enough to prevent any leaks but be careful not to overtighten and damage the fittings.
4. Test for Leaks
With the water supply connections in place, it’s important to test for leaks before using your shower panel system. Turn on the water supply valve gradually and check for any signs of water leakage around the connections. If you notice any leaks, tighten the connections further or add more Teflon tape as needed. Repeat this process until the connections are completely leak-free.
Pro Tip: It’s a good idea to keep an eye on the connections periodically to ensure they remain tight and leak-free, especially after any maintenance or repair work on the plumbing system.
By following these step-by-step instructions, you can easily connect the water supply to your shower panel system. Remember, a proper water supply connection is essential for the optimal functioning of your shower panel and a refreshing showering experience.
Step 5.3: Install The Shower Head And Handles
Steps for Installing the New Showerhead and Handles
After successfully mounting the shower panel system on your bathroom wall (as described in Step 5.2), it’s time to move on to the next task: installing the shower head and handles. This step is crucial as it determines the functionality and aesthetics of your new shower system. Follow the steps below to ensure a proper installation.
Step 1: Begin by examining the showerhead and handles that came with your shower panel system. Check if any additional components, such as washers or O-rings, are included. Keep these handy as you will likely need them during the installation process.
Step 2: Before proceeding, ensure that your shower panel system’s water supply is turned off. This will prevent any accidental leaks or water damage during the installation.
Step 3: Take the showerhead and attach it to the designated connection point on the shower panel. This is typically located at the top center of the panel. If required, use a wrench to tighten the connection, ensuring it is secure. However, exercise caution to avoid over-tightening as it may cause damage.
Step 4: Next, take the handles that control the water temperature and flow and locate their respective connection points on the shower panel. These connection points are usually labeled with “H” for hot and “C” for cold. Align the handles properly and attach them, using a wrench if necessary, to ensure a snug fit. Be mindful not to exert excessive force while tightening, as it may lead to damage.
Step 5: Now that the showerhead and handles are securely attached to the shower panel, turn on the water supply and test for any leaks. Be attentive to any drips or water escaping from the connections. If any leaks are detected, prompt action should be taken to resolve them, such as adjusting the connections or adding appropriate washers or O-rings.
Step 6: If the installation is leak-free, test the functionality of the showerhead and handles. Turn the handles to adjust the water temperature and flow to your preference. Check if the showerhead produces a steady stream of water without any irregularities. This will ensure the proper functioning of your new shower panel system.
By following these step-by-step guidelines, you can install the showerhead and handles on your new shower panel system effortlessly. With this crucial part of the installation complete, you are one step closer to enjoying the enhanced showering experience that your upgraded shower panel system has to offer.
Step 6: Test The Shower Panel System
Instructions on testing the functionality of the installed shower panel system
Once you have successfully installed your shower panel system, the next crucial step is to test its functionality. Testing the system will ensure that everything is in working order before you start enjoying your new shower experience. Follow these instructions to test the shower panel system:
- Turn on the water supply: Start by turning on the main water supply to the shower panel system. You can usually find the water supply valve near the shower area or in the basement. Turn the valve fully to allow the water to flow into the system.
- Check for leaks: Carefully inspect the entire system for any signs of leaks. Look for water drips or spray coming from the connections or joints. If you notice any leaks, tighten the connections using a wrench or plumber’s tape to fix the issue. It’s crucial to resolve any leaks before proceeding further.
- Adjust water temperature: Set the desired water temperature using the control knob or valve on the shower panel. Begin by turning the knob to the minimum temperature and gradually increase it until you reach the desired level. Make sure the water temperature changes accordingly.
- Test water pressure: Turn on the showerheads, body jets, and handheld shower to check the water pressure. Observe the flow rate and make sure it’s strong and consistent. If you notice any weak spots, it could indicate a clogged nozzle or an issue with the water pressure. Cleaning the nozzles or contacting a professional may be necessary.
- Adjust shower settings: Explore the various shower settings available on the panel, such as rain shower, waterfall, massage jets, or mist. Switch between these settings to ensure they function correctly and provide the desired shower experience. Listen for any irregular sounds like rattling or squeaking, which could indicate a mechanical issue.
- Inspect additional features: If your shower panel system has extra features like LED lights, temperature display, or steam function, test each of them individually. Ensure the LED lights illuminate properly and the temperature display reflects the accurate water temperature. If there’s a steam function, activate it and verify if it works correctly.
- Overall system performance: After testing each component and feature of the shower panel system, evaluate its overall performance. Pay attention to any unusual water flow patterns, inconsistent temperature, or malfunctioning controls. In case you encounter any issues, refer to the user manual or contact the manufacturer for troubleshooting assistance.
By following these instructions and thoroughly testing your shower panel system, you can ensure that everything is functioning as intended. Once you are satisfied with the system’s performance, you can confidently enjoy your luxurious showers, knowing that you’ve successfully installed and tested your shower panel system. Happy showering!
Step 6.1: Turn On The Water Supply
How to turn on the water supply to check for leaks
Now that you have successfully installed your shower panel system, it’s time to turn on the water supply and check for any leaks. This step is crucial to ensure that your installation is watertight and functioning properly. Let’s take a look at how you can do it:
Step 1: Locate the water supply valve
Begin by locating the water supply valve for your shower panel system. This valve is typically found near the water main or in the bathroom, depending on the layout of your plumbing system. It is important to know the exact location of the valve before proceeding to the next step.
Step 2: Open the water supply valve slowly
With caution, slowly open the water supply valve by turning it counterclockwise. Doing it gradually will prevent any sudden surges of water that could potentially cause damage.
Step 3: Observe for leaks
As the water starts flowing through the shower panel system, closely observe for any leaks. Pay close attention to areas such as connections, joints, and pipes. If you notice any water dripping or spraying, it indicates a leak that needs to be addressed.
Step 4: Tighten any loose connections
If you do detect a leak, the first thing you should do is check for any loose connections. Using a wrench, carefully tighten the fittings and connections until they are snug.
Note: Make sure not to overtighten as it may damage the components or cause further leaks.
Step 5: Inspect the shower panel system
After tightening any loose connections, inspect the entire shower panel system thoroughly. Look for any signs of water leakage, such as puddles or wet spots. If you still can’t find the source of the leak, it’s recommended to consult a professional plumber to avoid any further complications.
Step 6: Repeat the process if necessary
If you have detected and addressed any leaks, it’s time to repeat the process of turning on the water supply and checking for leaks. Ensure that all connections are secure and that the system is functioning as intended.
Step 7: Enjoy your new shower panel system!
Once you are satisfied that there are no leaks and everything is in proper working order, it’s time to enjoy the luxurious experience provided by your new shower panel system. Indulge in the invigorating spray patterns and adjustable settings that will transform your bathroom into a haven of relaxation.
By following these steps and taking the time to turn on the water supply and check for leaks, you can ensure that your shower panel system is installed correctly and prevent any potential water damage in the future. Don’t forget to perform regular maintenance and inspections to keep your system running smoothly for years to come.
Step 6.2: Adjust The Settings
Now that you have successfully installed your shower panel system, it’s time to adjust the settings to ensure a satisfying and invigorating shower experience.
Guidance on adjusting the settings of the shower panel
Here are some important tips to help you make the most out of your newly installed shower panel system:
- Water Temperature: Begin by adjusting the water temperature to your desired level. Depending on the model of your shower panel, you may have a temperature control knob or a touchscreen interface to set the water temperature. Experiment with different settings until you find the perfect temperature that suits your preference.
- Water Pressure: Next, you’ll want to adjust the water pressure. Most shower panel systems offer different options to customize the water pressure according to your liking. Whether it’s a rotating knob or buttons on the panel, take the time to find the pressure that provides a relaxing massage or an invigorating spray.
- Showerhead Modes: Explore the various showerhead modes available in your shower panel system. These modes typically include rainfall, waterfall, handheld spray, and jet sprays. Each mode offers a unique shower experience, so try them all to see which one you enjoy the most. Some models also allow you to combine different modes for a personalized shower experience.
- Additional Features: Many shower panel systems come equipped with additional features such as LED lights, music players, and even aromatherapy options. Take advantage of these extra features to enhance your shower experience. Follow the manufacturer’s instructions to enable and adjust these features accordingly.
- Cleaning and Maintenance: Lastly, it’s crucial to keep your shower panel system clean and well-maintained to prolong its lifespan and ensure optimal performance. Consult the user manual for cleaning instructions and preventive maintenance tips. Regularly cleaning the nozzles and filters will help maintain water flow and prevent any clogging issues.
By adjusting the settings of your shower panel system according to your preferences and properly maintaining it, you’ll be able to enjoy a luxurious and rejuvenating shower experience every time.
Step 7: Clean Up And Enjoy
Tips on Cleaning up After Installation
Now that you have successfully installed your new shower panel system, it’s time to clean up and start enjoying its amazing features. Follow these simple tips to ensure a hassle-free and efficient cleaning process:
1. Gather Your Cleaning Supplies
Before you begin cleaning, gather all the necessary supplies. This may include a mild soap or cleaner specifically designed for the type of materials used in your shower panel system, a non-abrasive sponge or cloth, a squeegee, and a clean towel.
2. Start with the Exterior
Begin by wiping down the exterior of the shower panel system. Use a damp cloth or sponge to remove any dirt or residue that may have accumulated during the installation process. Pay special attention to the edges and corners where grime tends to build up.
3. Clean the Shower Jets
Next, focus on cleaning the shower jets. These are the components responsible for delivering water to your body, so it’s important to keep them clean and free from any mineral deposits or debris. Gently scrub the jets using a non-abrasive sponge or cloth soaked in a mild cleaning solution. Rinse thoroughly to remove any cleaning residue.
4. Address the Control Panel
The control panel is an integral part of your shower panel system, allowing you to adjust water temperature, pressure, and other settings. Wipe it down with a damp cloth to remove any fingerprints or smudges. Make sure to dry it thoroughly to prevent water damage.
5. Don’t Forget the Showerhead
If your shower panel system includes a separate showerhead, it’s important to clean it as well. Unscrew the showerhead and soak it in a solution of equal parts water and vinegar to remove any mineral deposits. Rinse with clean water and reattach it to the system.
6. Finish with the Glass or Mirrored Surface
If your shower panel system features a glass or mirrored surface, give it a streak-free shine by using a glass cleaner and a clean, lint-free cloth. Spray the cleaner directly onto the surface and wipe it off in a circular motion until all streaks are gone.
Tips on Enjoying the Newly Installed Shower Panel System
Once your shower panel system is clean and sparkling, it’s time to enjoy the luxurious experience it provides. Here are a few tips to make the most of your new investment:
1. Experiment with Water Settings
Take advantage of the customizable water settings on your shower panel system. Try adjusting the water pressure, temperature, and spray patterns to find the perfect shower experience that suits your preferences.
2. Relax and Unwind
After a long day, let the soothing water jets of your shower panel system wash away any stress or tension. Take your time and enjoy the relaxation it offers.
3. Save Water
Many shower panel systems are designed to be water-efficient, helping you reduce water consumption without compromising on the shower experience. Be mindful of the environment by using the water-saving features of your system.
4. Keep the System Well-Maintained
To ensure your shower panel system continues to provide optimal performance, regular maintenance is crucial. Follow the manufacturer’s instructions regarding cleaning and maintenance to keep it in top condition.
Now that you know how to clean up after installation and make the most of your newly installed shower panel system, it’s time to enjoy refreshing showers with enhanced functionality and comfort. Don’t wait any longer; experience the luxury firsthand!
Frequently Asked Questions
Can You Install Shower Panel In Existing Shower?
Yes, you can install a shower panel in your existing shower. It’s a convenient and affordable way to upgrade your shower experience. Just make sure to measure your available space and choose a compatible panel. Professional installation may be required for proper setup and to ensure optimal functionality.
How Do You Install Shower Wall Panels?
To install shower wall panels, start by measuring and cutting the panels to fit your shower. Next, apply adhesive to the back of the panels and press them firmly onto the walls. Use screws or nails to secure the panels in place.
Finally, seal the joints with silicone to prevent water leakage.
What Do You Put Behind Shower Panels?
The area behind shower panels is typically finished with moisture-resistant materials like cement board or waterproof membrane.
Are Shower Panels A Good Idea?
Yes, shower panels are a good idea as they offer numerous benefits like easy installation, multiple spray settings, water efficiency, and added luxury to your shower experience. They are a cost-effective and versatile alternative to traditional showers.
Conclusion
Upgrading your shower with a panel system is a simple and efficient way to enhance your bathing experience. With the right tools and steps, the installation process can be easily accomplished. By following the guidelines in this blog post, you can confidently transform your shower into a luxurious oasis.
Say goodbye to ordinary showers and welcome the comforts and convenience of a shower panel system into your home. Start the installation today and enjoy the benefits for years to come.