
To install a Schluter shower pan, start by measuring and marking the location of the drain and slope. Then apply mortar to the subfloor, install the drain assembly, and set the pan in place, ensuring it is level and properly supported.
Are you planning to install a Schluter shower pan in your bathroom? If so, you’re in the right place. Installing a shower pan can be a complex process, but with the right instructions, it can be done successfully. We will guide you through the step-by-step process of installing a Schluter shower pan.
From measuring and marking the location of the drain and slope to setting the pan in place, you’ll gain all the necessary knowledge to complete the installation with ease. So let’s get started and make your shower pan installation a breeze.
Benefits Of Installing A Schluter Shower Pan Yourself
Reduced Costs
One of the biggest advantages of installing a Schluter shower pan yourself is the significant cost savings it offers. When you hire a professional to handle the installation, you not only have to pay for their labor charges but also for any additional materials and supplies they might require. By taking on the project yourself, you can eliminate the need for expensive labor costs and, in turn, keep your budget in check. This is particularly beneficial for those who are working with a tight budget or are looking to save money for other aspects of their bathroom renovation.
Personal Satisfaction
Another key benefit of installing a Schluter shower pan yourself is the sense of personal satisfaction that comes along with it. Taking on a DIY project can be incredibly rewarding, allowing you to showcase your skills and creativity. By successfully completing the installation on your own, you can take pride in your accomplishment and enjoy the satisfaction of knowing that you were able to achieve a professional-looking shower all by yourself.
Customize Design and Layout
Installing a Schluter shower pan yourself also provides you with the opportunity to customize the design and layout of your shower to perfectly fit your preferences and needs. Unlike relying on a professional installer who may have their own limitations or style preferences, tackling the project yourself gives you the freedom to explore various design options and make adjustments as necessary. Whether you want to create a unique pattern using different tile colors or incorporate specific accessories, having complete control over the installation process allows you to bring your vision to life.
Understanding The Schluter Shower System
Installing a shower pan is an important step when it comes to creating a reliable and long-lasting shower enclosure. One of the most popular options in the market is the Schluter Shower System. This innovative system offers a range of benefits, including superior waterproofing, ease of installation, and durability. In this blog post, we will take an in-depth look at the Schluter Shower System, focusing on its main components, the importance of proper waterproofing, and how to install a Schluter shower pan.
Introduction to the Schluter Shower System
The Schluter Shower System is a comprehensive solution that ensures the integrity of your shower enclosure. It is specifically designed to prevent leaks and moisture damage, offering a completely watertight and durable shower system.
One of the key features of the Schluter Shower System is its versatility. Whether you are building a new shower or renovating an existing one, this system can be easily adapted to meet your specific needs and requirements.
Overview of Shower Pan Components
Before diving into the installation process, it’s important to understand the main components that make up the Schluter Shower System. These components work together to provide a solid foundation for your shower.
| Component | Description |
|---|---|
| KERDI-BOARD | A lightweight, waterproof building panel that acts as a substrate for tile installation. |
| KERDI-LINE | A linear drain that offers elegant and efficient water removal. |
| KERDI-MEMBRANE | A pliable waterproofing membrane that ensures a watertight shower. |
| KERDI-SHOWER-PAN | A prefabricated shower pan made from lightweight expanded polystyrene. |
These components work seamlessly together to create a reliable and efficient shower system, ensuring that water is effectively drained and does not penetrate through the substrate.
Importance of Proper Waterproofing
Proper waterproofing is crucial in any shower installation. Without it, water can seep into the walls and floor, leading to costly repairs and potential mold growth. The Schluter Shower System excels in this aspect, offering an integrated and foolproof waterproofing solution.
One of the key benefits of the Schluter Shower System is the KERDI waterproofing membrane. This pliable membrane is applied to the shower walls and floor, providing a seamless and watertight barrier. Its unique composition ensures that no water can penetrate through, offering superior protection against leaks.
By investing in the Schluter Shower System, you can have peace of mind knowing that your shower enclosure is waterproofed to the highest standards. This not only protects your investment but also ensures a safe and healthy environment for you and your family.
In the next section, we will explore the step-by-step process of installing a Schluter shower pan, guiding you through each stage to ensure a successful and leak-free installation.
Preparing For Installation
Before installing a Schluter shower pan, it is important to properly prepare the area to ensure a successful installation. This includes measuring and assessing the shower area, gathering the necessary tools and materials, and preparing the subfloor and drain.
Measuring and Assessing the Shower Area
The first step in preparing for the installation of a Schluter shower pan is to accurately measure and assess the shower area. This will determine the size and shape of the shower pan needed.
To do this, start by measuring the width and length of the shower area using a tape measure. Be sure to take into account any obstructions or irregularities in the walls or floor that may affect the dimensions.
Next, assess the condition of the existing subfloor and drain. Look for any cracks, rot, or unevenness that may need to be addressed before installation. It is important to have a solid and level foundation for the shower pan to sit on.
Gathering the Necessary Tools and Materials
Once you have measured and assessed the shower area, it’s time to gather all the necessary tools and materials for the installation. Having everything on hand before you begin will make the process much smoother.
Here is a list of the tools and materials you will need:
| Tools | Materials |
|---|---|
| Measuring tape | Schluter shower pan |
| Pencil | Thin-set mortar |
| Square | Waterproofing membrane |
| Trowel | Grout |
| Screwdriver | Tile |
Make sure to gather all the necessary tools and materials ahead of time, so you aren’t scrambling to find something in the middle of the installation.
Preparing the Subfloor and Drain
Before installing the Schluter shower pan, it is crucial to properly prepare the subfloor and drain. This will ensure a secure and water-tight installation.
To prepare the subfloor, remove any existing flooring material down to the bare subfloor. This will provide a clean surface for the installation of the shower pan. Inspect the subfloor for any damage or unevenness and make any necessary repairs or adjustments.
Next, prepare the drain by removing the existing drain and cleaning the area. Install a new drain if needed, following the manufacturer’s instructions.
Finally, apply a layer of thin-set mortar to the subfloor using a trowel, smoothing it out evenly. This will create a solid base for the shower pan to rest on.
By measuring and assessing the shower area, gathering the necessary tools and materials, and properly preparing the subfloor and drain, you will be well on your way to a successful installation of a Schluter shower pan.
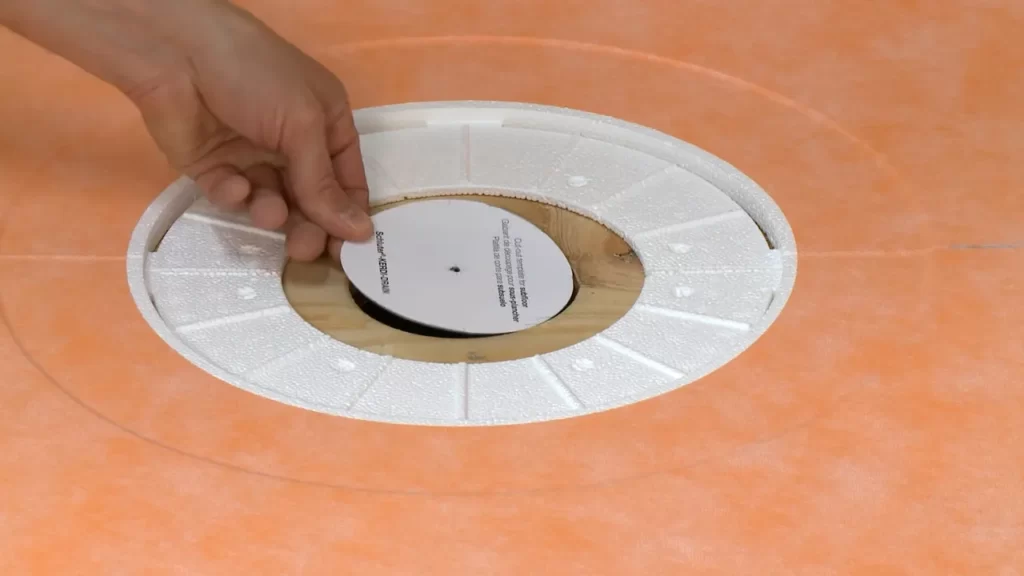
Step 1: Installing The Drain Assembly
Installing the drain assembly is the first step in the process of installing a Schluter shower pan. This crucial step ensures proper drainage and prevents any leaks in your shower. In this section, we will guide you through the process of choosing the right drain type, cutting a hole in the subfloor, and attaching the drain assembly.
Choosing the Right Drain Type
Choosing the right drain type is essential to ensure effective drainage in your shower. Schluter offers a variety of drain options to suit your specific needs. The most common types include:
| Type | Description |
|---|---|
| Center Drain | A centrally positioned drain that is ideal for showers with single slopes. |
| Off-Center Drain | A drain that is positioned closer to one edge of the shower tray, suitable for showers with multiple slopes. |
| Linear Drain | A sleek and modern drain that runs along one edge of the shower area, providing a more contemporary look. |
Consider factors such as the shower’s layout, design preferences, and the specifics of your project when choosing the drain type. Remember to select a drain that is compatible with the Schluter shower pan system.
Cutting a Hole in the Subfloor
Before attaching the drain assembly, you’ll need to cut a hole in the subfloor to accommodate it. Follow these steps:
- Measure the dimensions of the drain assembly to determine the size and shape of the hole you need to cut. Make sure to consider any manufacturer recommendations.
- Using a jigsaw or similar saw, carefully cut the hole in the subfloor according to your measurements. Take your time to ensure precise cutting.
- Clear any debris or shavings from the subfloor, ensuring a clean surface for installing the drain assembly.
Attaching the Drain Assembly
Once you have cut the hole in the subfloor, you are ready to attach the drain assembly. Follow these steps:
- Apply a generous amount of PVC solvent cement to the inside of the drain fitting and the outside of the pipe connected to the waste outlet.
- Insert the pipe into the drain fitting, twisting it to ensure a secure and tight connection.
- Position the drain assembly in the hole you cut, ensuring it is level and centered.
- Using screws or the provided hardware, secure the drain assembly to the subfloor. Make sure to follow the manufacturer’s instructions for proper installation.
By following these steps and taking the time to choose the right drain type, cut a precise hole, and securely attach the drain assembly, you will ensure a proper foundation for your Schluter shower pan installation. This will set you on the path towards a leak-free and visually appealing shower space.
Step 2: Installing The Shower Pan Membrane
In this crucial step, we will guide you through the process of installing the shower pan membrane. The membrane is a key component in ensuring effective waterproofing for your shower, preventing moisture from seeping into the subfloor. Follow these instructions carefully to ensure a successful installation.
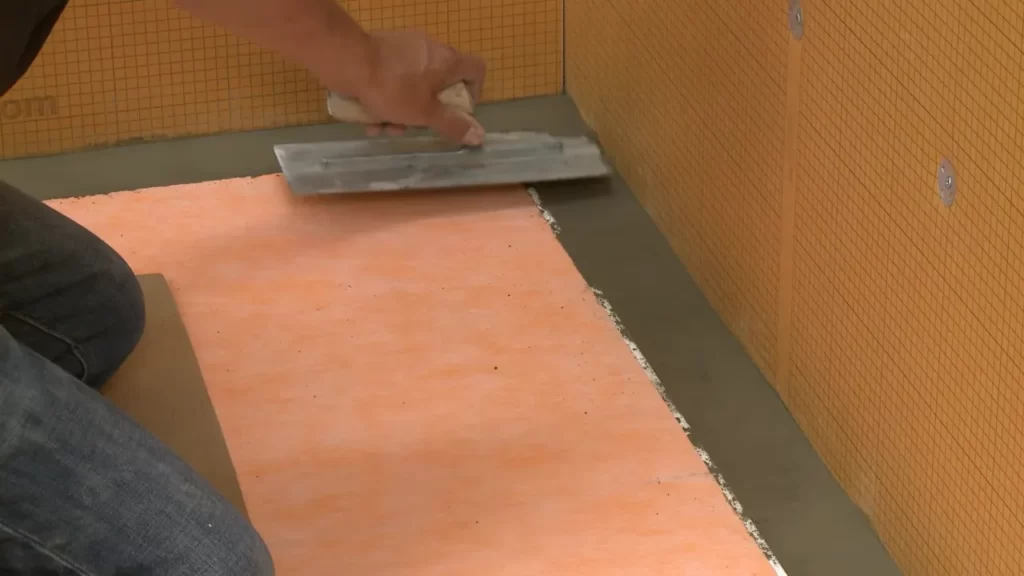
Applying the Membrane to the Subfloor
To begin the installation, you’ll need to apply the shower pan membrane to the subfloor. Here’s how:
- Ensure that the subfloor is clean, dry, and free from any debris or protrusions. This will ensure proper adhesion of the membrane.
- Roll out the membrane across the subfloor, starting from one end and working your way to the other. Make sure the membrane is centered and covers the entire shower area.
- Use a trowel or putty knife to spread a layer of thin-set adhesive or waterproofing mortar over the subfloor. This will enhance the bond between the membrane and the subfloor.
- Carefully place the membrane onto the adhesive, pressing it down firmly to ensure proper adhesion. Use a roller or a flat trowel to eliminate any air pockets or bubbles, ensuring complete contact between the membrane and the subfloor.
Overlapping and Sealing the Membrane Edges
Next, you’ll need to properly overlap and seal the edges of the membrane to achieve a watertight barrier. Follow these steps:
- Take a sharp utility knife or scissors and cut the membrane to the desired length, leaving an extra few inches of overhang along the walls.
- Fold the membrane up along the walls, ensuring a minimum 2-inch overlap at the corners.
- Apply a generous amount of waterproofing mortar or adhesive along the folded sections of the membrane, pressing the edges down firmly to create a strong bond.
- Use a seam tape specifically designed for waterproofing applications to seal the overlapping edges. Apply the tape along the seams, using your fingers or a flat trowel to ensure proper adhesion.
- Inspect the entire membrane carefully, paying close attention to the corners and seams. Make any necessary adjustments or repairs to ensure a secure and watertight installation.
Ensuring Effective Waterproofing
Finally, you’ll want to ensure that the shower pan membrane provides effective waterproofing for your shower. Here are some additional steps to consider:
- Inspect the membrane for any gaps, tears, or weak points. If any are found, seal them with the appropriate waterproofing product, following the manufacturer’s instructions.
- Perform a water test to check the effectiveness of the waterproofing. Fill the shower pan with water up to the desired level and leave it for a period of time. If any leaks or seepage occur, address them promptly and make the necessary repairs.
- Remember to keep the surrounding areas dry during the installation process to prevent moisture from compromising the effectiveness of the waterproofing membrane.
By following these steps and taking necessary precautions, you can ensure a successful installation of the shower pan membrane, providing a secure and waterproof foundation for your shower.
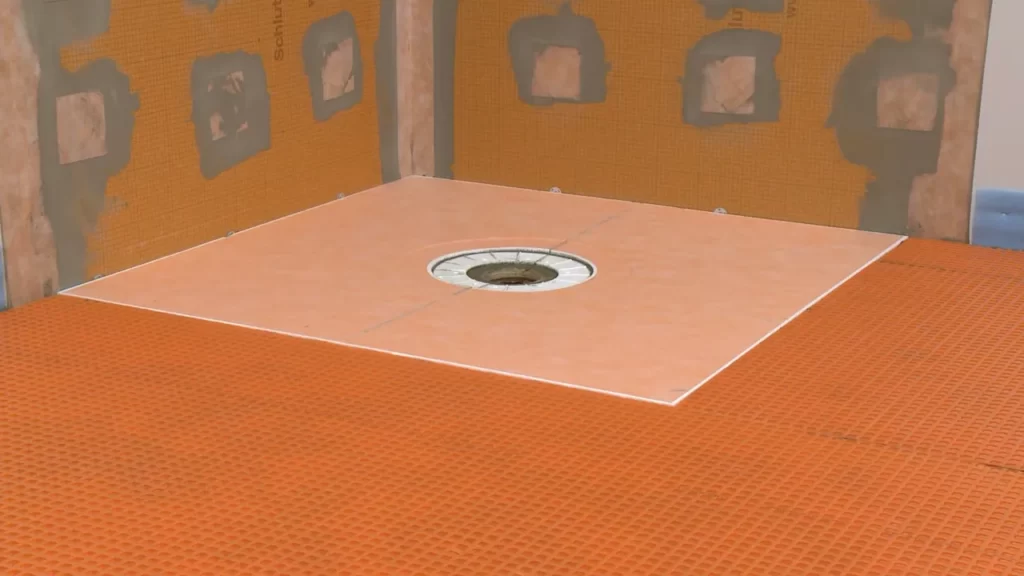
Step 3: Setting The Shower Pan
Once you have prepared the mortar bed and ensured a solid foundation, it’s time to proceed to setting the shower pan. This step is crucial as it lays the groundwork for a sturdy, leak-free shower base. By following these subheadings, you can confidently set your Schluter shower pan with precision and expertise.
Preparing the Mortar Bed
To ensure a stable shower pan installation, it’s essential to create a mortar bed. This bed acts as a strong and level foundation for your shower pan. Here’s how you can prepare the mortar bed:
- Make sure the subfloor is clean and free of debris.
- Mix the mortar according to the manufacturer’s instructions, achieving a thick consistency.
- Scoop the mortar onto the subfloor using a trowel.
- Spread and level the mortar evenly across the subfloor, ensuring it extends slightly beyond the perimeter of the shower pan.
- Use a flat trowel or float to smooth the surface of the mortar bed, eliminating any lumps or uneven spots.
Placing and Leveling the Shower Pan
Now that your mortar bed is ready, it’s time to place and level the shower pan. Follow these steps to ensure proper alignment:
- Carefully lift the shower pan and lower it onto the mortar bed.
- Adjust the position of the pan to align it with the drain and the walls.
- Check the levelness of the pan from multiple sides, making any necessary adjustments.
- Ensure the pan is seated securely on the mortar bed, with no gaps between the pan and the subfloor.
Securing the Shower Pan to the Subfloor
To complete the installation process, the shower pan needs to be securely fastened to the subfloor. Take the following steps to ensure stability:
- Use a drill and appropriate screws or nails to secure the shower pan flange to the subfloor.
- Place fasteners along the edges of the shower pan, following the manufacturer’s instructions for spacing.
- Ensure the fasteners are tight enough to keep the pan firmly in place, but avoid overtightening, which could damage the pan.
With these steps completed, your Schluter shower pan is now set and ready for the next phase of your shower installation. Proceeding with attention to detail and precision will result in a reliable and long-lasting shower base that will provide years of comfort and relaxation.
Step 4: Installing The Tile Backer Board
Now that you have prepared the shower area and have the necessary tools on hand, it’s time to move on to Step 4: Installing the Tile Backer Board. This step is crucial in creating a strong and durable foundation for your shower and ensuring a successful tile installation. In this section, we will walk you through the process of preparing the backer board, installing it on the walls and floor, and ensuring proper seams and fastening.
Preparing the Backer Board
Before you begin installing the backer board, it is important to prep the surface properly. This will ensure that the board adheres securely and provides a solid base for the tile. Follow these steps to prepare the backer board:
- Measure the dimensions of the area where you will be installing the backer board.
- Cut the backer board panels to fit using a utility knife or a backer board cutter. Be sure to wear safety goggles and a dust mask while cutting.
- Smooth out any rough edges or corners using a rasp or sandpaper.
- Remove any dirt, dust, or debris from the surface using a vacuum cleaner or a brush.
Installing the Backer Board on the Walls and Floor
Now that you have prepared the backer board, you can proceed with installing it on the walls and floor. Follow these steps for a successful installation:
- Start by applying a layer of thin-set mortar to the prepared surface using a notched trowel. This will create a bonding layer for the backer board.
- Place the backer board panels onto the mortar, ensuring that they are flush with the edges and properly aligned.
- Use backer board screws or nails to fasten the panels to the studs or subfloor. Be sure to follow the manufacturer’s recommendations for spacing and placement.
- Repeat the process for the remaining panels, making sure to leave a small gap between each panel for expansion.
- Trim the backer board to fit around any fixtures, such as showerheads or faucets, using a jigsaw or a hole saw.
Ensuring Proper Seams and Fastening
To ensure the backer board is properly sealed and fastened, follow these steps:
- Fill the seams between the backer board panels with backer board tape, pressing it firmly into the thin-set mortar.
- Cover the tape with a layer of thin-set mortar, using a flat trowel to smooth it out.
- Secure the tape and mortar by embedding backer board screws or nails along the seams.
- Inspect the entire backer board installation to ensure that all panels are securely fastened and that there are no gaps or loose spots.
By following these steps, you can ensure a proper installation of the tile backer board. This will create a stable foundation for your shower and pave the way for a successful tile installation in the next step.
Step 5: Tiling The Shower Area
Now that you’ve prepared the shower area and installed the Schluter shower pan, it’s time to move on to the exciting part – tiling the shower area. This step will not only enhance the overall aesthetics of your bathroom but also ensure a watertight and durable finish. In this section, we’ll walk you through the process of choosing the right tiles and adhesive, laying and aligning the tiles, and finally grouting and sealing them.
Choosing the Right Tiles and Adhesive
When it comes to selecting the tiles for your shower area, it’s essential to consider factors like durability, slip resistance, and style. Porcelain and ceramic tiles are popular choices due to their water resistance and wide range of colors and designs. Natural stone tiles like marble or travertine can add a luxurious touch to your shower space.
To ensure a strong bond between the tiles and the shower pan, it’s crucial to choose the correct adhesive. Opt for a high-quality thin-set mortar that is specifically designed for bonding tiles to substrates, such as Schluter-KERDI-SET. This type of adhesive offers excellent performance and long-lasting durability, ensuring your tiles stay in place for years to come.
Laying and Aligning the Tiles
Before starting the tiling process, make sure you have all the necessary tools at hand, including a notched trowel, tile spacers, and a tile cutter or wet saw. Begin by applying the thin-set adhesive onto the shower area using the flat side of the trowel, spreading it evenly in small sections. Next, use the trowel’s notched side to create ridges in the adhesive, which will help to improve the tile bond.
Start laying the tiles from the bottom and work your way up, pressing each tile firmly into the adhesive. Be mindful of using tile spacers between each tile to maintain consistent spacing and allow for grouting later on. Continue this process until all the tiles are in place, ensuring they are aligned, level, and evenly spaced.
Grouting and Sealing the Tiles
Once the tiles are set and the adhesive has cured as per the manufacturer’s instructions, it’s time to grout the gaps between the tiles. Mix the grout according to the package instructions and apply it to the tile joints using a grout float. Work the grout into the joints, making sure to remove any excess with a damp sponge before it dries.
After the grout has cured, typically within 24-48 hours, it’s essential to seal the tiles to protect them from moisture and stains. Select a high-quality penetrating sealer that is suitable for your tile material and apply it following the manufacturer’s instructions. Regular resealing is recommended to maintain the appearance and longevity of your tiled shower area.
In conclusion, tiling the shower area is a crucial step in the installation process. By choosing the right tiles and adhesive, laying and aligning them properly, and grouting and sealing the tiles, you can create a beautiful and waterproof shower space that will stand the test of time. So go ahead and unleash your creativity to transform your bathroom into a stunning oasis.
Step 6: Finishing Touches
After successfully installing the Schluter shower pan, it’s time to add the finishing touches to your shower project. This step involves installing shower fixtures and accessories, applying silicone sealant, as well as testing for leaks and ensuring the functionality of your newly installed shower system. Let’s go through each of these tasks in detail.
Installing Shower Fixtures and Accessories
Now that the Schluter shower pan is in place, it’s time to install your desired shower fixtures and accessories. Whether you choose a rainfall showerhead, handheld showerhead, or any other fixtures, ensure that they are compatible with the Schluter system. Follow the manufacturer’s instructions for each fixture and use the appropriate tools for the installation. Make sure to securely attach the fixtures to the walls or the designated areas as specified by the instructions.
Applying Silicone Sealant
One crucial step in the installation process is applying silicone sealant around the seams and joints of your shower area. Silicone sealant acts as a barrier against water penetration and helps maintain a watertight seal. Use a high-quality silicone sealant suitable for bathrooms, ensuring it is mold and mildew resistant for long-lasting protection. Carefully apply the silicone sealant along the edges of the shower pan, where the pan meets the walls, and around any fixtures or accessories. Smooth it out using a caulk tool or a finger to create an even and neat finish.
Testing for Leaks and Functionality
Before declaring your shower installation complete, it’s crucial to test for leaks and ensure proper functionality. Fill the shower pan with water and inspect all areas for any signs of leakage. Pay close attention to the seams, corners, and around the fixtures. If you notice any leaks, identify the source and promptly address it by reapplying silicone sealant or making any necessary adjustments. Additionally, check the functionality of all shower fixtures and accessories. Turn on the water and test the flow, temperature, and any adjustable settings to guarantee optimal performance.
Maintenance And Care Tips
The maintenance and care of your Schluter shower pan is essential to ensure its longevity and optimal performance. By following some simple maintenance and care tips, you can keep your shower pan in pristine condition for years to come. In this section, we will discuss two important aspects of maintenance and care: regular cleaning and inspection, and addressing and repairing any issues that may arise.
Regular Cleaning and Inspection
To keep your Schluter shower pan clean and free from dirt, grime, and soap residue, regular cleaning is necessary. Here are some steps to follow:
- Start by removing any loose debris or hair from the surface of the shower pan.
- Next, use a non-abrasive cleaner specifically designed for tiled surfaces. Apply the cleaner to a sponge or soft cloth and gently scrub the shower pan, paying special attention to any stained or dirty areas.
- Rinse the shower pan thoroughly with warm water to remove any residue from the cleaner.
- Finally, wipe the surface of the shower pan dry with a clean towel to prevent water spots.
In addition to regular cleaning, it is important to inspect your Schluter shower pan periodically for any signs of damage or wear. This will help you identify and address any potential issues before they become major problems. Here’s how you can inspect your shower pan:
- Check the seams and corners of the shower pan for any signs of cracking or separation.
- Look for any discoloration or staining on the surface of the shower pan, as this may indicate a leak.
- Inspect the grout lines for any signs of deterioration or mold growth.
- Pay attention to any unusual odors or moisture around the shower pan, as this might be a sign of a hidden problem.
Addressing and Repairing any Issues
If you notice any issues during your inspection or experience any problems with your Schluter shower pan, it is important to address and repair them promptly. Ignoring issues can lead to more significant damage and costly repairs in the future. Here are some steps to take:
- Contact a professional plumber or tile installer to assess the problem and provide expert advice.
- If there are any cracks or separations in the seams or corners of the shower pan, these should be repaired immediately to prevent water damage. Consult the manufacturer’s guidelines or seek professional assistance for proper repair techniques.
- If you encounter any leaks or water damage, it is crucial to address the source of the problem and repair it promptly. This may involve resealing the shower pan or replacing damaged components.
- In case of mold growth or deteriorating grout lines, clean and replace the affected areas following proper cleaning techniques and using suitable products.
By following these maintenance and care tips, you can ensure that your Schluter shower pan remains in excellent condition, providing you with a beautiful and functional shower experience.
Frequently Asked Questions
How Do You Install Schluter Shower Pan?
To install a Schluter shower pan, start by preparing the subfloor and ensuring it’s level. Then, apply a waterproofing membrane and set the shower pan in place. Secure the pan with modified thin-set mortar and connect the drain assembly. Finally, waterproof the seams and install tile or other finish materials.
What Kind Of Thinset Do You Use For A Schluter Shower Pan?
For a Schluter shower pan, use a high-quality thinset mortar specifically designed for tile installation. Choose a thinset that is suitable for both interior and exterior applications, and compatible with the type of tile you plan to install. Follow manufacturer guidelines for the best results.
Do You Have To Put Mortar Under A Shower Pan?
Yes, it is necessary to put mortar under a shower pan. Mortar provides stability and support for the shower pan, preventing movement and potential leaks. It also helps to create a level and secure base for the shower pan installation.
Can You Cut To Fit The Schluter Shower Pan?
Yes, you can cut the Schluter shower pan to fit.
Conclusion
To wrap up, installing a Schluter shower pan is a straightforward process that can be easily accomplished with the right tools and techniques. By following the step-by-step instructions provided in this guide, anyone can achieve a professional and leak-free shower base installation.
Remember to always prioritize safety, precision, and attention to detail throughout the process. Now, you’re ready to enjoy a beautiful and durable shower for years to come.