
To install a shower pan drain, first, gather the necessary tools and materials, including a new drain assembly, plumber’s putty, a wrench, and a screwdriver. Then, remove the old drain by loosening the locking nut and unscrewing the drain flange.
Apply plumber’s putty around the new drain’s flange, and insert it into the drain opening. Tighten the locking nut to secure the drain in place. Finally, test for leaks by running water into the shower pan and checking for any signs of water escaping the drain.
Gathering The Necessary Tools And Materials
Before you begin the installation process of a shower pan drain, it is crucial to gather all the necessary tools and materials. Having everything you need within reach will ensure a smooth and efficient installation, without the need for frequent interruptions or trips to the hardware store. In this section, we will discuss the steps involved in gathering the required tools and materials.
Researching the necessary tools and materials
To start, it’s important to have a clear understanding of the tools and materials needed for the shower pan drain installation. Proper research will help you identify the specific items required, ensuring that you don’t miss anything essential. Below, you will find a list of items commonly needed for this installation process.
Listing the items required for the installation process
| Tools | Materials |
|---|---|
|
|
Purchasing or gathering the tools and materials
With the list of necessary tools and materials in hand, it’s time to purchase or gather them. Check your existing tools and materials inventory to see if any items can be reused or repurposed. For the rest, visit your local hardware store or browse online marketplaces to acquire everything on the list. Make sure to double-check that you have acquired all the items before starting the installation process.
By gathering the necessary tools and materials beforehand, you are setting yourself up for a successful shower pan drain installation. You will be prepared, organized, and ready to tackle each step without delay. With all the items in your possession, you can proceed confidently and ensure a smooth installation process.
Preparation Steps Before Installing The Shower Pan Drain
Before you can install a shower pan drain, it’s essential to complete a few preparation steps to ensure a smooth installation process. These steps will help you remove any old drain, clean the shower pan, and check for any leaks or damages.
Removing the old drain (if applicable)
If you’re replacing an existing shower pan drain, the first step is to remove the old one. This can be done by following these simple steps:
- Locate the drain cover and remove it using a screwdriver or a specific drain removal tool.
- Use a wrench or pliers to loosen the locknut that secures the drain in place.
- Gently pull the drain body upward to detach it from the pipe beneath.
- Ensure the area around the old drain is clean and free of any debris or caulk residue.
Ensuring the shower pan is clean and free of debris
Before installing a new shower pan drain, it’s vital to clean the shower pan thoroughly to ensure a proper seal. Follow these steps to clean the shower pan:
- Remove any existing debris, such as soap scum or hair, using a brush or a damp cloth.
- Inspect the surface for any cracks or damages and repair them using an appropriate shower pan repair kit.
- Wipe the entire area with a mild soap solution to remove any residual dirt or grease.
- Rinse the shower pan thoroughly with clean water and allow it to dry completely.
Checking for any leaks or damages
Before proceeding with the installation, it’s crucial to check for any leaks or damages in the shower pan. Follow these steps to ensure a watertight seal:
- Inspect the drain pipe connections for any signs of leaks or corrosion. Tighten or replace any faulty fittings if necessary.
- Turn on the shower and let the water run for a few minutes to check for any leaks along the shower pan or drain.
- Visually inspect the entire shower pan, paying close attention to the corners and edges, for any cracks or damages.
- If you notice any leaks or damages, repair them before proceeding with the installation.
By completing these preparation steps, you’ll ensure that the shower pan drain installation is successful and that your shower remains leak-free for years to come.
Installing The Shower Pan Drain
One crucial step in installing a shower pan is installing the shower pan drain. Proper installation of the drain ensures that water flows smoothly and does not cause any leaks or damage. In this section, we will guide you through the process of measuring and marking the drain placement, cutting the hole for the drain, connecting the drain pipe to the plumbing system, applying plumber’s putty or silicone sealant, and finally inserting and securing the drain in place.
Measuring and marking the drain placement
The first step in installing a shower pan drain is to measure and mark the drain placement accurately. To do this, follow these steps:
- Using a measuring tape, measure the distance from the walls to determine the center point of the drain.
- Mark the center point on the shower floor using a pencil or marker.
Cutting the hole for the drain
Once you have marked the drain placement, the next step is cutting the hole for the drain. Follow these steps:
- Place a hole saw attachment that matches the size of your drain over the marked center point.
- Using a power drill, carefully cut the hole by applying firm and steady pressure.
- Remove any debris or excess material from the hole.
Connecting the drain pipe to the plumbing system
After cutting the hole for the drain, the next step is connecting the drain pipe to the plumbing system. Follow these steps:
- Attach the drain pipe to the bottom of the drain assembly, following the manufacturer’s instructions.
- Connect the other end of the drain pipe to the plumbing system in your bathroom.
- Ensure the connections are secure and watertight.
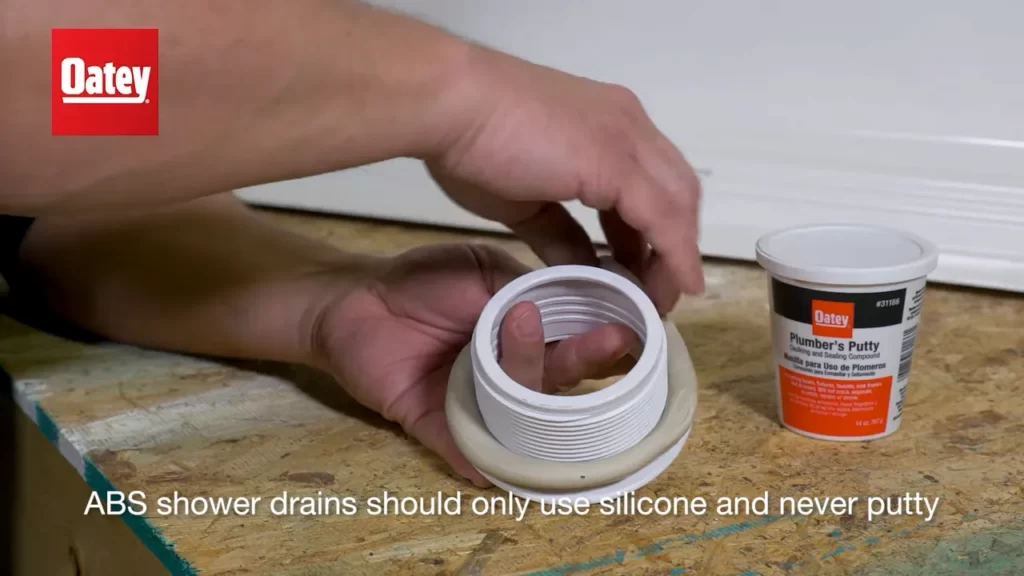
Applying plumber’s putty or silicone sealant
Once the drain pipe is connected, it is important to apply plumber’s putty or silicone sealant to ensure a watertight seal. Follow these steps:
- Apply a thick, even layer of plumber’s putty or silicone sealant around the underside of the drain flange.
- Place the drain flange into the hole and press firmly to create a tight seal.
- Wipe away any excess putty or sealant using a cloth or sponge.
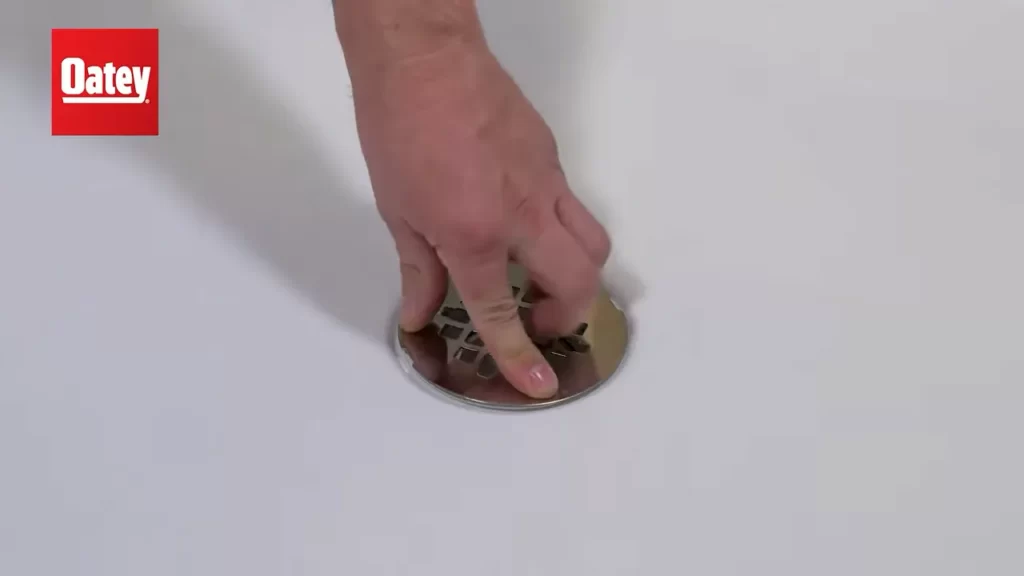
Inserting and securing the drain in place
The final step in installing the shower pan drain is inserting and securing the drain in place. Follow these steps:
- Insert the drain body into the drain flange, aligning the screw holes.
- Secure the drain body in place by tightening the screws with a screwdriver.
- Ensure that the drain is level and flush with the shower floor.
By following these step-by-step instructions, you can successfully install a shower pan drain and ensure a properly functioning and leak-free shower.
Connecting The Drain To The Shower Pan
Once you have successfully prepared the drain flange and installed the shower pan liner, it’s time to move on to the next important step – connecting the drain assembly to the shower pan. This crucial step ensures that water will be properly drained and will prevent any leaks or water damage in your bathroom. In this section, we will guide you through the process of connecting the drain to the shower pan, ensuring a secure and watertight fit.
Preparing the Drain Flange
Before you can connect the drain to the shower pan, it is essential to prepare the drain flange. This involves applying a generous amount of plumber’s putty or silicone caulk around the underside of the flange. The putty or caulk creates a watertight seal between the flange and the shower pan, preventing any water from leaking through.
Note: When using plumber’s putty, make sure to knead it thoroughly in your hands before applying to ensure proper consistency and ease of use.
Installing the Shower Pan Liner
Now that the drain flange is prepared, it’s time to install the shower pan liner. The liner acts as a waterproof barrier, ensuring that any water that enters the shower pan is directed towards the drain. Carefully position the liner over the shower pan, allowing it to drape over the edges.
- Start by making a small hole in the center of the liner, using a utility knife or scissors. This hole should align with the drain opening on the shower pan.
- Gently push the liner through the hole, allowing it to form a seal around the drain.
- Apply a bead of silicone caulk around the edges of the drain hole to further secure the liner.
- Smooth out any wrinkles or creases in the liner, ensuring a flat and even surface.
Note: Make sure the shower pan liner extends at least 6 inches up the walls surrounding the shower pan to ensure proper waterproofing.
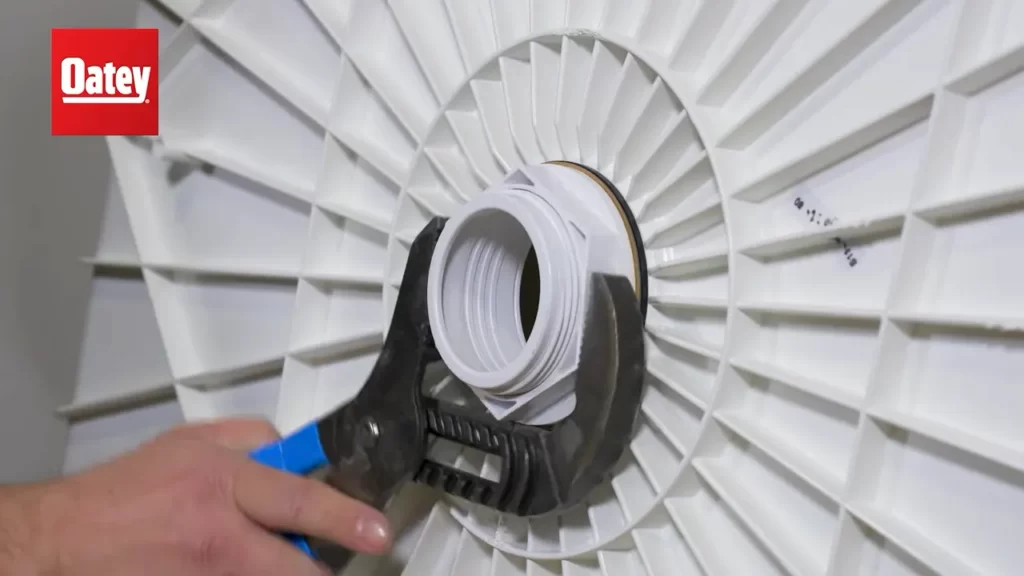
Attaching the Drain Assembly to the Shower Pan
Now that the liner is properly installed, it’s time to attach the drain assembly to the shower pan.
- Place the rubber gasket onto the drain flange, ensuring it is centered and securely in place.
- Insert the drain assembly through the drain hole, aligning it with the gasket.
- Tighten the drain nut onto the drain body, using pliers or a wrench. Be careful not to overtighten, as this can damage the drain or the shower pan.
Testing for Proper Fit and Alignment
After attaching the drain assembly, it is crucial to test for proper fit and alignment before proceeding with the rest of the installation.
- Pour a bucket of water into the shower pan, ensuring that the water flows properly towards the drain.
- Observe the drain assembly for any signs of leaks or water backup.
- If everything looks good, continue with the installation process. If not, double-check the connections and make any necessary adjustments.
By following these steps and ensuring a secure connection between the drain and the shower pan, you can have peace of mind knowing that your shower will function efficiently and be free from any potential water damage.
Sealing And Waterproofing The Drain
When it comes to installing a shower pan drain, one of the most important steps is sealing and waterproofing the drain. This ensures that water is properly channeled into the drain and prevents any potential leakage or damage. In this section, we will discuss two crucial aspects of sealing and waterproofing the drain: applying a waterproof membrane around the drain and checking for any potential leaks or gaps. Let’s dive in!
Applying a waterproof membrane around the drain
In order to create a watertight seal around the drain, it is essential to apply a waterproof membrane. This acts as a barrier between the drain and the surrounding shower pan, preventing any water from seeping through. Here’s how you can do it:
- Clean the area around the drain thoroughly to ensure a proper bond between the membrane and the surface.
- Apply a layer of waterproofing primer to the surface. This helps improve adhesion and creates a stronger bond.
- Once the primer is dry, carefully apply the waterproof membrane around the drain. Make sure to follow the manufacturer’s instructions for application.
- Press the membrane firmly onto the surface, making sure there are no air bubbles or wrinkles. This ensures a tight seal.
- Allow the waterproofing membrane to dry completely before proceeding with the installation of the shower pan.
Checking for any potential leaks or gaps
After applying the waterproof membrane, it is crucial to check for any potential leaks or gaps that may compromise the effectiveness of the drain. Follow these steps to ensure a watertight seal:
- Carefully inspect the area around the drain, looking for any visible gaps or cracks in the membrane.
- Run a small amount of water into the shower pan and observe if there are any signs of leakage around the drain.
- If you notice any leaks or gaps, it is important to address them immediately. Apply additional waterproofing membrane or sealant to these areas to ensure a proper seal.
- Repeat the water test to verify that there are no more leaks or gaps.
Ensuring proper drainage and water flow is crucial for the functionality of the shower pan drain. By following these steps, you can be confident that your shower pan drain is properly sealed and waterproofed, providing you with a worry-free shower experience.
Testing And Finishing Touches
Testing the drain for proper functionality
Once you have successfully installed the shower pan drain, it is important to test it for proper functionality. This step ensures that your shower drain is working correctly, preventing any leaks or drainage issues down the line. Follow these steps to test the drain:
- Fill the shower pan with water
- Observe the flow of water and check for any leaks
- Ensure the water drains quickly and efficiently without any signs of clogging
Adjusting and tightening any loose connections
During the installation process, it is possible that some connections may become loose. It is essential to check and tighten any loose connections before finalizing the installation. Follow the steps below to adjust and tighten the connections:
- Inspect each connection point for signs of looseness
- If you notice any loose connections, use a wrench or pliers to tighten them
- Ensure all connections are secure and snug
Securing the access panel or drain cover
Once you have tested and adjusted the drain, it is time to secure the access panel or drain cover. This step not only provides a finished look to your shower pan but also ensures easy access to the drain for future maintenance or repairs. Follow these steps to secure the access panel or drain cover:
- Place the access panel or drain cover over the drain opening
- Align it properly, ensuring a tight fit
- Secure the panel or cover using screws or brackets, following the manufacturer’s instructions
Cleaning up the worksite
Once you have completed the installation and testing, it is important to clean up the worksite. This step ensures a neat and tidy finish and removes any debris or excess materials. Follow these steps to clean up the worksite:
- Remove any tools and equipment from the area
- Sweep or vacuum the floor to remove any dust or debris
- Dispose of any leftover materials properly
- Wipe down the shower pan and surrounding area to remove any dirt or grime
Congratulations! You have successfully installed a shower pan drain and completed the necessary testing and finishing touches. Your shower is now ready to provide you with a refreshing and leak-free experience. Remember to perform regular maintenance checks to ensure the longevity of your shower drain.
Additional Tips And Troubleshooting
Installing a shower pan drain is an essential step in creating a functional and leak-free shower. However, there may be some common issues that you could encounter during the installation process. Troubleshooting these problems and knowing how to maintain the shower pan drain properly ensures the longevity of your shower system. Here are some additional tips and troubleshooting techniques to help you successfully complete the installation.
Troubleshooting common issues during installation
During the installation of a shower pan drain, you might come across a few common issues. Here are some troubleshooting techniques and solutions to help you overcome these challenges:
- Leakage around the drain: If you notice water leaking around the drain after installation, it could be due to improper sealing. Make sure that the drain flange is securely tightened and that a high-quality waterproof sealing material is used to prevent any leaks.
- Poor drainage: Inadequate drainage can lead to water pooling in your shower. If you experience this issue, ensure that the shower pan slope is properly set to allow the water to flow towards the drain. Additionally, check for any obstructions or blockages in the drain pipe that could be causing slow drainage.
- Unstable drain: If the drain feels unstable or wobbles after installation, it may not have been properly secured. Take the time to ensure that the drain assembly is securely fastened according to the manufacturer’s instructions.
Tips for maintaining and prolonging the lifespan of the shower pan drain
Maintaining your shower pan drain properly is essential for its longevity and overall performance. Here are some tips to help you prolong the lifespan of your shower pan drain:
- Regular cleaning: Clean your shower drain regularly to prevent the buildup of soap scum, hair, and debris. Use a drain brush or pour boiling water down the drain to remove any clogs or blockages.
- Monthly inspection: Perform monthly inspections of your shower drain to check for any signs of leaks or damage. Look for discoloration, corrosion, or loose components. If any issues are found, address them promptly to avoid further damage.
- Avoid chemical cleaners: Harsh chemical drain cleaners can damage the internal components of your shower pan drain. Instead, opt for mild and environmentally-friendly alternatives, such as baking soda and vinegar, to keep your drain clean and clear.
- Protective drain covers: Consider using a drain cover to prevent large debris, such as hair or small objects, from entering the drain and causing clogs. Regularly clean the drain cover to maintain proper water flow.
By following these troubleshooting tips and practicing regular maintenance, you can ensure that your shower pan drain functions optimally and remains free from issues. Remember to consult the manufacturer’s instructions and, when in doubt, seek professional assistance for complex installations or repairs.
Frequently Asked Questions
How Do You Install A Shower Pan Floor Drain?
To install a shower pan floor drain, follow these steps: 1. Mark the drain location on the shower base. 2. Cut a hole for the drain using a jigsaw. 3. Apply plumber’s putty around the drain flange and insert it into the hole.
4. Secure the drain by tightening the screws. 5. Finally, connect the drain pipe to the floor drain.
What Is The Proper Way To Install A Shower Pan?
To properly install a shower pan, follow these steps: 1. Prepare the floor by making sure it is clean and level. 2. Apply a layer of mortar to the floor and press the shower pan firmly into it. 3. Check for any leaks and make sure the pan is properly sealed.
4. Connect the drain to the plumbing system. 5. Finally, test the shower pan by running water to ensure it is working properly.
How Do You Seal A Shower Pan Drain?
To seal a shower pan drain: 1. Clean the drain and surrounding area thoroughly. 2. Apply plumber’s putty on the drain flange. 3. Insert the drain flange into the drain pipe and tighten the screws. 4. Use silicone caulk to seal around the edges of the drain flange.
5. Smooth the caulk and let it dry before using the shower.
How Far From The Wall Is A Drain In A Shower Pan?
The distance between the wall and the drain in a shower pan can vary, but it is typically around 12 inches.
Conclusion
Installing a shower pan drain is a fundamental step in creating a functional and leak-free shower system. By following the step-by-step instructions outlined in this guide, you can confidently tackle this project on your own. Remember to choose the right type of drain, carefully prepare the subfloor, and ensure a proper connection to the plumbing system.
With a little patience and attention to detail, you’ll be enjoying a perfectly installed shower pan drain in no time.