To install a waterproof membrane in a shower, first, clean and prime the surface, then apply the membrane, ensuring proper coverage and adhesion to prevent water leaks. The installation process includes cutting the membrane to size, applying adhesive, and sealing all joints and corners for a watertight seal.
A waterproof membrane is an essential component in a shower, as it acts as a barrier to prevent water from penetrating through the walls and floor, protecting the underlying structure from moisture damage. By installing a waterproof membrane, you can ensure a long-lasting and durable shower that remains free from leaks and water-related issues.
In this guide, we will discuss the step-by-step process of installing a waterproof membrane in a shower, providing you with the knowledge and skills to undertake this project successfully.
Understanding The Role Of Waterproof Membrane
Understanding the Role of Waterproof Membrane
When it comes to shower installation, ensuring proper waterproofing is vital to prevent water damage, increase the longevity of tiles, and protect the subfloor from moisture. One key component of a successful waterproofing system is the waterproof membrane. Understanding the role of the waterproof membrane is crucial in achieving a watertight shower that will stand the test of time. In this section, we will delve into the importance of the waterproof membrane and how it contributes to a functional and durable shower.
Preventing Water Damage
The primary function of the waterproof membrane in a shower installation is to prevent water from penetrating through the walls and floors, thereby preventing water damage. Without a waterproof membrane, water can seep into the underlying surfaces, leading to mold growth, rotting of wooden structures, and structural damage. By acting as a barrier, the waterproof membrane ensures that water remains confined within the shower area, reducing the risk of leaks and water damage to adjacent areas.
Ensuring Longevity of Tiles
Another crucial role of the waterproof membrane is to protect the tiles from moisture, which can compromise their integrity and aesthetics. Moisture can cause tiles to loosen, crack, or become discolored over time. The waterproof membrane acts as a safeguard against moisture, preserving the condition and appearance of the tiles. By preventing water infiltration, it helps maintain the bond between the tiles and the substrate, ensuring a long-lasting and visually appealing shower surface.
Protecting Subfloor from Moisture
In addition to protecting the tiles, the waterproof membrane also plays a vital role in safeguarding the subfloor from moisture. When water penetrates through the shower walls or floor, it can seep into the subfloor, causing it to swell, rot, or weaken. This can lead to costly repairs and structural issues. By creating a watertight seal, the waterproof membrane prevents moisture from reaching the subfloor, preserving its structural integrity and prolonging its lifespan.
In conclusion, understanding the role of the waterproof membrane in shower installation is essential for ensuring a functional and durable shower. It serves to prevent water damage, increase the longevity of tiles, and protect the subfloor from moisture. By implementing a reliable waterproofing system that includes a high-quality waterproof membrane, you can have peace of mind knowing that your shower is well-protected against leaks and water-related issues. Take the necessary steps to integrate a waterproof membrane into your shower installation, and enjoy a safe and long-lasting showering experience.
Preparing For Installation
Before you begin installing a waterproof membrane in your shower, it’s important to properly prepare the area. This will ensure that the membrane adheres correctly and provides long-lasting protection against leaks and water damage. In this section, we’ll explore the necessary steps to take in order to prepare the shower for installation.
Gathering the Necessary Tools and Materials
Before you kick-start the installation process, make sure you have all the essential tools and materials on hand. This will save you precious time and ensure a smooth installation. Here’s a list of what you’ll need:
| • Trowel | • Utility knife |
| • Paint roller and tray | • Notched trowel |
| • Waterproofing membrane | • Waterproof membrane adhesive |
| • Seam tape | • Silicone caulk |
| • Membrane reinforcement fabric | • Grout float |
Having all these tools and materials at your disposal will ensure a seamless installation process without any hiccups. Now let’s move on to the next step.
Measuring and Calculating the Amount of Membrane Required
Once you have all the necessary tools and materials, it’s time to measure and calculate the amount of waterproof membrane required. This step is crucial in order to avoid any wastage or running out of membrane in the middle of the installation. Here’s how to do it:
- Carefully measure the dimensions of your shower walls and floor using a tape measure.
- Calculate the area of each wall and the floor separately by multiplying the length by the height.
- Add up the total area of all the walls and the floor to get the overall area that needs to be covered with the waterproof membrane.
- It’s always a good idea to add a little extra to account for any potential errors or cuts that may be required.
By accurately measuring and calculating the required amount of membrane, you can ensure that you have enough to complete the installation from start to finish.
Prepping the Shower Area for Installation
Now that you have gathered all the tools and materials and determined the amount of membrane needed, it’s time to prep the actual shower area. Here are the steps to follow:
- Start by removing any existing tiles or wall coverings from the shower area using a utility knife and a pry bar if necessary.
- Ensure that the shower walls and the floor are clean and free from any loose debris or dirt. Use a vacuum or a broom to thoroughly clean the area.
- Inspect the walls and the floor for any cracks, holes, or uneven surfaces. Fill in any cracks or holes with a suitable filler and use a leveling compound to even out any uneven areas.
- Apply a layer of primer to the cleaned and prepared shower walls and floor, following the manufacturer’s instructions.
- Allow the primer to dry completely before moving on to the next step.
By prepping the shower area properly, you create a solid foundation for the installation of the waterproof membrane.

Preparing The Subfloor
Checking for Any Damage or Unevenness
Before installing a waterproof membrane in the shower, it is essential to prepare the subfloor properly. This preparation ensures a smooth and durable installation that will protect your shower walls and prevent water damage. The first step in preparing the subfloor is to check for any damage or unevenness.
Start by inspecting the subfloor for any signs of water damage, such as rot or mold. Look for discoloration, soft spots, or a musty odor. If you notice any of these signs, it is crucial to address the issue before proceeding with the installation. Replace any damaged or rotten sections of the subfloor to ensure a solid foundation for the waterproof membrane.
In addition to checking for damage, it is also important to assess the subfloor’s levelness. Uneven subfloors can lead to problems down the line, such as tiles cracking or the waterproof membrane not adhering properly. To determine if the subfloor is level, use a long straight edge, like a level, and place it on the floor. Check for any gaps between the straight edge and the floor surface. If you notice any gaps, these areas will require leveling.
Applying a Primer to Ensure Adhesion
Once you have checked the subfloor for any damage or unevenness, the next step is to apply a primer to ensure proper adhesion of the waterproof membrane. A primer acts as a bonding agent that helps the membrane adhere firmly to the subfloor, ensuring a watertight seal.
Before applying the primer, thoroughly clean the subfloor to remove any dust, dirt, or debris. Use a broom or vacuum cleaner to sweep away loose particles, and then wipe the surface with a damp cloth to remove any remaining grime.
Once the subfloor is clean and dry, you can begin applying the primer. Choose a primer suitable for the type of subfloor you have, whether it is wood, concrete, or another material. Follow the manufacturer’s instructions for application, including the recommended drying time.
Patching Any Cracks or Holes
Patching any cracks or holes in the subfloor is an essential step to ensure a smooth and even surface for installing the waterproof membrane. Cracks and holes can compromise the integrity of the membrane and lead to leakage, so it is crucial to address them before proceeding.
Start by filling in any cracks or small holes with a suitable patching compound. Use a putty knife or trowel to carefully apply the compound, ensuring it fills the entire crevice. Smooth out the surface with the putty knife, removing any excess compound.
For larger holes or damaged areas, cut out the damaged section using a saw or other appropriate tool. Replace the section with a new piece of subfloor material and secure it in place with nails or screws. Ensure the new section is level with the rest of the subfloor.
By thoroughly preparing the subfloor, checking for any damage or unevenness, applying a primer for adhesion, and patching any cracks or holes, you set the foundation for a successful installation of a waterproof membrane in your shower. Following these steps will help ensure a long-lasting and leak-free shower that provides peace of mind and protects your bathroom from water damage.
Applying The Membrane
Once you have prepared the shower area and properly adhered the primer, it’s time to apply the waterproof membrane. This crucial step ensures that your shower remains leak-free and protected from moisture damage. In this guide, we will walk you through the process, highlighting each step to help you install the waterproof membrane successfully.
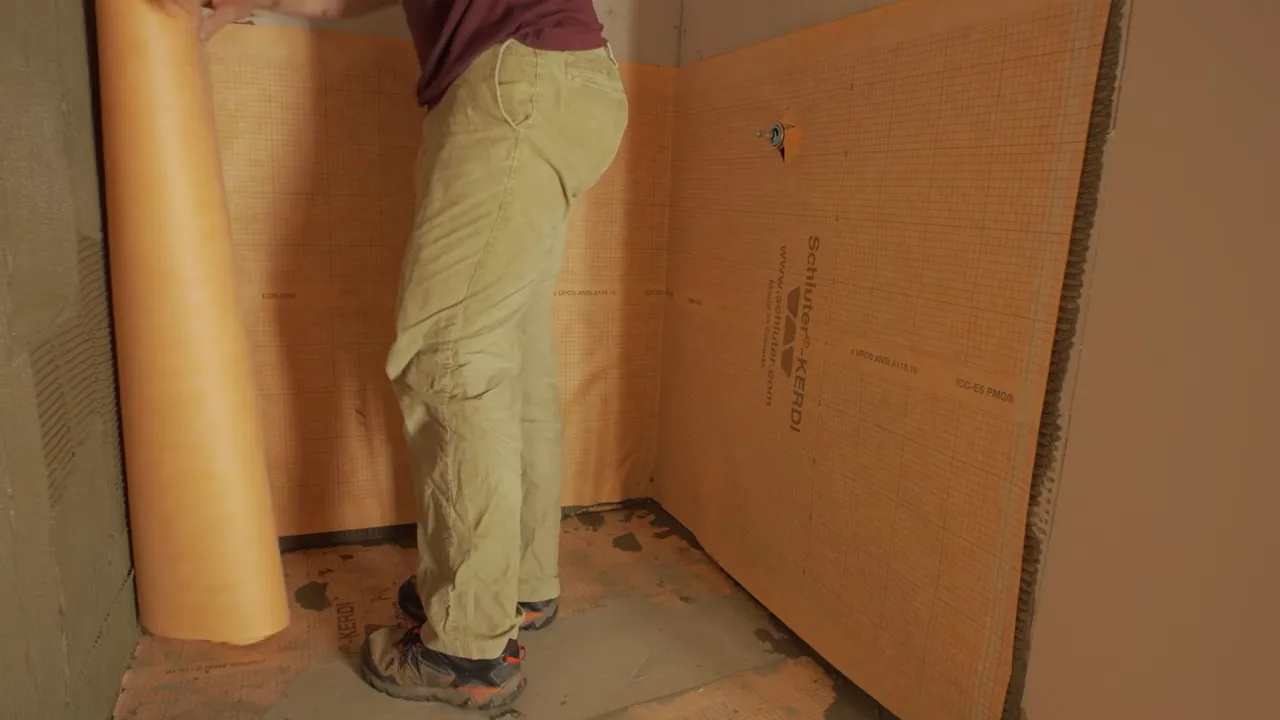
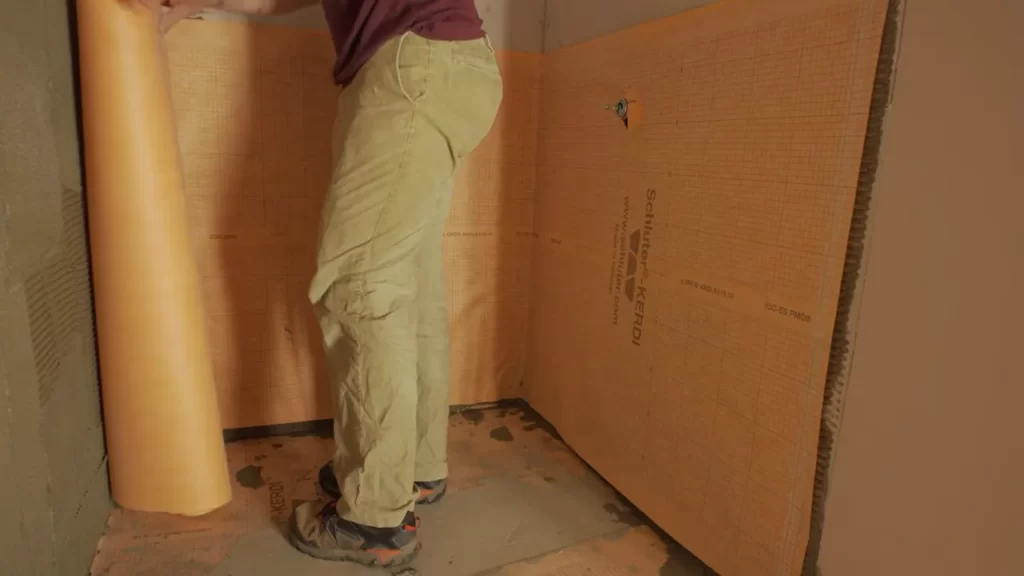
1. Cutting and Fitting the Membrane to the Shower Area
The first step in applying the waterproof membrane is to cut and fit it to the shower area. Start by measuring the dimensions of the shower floor and walls, ensuring accuracy for a proper fit. Using a sharp utility knife or scissors, carefully cut the membrane according to the measurements, allowing for a slight overlap at the edges.
Once cut, place the membrane on the shower floor, making sure it covers the entire surface area. Then, smoothly press the membrane against the walls, ensuring a secure fit. It’s important to note that you may need to make adjustments and trim the membrane as necessary to ensure a precise fit around fixtures such as drains and faucets.
2. Mixing and Applying the Waterproofing Adhesive
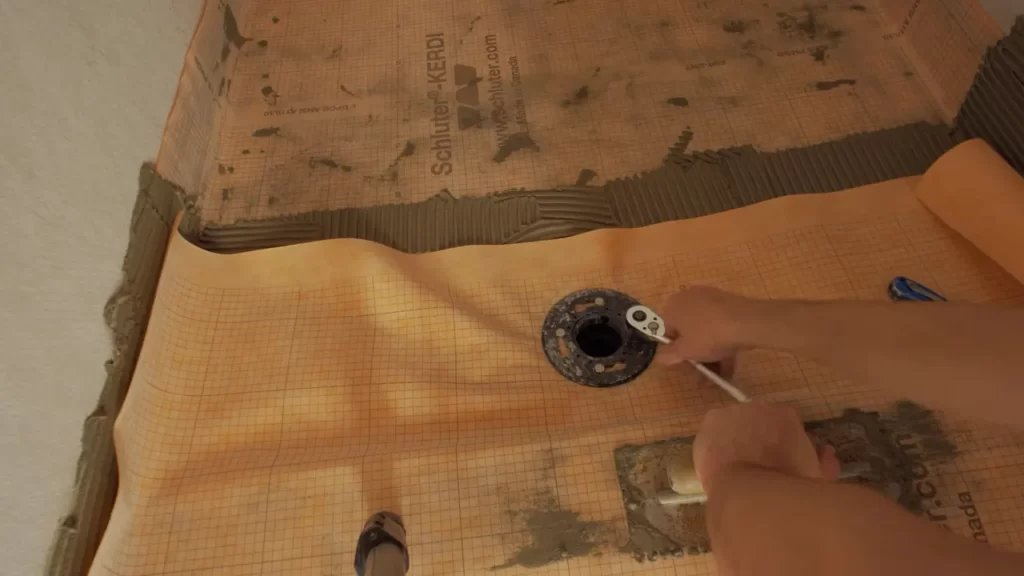
Next, it’s time to mix and apply the waterproofing adhesive. Follow the manufacturer’s instructions to ensure the correct mixing ratio and consistency. Using a trowel or a recommended applicator, spread the adhesive evenly onto the shower floor, starting at one corner and working your way towards the center.
Ensure that the adhesive covers the entire surface area where the membrane will be placed. It’s crucial to work efficiently while applying the adhesive to prevent it from drying before the membrane is pressed onto it. Be sure to wear protective gloves and work in a well-ventilated area when handling the adhesive.
3. Pressing the Membrane Firmly onto the Subfloor
After applying the adhesive, carefully place the waterproof membrane onto the adhesive-coated shower floor. Start from one corner, and using a flat trowel or a grout float, firmly press the membrane onto the subfloor. Apply even pressure to ensure that the membrane is flat, eliminating any air pockets or wrinkles.
Work your way across the entire surface, ensuring that each section of the membrane is pressed firmly into place. Take extra care around edges, corners, and fixtures, making sure the membrane adheres tightly. If any excess adhesive squeezes out from between the membrane and subfloor, remove it promptly to maintain a neat and professional finish.
Once the membrane is successfully pressed onto the subfloor, allow it to dry and cure according to the manufacturer’s instructions. This will ensure optimal adhesion and waterproofing performance. Following these steps will result in a secure and reliable waterproof membrane installation, providing you with a long-lasting, leak-free shower.

Sealing The Edges And Corners
Applying Waterproofing Tape to the Edges
Ensuring that all edges are properly sealed is crucial to the success of your waterproof membrane installation. One effective method is to apply waterproofing tape. This tape acts as an extra barrier, preventing any water from seeping through the edges and causing damage to the underlying structure. To apply the tape, follow these steps:
- Clean the edges thoroughly, removing any dirt, dust, or debris. This will ensure a smooth surface for the tape to adhere to.
- Cut the waterproofing tape into strips that are long enough to cover the entire length of the edges. It’s better to cut them slightly longer than needed, as you can trim any excess later.
- Peel off the backing from the tape, revealing the adhesive side.
- Press the adhesive side of the tape firmly onto the edge, starting from one end and continuing to the other. Ensure that the tape adheres tightly and evenly along the entire edge.
- Repeat this process for all the edges, ensuring that each one is sealed with the waterproofing tape.
Creating a Watertight Seal in the Corners
The corners of your shower are vulnerable areas where water can easily penetrate if not properly sealed. It’s essential to create a watertight seal in these corners to prevent any leakage. The following steps will guide you in achieving this:
- Apply a thin layer of waterproofing membrane in the corner, using a paintbrush or trowel. Ensure that the membrane fully covers the vertical and horizontal surfaces of the corner.
- Press a strip of waterproofing fabric into the applied membrane, running it along the corner’s vertical and horizontal surfaces. The fabric will act as reinforcement, strengthening the seal.
- Carefully apply another layer of waterproofing membrane over the fabric, completely covering it. Smooth out any bumps or excess membrane, ensuring a uniform and secure seal.
- Repeat this process for all the corners in your shower, creating watertight seals at each one.
Overlapping the Membrane Sheets
When installing the waterproof membrane in your shower, overlapping the sheets is essential to create a continuous barrier against water intrusion. Follow these steps to ensure proper overlapping:
- Install the first sheet of waterproof membrane according to the manufacturer’s instructions, ensuring it is properly adhered to the surface.
- Overlap the second sheet onto the first sheet, keeping a minimum overlap of at least 2 inches. This overlap will ensure that any water seeping through one sheet will be caught by the overlapping sheet.
- Securely press the second sheet onto the first, ensuring a strong bond between the two.
- Repeat this process for each subsequent sheet, overlapping them onto the previous sheet by at least 2 inches. This will create a seamless and waterproof membrane that covers the entire shower area.
Remember, properly sealing the edges and corners and overlapping the membrane sheets are essential steps when installing a waterproof membrane in your shower. By following these steps, you can ensure a watertight seal that will protect your shower and underlying structure from water damage.
Testing For Leakages
Allowing Sufficient Drying Time
Before conducting a water test to check for leakages in your newly installed waterproof membrane, it’s crucial to allow the membrane to dry completely. Allowing sufficient drying time ensures that any excess moisture trapped during the installation process evaporates, providing a clear and accurate representation of the membrane’s effectiveness. In general, it is recommended to wait at least 24 to 48 hours for the membrane to fully dry before proceeding with the water test.
Conducting a Water Test to Check for Leaks
Once the waterproof membrane has had sufficient drying time, it’s time to conduct a water test to check for any potential leaks. This is an important step to ensure that your shower remains watertight and prevents any moisture-related issues in the future.
To conduct the water test, follow these steps:
- First, plug the drain to prevent any water from escaping.
- Next, fill the shower basin with water, ensuring that the water level reaches at least a few inches above the highest point of the waterproof membrane.
- Allow the water to sit in the shower for approximately 30 minutes to an hour. During this time, closely observe the membrane for any signs of leakage, such as water seeping through cracks or seams.
- If you notice any leaks, mark their location using a waterproof marker or tape. This will help you address the issues effectively later on.
Remember, it’s essential to conduct the water test thoroughly and carefully, paying close attention to all areas of the shower, especially corners and seams, where leaks are most likely to occur.
Addressing Any Issues and Making Necessary Repairs
Once the water test is complete, and you have identified any areas with leaks, it’s time to address these issues and make the necessary repairs. This step is crucial in ensuring the long-term effectiveness of your waterproof membrane and preventing any future water damage.
Here’s how you can address the identified issues:
- Begin by draining the water from the shower basin.
- Using a clean cloth or sponge, thoroughly dry the areas where leaks were detected.
- If the leaks are minor and only involve small cracks or gaps, you can apply a waterproof sealant or adhesive to seal them. Be sure to follow the manufacturer’s instructions and choose a product suitable for your specific membrane type.
- For more significant issues, such as damaged or deteriorated sections of the membrane, it may be necessary to replace those portions entirely. Consult a professional if needed to ensure proper installation and optimal performance.
By promptly addressing any identified issues and making necessary repairs, you can ensure that your waterproof membrane provides reliable protection against water damage and extends the lifespan of your shower.
Installing Shower Tiles
When it comes to installing shower tiles, it’s important to follow the proper steps for a professional-looking and durable finish. From choosing the right tiles for your bathroom to grouting and sealing the tile surface, each step plays a crucial role in ensuring a successful installation. In this post, we will guide you through these steps, helping you achieve a beautiful and waterproof shower.
Choosing the Right Tiles for Your Bathroom
The first step in installing shower tiles is selecting the right tiles for your bathroom. Not all tiles are suitable for wet areas like showers, so it’s important to choose ones that are specifically designed for this purpose. Here are a few factors to consider when making your selection:
- Material: Opt for tiles made of ceramic, porcelain, or natural stone, as they are water-resistant and durable.
- Size: Consider the size of the tiles based on the size of your shower. Larger tiles can make the space look bigger, while smaller tiles can create intricate patterns.
- Finish: Choose a finish that provides slip resistance to prevent accidents in the shower, such as a matte or textured surface.
Applying Thinset Mortar and Setting the Tiles
Once you have chosen your tiles, the next step is to prepare the surface and apply thinset mortar to set the tiles. Follow these steps:
- Prepare the surface: Ensure the shower walls are clean, dry, and free of any debris. Repair any cracks or damages before proceeding.
- Mix thinset mortar: Follow the manufacturer’s instructions to mix the thinset mortar to the right consistency. Use a notched trowel to apply the mortar evenly on the wall, working in small sections.
- Set the tiles: Press the tiles firmly into the mortar, using a slight twisting motion to ensure a secure bond. Use spacers to maintain consistent spacing between tiles.
- Check for level: Use a level to ensure the tiles are straight and even. Make adjustments if necessary before the mortar sets.
Grouting and Sealing the Tile Surface
After the tiles have been set and the mortar has dried, it’s time to grout and seal the tile surface. Here’s how:
- Mix the grout: Prepare the grout according to the manufacturer’s instructions. Use a grout float to apply the grout to the tile surface, holding the float at a 45-degree angle.
- Remove excess grout: After applying the grout, use a damp sponge to remove any excess grout from the tile surface. Rinse the sponge frequently to ensure a clean finish.
- Seal the grout: Once the grout has dried, apply a grout sealer to protect it from stains and moisture. Follow the sealer manufacturer’s instructions for the best results.
- Clean and polish: After sealing the grout, clean the tiles and polish them to achieve a sparkling finish. Use a non-abrasive cleaner and a soft cloth to avoid scratching the tiles.
By following these steps, you can install shower tiles effectively and create a waterproof barrier that will stand the test of time. Remember to choose the right tiles, apply thinset mortar correctly, and grout and seal the tile surface for a professional-looking finish. Enjoy your newly tiled shower!
Maintaining The Waterproof Membrane
The installation of a waterproof membrane is crucial in maintaining a leak-free and durable shower. However, simply installing the membrane is not enough; regular maintenance is key to ensure its long-term effectiveness. By keeping up with inspections, addressing repairs promptly, and implementing proper cleaning techniques, you can extend the lifespan of the waterproof membrane in your shower.
Regular Inspections and Repairs
Inspecting the waterproof membrane on a regular basis is essential to identify any potential issues before they escalate. Leakage or cracks in the membrane can lead to water damage and mold growth, compromising the integrity of your shower. Take the following steps to conduct a thorough inspection:
- Examine the entire surface of the membrane, including corners and seams, for any signs of deterioration.
- Check for discoloration, swelling, or soft spots that may indicate water intrusion.
- Ensure that the membrane is securely adhered to the surface and there are no loose areas.
If any flaws or damage are detected during the inspection, prompt repairs are necessary to prevent further issues. Trust a professional to handle extensive repairs, while minor damages can be tackled by following these steps:
- Clean the damaged area with mild soap and water, ensuring it is free from any debris or dirt.
- Apply an appropriate waterproof sealant specifically designed for the type of membrane installed.
- Allow sufficient time for the sealant to dry and bond with the membrane before using the shower.
Cleaning and Removing Mildew and Mold
Despite the waterproof properties of the membrane, constant exposure to moisture can lead to the growth of mildew and mold. Regular cleaning is necessary to prevent and remove these unwelcome intruders. Follow these steps to maintain a clean and mold-free shower:
- Use a mildew and mold cleaner that is suitable for your specific membrane type.
- Apply the cleaner directly to the affected areas and scrub gently with a soft-bristled brush.
- Rinse thoroughly with clean water to remove any residue.
- Wipe the surface dry with a clean cloth or let it air dry completely.
Remember, prevention is better than cure. To avoid the growth of mildew and mold, ensure proper ventilation in your shower area by using exhaust fans or opening windows. Regularly remove any moisture-trapping items such as shower curtains or bath mats to allow the area to dry effectively.
Extending the Lifespan of the Membrane
To maximize the lifespan of your waterproof membrane, consider implementing the following practices:
- Keep the shower area clean and dry by wiping off excess water after each use.
- Avoid using harsh chemicals or abrasive cleaners that may damage the membrane.
- Regularly check and replace worn-out caulking or grout around the edges of the shower to maintain a watertight seal.
- Consider applying an additional layer of waterproof sealant every few years as an extra protective measure.
By taking these proactive measures to maintain your waterproof membrane, you can ensure a leak-free shower that stands the test of time.
Final Thoughts On Mastering Waterproof Membrane Installation
Final Thoughts on Mastering Waterproof Membrane Installation
Installing a waterproof membrane in your shower is a crucial step to ensure a leak-free and long-lasting shower space. By creating a barrier against moisture, waterproof membranes prevent water from seeping through to the underlying structure, protecting your walls and floors from damage. However, it’s essential to follow proper installation guidelines to ensure the effectiveness of the membrane. In this final section, we will discuss the advantages of professional installation, the importance of following the manufacturer’s guidelines, and how you can enjoy a leak-free shower for years to come.
Advantages of Professional Installation
While installing a waterproof membrane may seem like a straightforward task, it’s worth considering the advantages of professional installation. Hiring a professional ensures that the membrane is installed correctly, minimizing the risk of leaks and potential water damage. Experienced installers have the necessary expertise to handle any challenges that may arise during the installation process. They can also provide recommendations on the most suitable membrane for your specific shower design and usage.
By entrusting the installation to professionals, you can have peace of mind knowing that your waterproof membrane will be applied with precision and care. Professional installers understand the importance of a meticulous installation process, which includes properly preparing the surface, using the right adhesives, and sealing all joints and corners. Their expertise ensures that the waterproofing system performs optimally, giving you a shower space that can withstand moisture without compromising its integrity.
Importance of Following Manufacturer’s Guidelines
To achieve the best results when installing a waterproof membrane, it is crucial to follow the manufacturer’s guidelines meticulously. Each manufacturer has specific recommendations regarding surface preparation, adhesive application, curing time, and sealing methods. Deviating from these guidelines can affect the performance of the membrane and compromise its ability to keep water at bay.
By adhering to the manufacturer’s instructions, you’ll ensure that the waterproof membrane is installed correctly, maximizing its effectiveness. This includes preparing the surface by removing any debris, dirt, or old adhesive before applying the membrane. Proper adhesive application is another key factor that needs to be addressed carefully, as it ensures a strong and durable bond between the membrane and the substrate.
Additionally, the manufacturer’s guidelines provide valuable information on curing time, allowing the adhesive to set properly before proceeding with further steps. It’s essential to allow sufficient time for the membrane to cure to ensure its optimal performance. Lastly, following the manufacturer’s instructions for sealing joints and corners will prevent any potential water penetration points, providing an extra layer of protection.
Enjoying a Leak-Free and Long-Lasting Shower Space
Mastering the installation of a waterproof membrane in your shower ensures that you can enjoy a leak-free and long-lasting shower space for years to come. By taking the time to follow professional installation techniques and the manufacturer’s guidelines, you create a robust barrier against moisture, protecting your shower from damage caused by water infiltration.
With a properly installed waterproof membrane, you can confidently enjoy your shower without worrying about leaks or water damage. Its ability to withstand water exposure ensures the longevity of your shower space, saving you time and money on repairs in the future.
In conclusion, while the installation of a waterproof membrane may seem like a simple task, it’s crucial to prioritize professional installation and follow the manufacturer’s guidelines to ensure its effectiveness. By doing so, you’ll create a leak-free and long-lasting shower space that provides you with comfort and peace of mind.
Frequently Asked Questions
What Adhesive Do You Use For Membrane In A Shower?
For shower membranes, use adhesive specifically designed for waterproofing. It ensures proper installation and long-term durability.
How Do You Apply Waterproof Membrane?
To apply a waterproof membrane, follow these steps: 1. Clean the surface thoroughly. 2. Use a brush or roller to apply the membrane evenly. 3. Ensure complete coverage, paying attention to seams and edges. 4. Allow the membrane to cure as per the manufacturer’s instructions.
5. Test the membrane for effectiveness with a water test before proceeding with further construction.
Does Tile Adhesive Stick To Waterproof Membrane?
Yes, tile adhesive does stick to waterproof membrane.
Where Do You Put Waterproof Membranes?
Waterproof membranes are typically used in areas prone to water exposure, such as basements, bathrooms, and roofs. They are placed beneath tiles, shingles, or other coverings to prevent water seepage and protect underlying structures from damage.
Conclusion
To summarize, installing a waterproof membrane in your shower is a crucial step in ensuring a moisture-resistant and long-lasting bathroom. By following the step-by-step guide provided in this blog post, you can successfully protect your shower walls from water damage and leaks.
Remember to properly prepare the surface, choose the right membrane material, and apply it correctly for optimal results. With a well-installed waterproof membrane, you can enjoy a beautiful and functional shower for years to come.