To install a shower from scratch, you need to remove existing fixtures, install plumbing and drainage, build a shower pan, and connect the showerhead and controls. Starting from a blank canvas, you can create a functional and stylish shower that meets your needs and preferences.
A new shower can be a beautiful addition to any bathroom. Whether you are renovating your existing space or building a new home, installing a shower from scratch allows you to customize it to your liking. From choosing the right fixtures and materials to creating a waterproof enclosure, the process can be both exciting and challenging.
We will provide you with a step-by-step guide on how to install a shower from scratch, ensuring a successful and rewarding project. Ready to get started? Let’s dive in!
Step 1: Preparing The Bathroom Space
When it comes to installing a shower from scratch, the first step is to prepare the bathroom space. This includes measuring the available space accurately, assessing the plumbing and electrical requirements, as well as removing any existing shower fixtures or enclosures.
Measuring the available space accurately
Before you begin the installation process, it’s important to measure the available space in your bathroom accurately. This will ensure that the shower you choose fits perfectly in the designated area. You can use a measuring tape to measure the length, width, and height of the space. Record these measurements carefully and make note of any obstacles or irregularities that may affect the installation process.
Assessing the plumbing and electrical requirements
Assessing the plumbing and electrical requirements is another crucial step in preparing the bathroom space for a new shower installation. This involves checking the existing plumbing and electrical connections to ensure they meet the necessary requirements for the chosen shower. If any adjustments or upgrades are needed, it’s essential to address them before moving forward with the installation process. Hiring a professional plumber or electrician can help ensure the job is done correctly and in compliance with building codes.
Removing any existing shower fixtures or enclosures
Before you can install a new shower from scratch, it’s important to remove any existing shower fixtures or enclosures that may be in place. This can include removing the showerhead, faucets, shower doors, or any other components that are no longer needed or compatible with the new shower design. Take care when removing these fixtures to avoid causing damage to the surrounding walls or flooring. If you’re unsure how to safely remove these items, it’s recommended to seek professional assistance.

Step 2: Choosing The Perfect Shower Components
Now that you have a clear vision of your dream shower, it’s time to move on to the important task of choosing the perfect shower components. In this step, we will focus on three key aspects: selecting the ideal shower base or pan, picking the right shower walls or tiles, and deciding on the appropriate shower fixtures and accessories.
Selecting the ideal shower base or pan
When it comes to the foundation of your shower, you want to make sure you choose the right base or pan. The shower base not only provides a level surface for your shower, but it also helps with proper water drainage. Here are some considerations to keep in mind:
- Material: Shower bases can be made from various materials, such as acrylic, fiberglass, or tileable options. Consider your preferences and budget when making this choice.
- Size and shape: Measure your available space and determine whether a square, rectangular, or corner-shaped shower base would fit best.
- Accessibility: If you have mobility concerns or plan to age in place, consider a low-profile or curbless shower base for easy access.
Picking the right shower walls or tiles
Once you have selected the shower base, it’s time to think about the walls or tiles that will surround your shower. The appearance and functionality of these components can greatly enhance your overall shower experience. Consider the following:
- Material: Shower walls or tiles can be made from different materials, including ceramic, porcelain, glass, or natural stone. Each material offers its unique aesthetic and maintenance requirements.
- Design and pattern: Think about the style you want to achieve with your shower. Consider incorporating accent tiles or creating a mosaic design to add a personal touch.
- Maintenance and durability: Choose a material that is easy to clean and resistant to water, mold, and mildew, ensuring your shower walls or tiles maintain their beauty over time.
Deciding on the appropriate shower fixtures and accessories
The final step in choosing the perfect shower components is selecting the right fixtures and accessories that will elevate your showering experience. Here are some factors to consider:
- Showerhead and hand shower: Decide whether you want a fixed showerhead, a handheld shower, or a combination of both for added flexibility and convenience.
- Water pressure and flow: Look for shower fixtures that offer adjustable water pressure and flow settings to cater to your preferences.
- Accessories and storage: Consider incorporating built-in niches, shelves, or hooks for storing toiletries, as well as other accessories like a shower bench or grab bars for added safety and comfort.
Taking the time to carefully choose the ideal shower base or pan, shower walls or tiles, and shower fixtures and accessories will ensure that your shower not only meets your functional requirements but also reflects your personal style. Remember, each component plays a vital role in creating a shower space that you’ll enjoy for years to come.

Step 3: Laying The Foundation With Plumbing And Electrical Work
Once you have finalized your shower design and gathered all the necessary materials, it’s time to move on to the crucial step of laying the foundation with plumbing and electrical work. This step involves planning the water supply and drainage system, as well as connecting the electrical wiring. Let’s dive into each of these tasks in detail.
Planning the Water Supply and Drainage System
Before you begin with any plumbing work, it is essential to have a well-thought-out plan for the water supply and drainage system of your shower. This plan will ensure that you meet building codes and regulations, while also providing efficient and adequate water flow.
Below are some key considerations to keep in mind:
- Identify the location of the main water supply line in your house. This will be crucial for connecting the shower’s water supply.
- Determine the ideal location for the drain. Make sure it aligns with your overall shower design and that it meets plumbing regulations.
- Calculate the proper sizing of pipes and fixtures to ensure optimal water pressure and drainage.
- Consider installing a water pressure regulator to prevent water flow issues.
Installing the Necessary Pipes, Valves, and Fittings
With your water supply and drainage plan in place, it’s time to start installing the necessary pipes, valves, and fittings for your shower. Proper installation is vital to ensure a leak-free and efficient water system.
Follow these steps for a successful installation:
- Using appropriate tools, cut the pipes to the desired lengths, ensuring precise measurements.
- Securely connect the pipes using reliable connectors and fittings. Use plumbing tape or joint compound to prevent leaks.
- Install shut-off valves at strategic points to allow for easy maintenance and repairs.
- Ensure proper ventilation by installing an air admittance valve or vent pipe.
Connecting the Electrical Wiring for Lighting and Ventilation
Lighting and ventilation are essential components of any shower space. As part of the foundation work, you need to connect the electrical wiring to ensure proper lighting and ventilation.
Here’s what you need to do:
- Hire a licensed electrician to handle the electrical connections, adhering to local electrical codes and regulations.
- Install waterproof and moisture-resistant light fixtures to enhance safety.
- Consider installing a separate circuit for your shower to avoid overloading the existing circuit.
- Ensure that all electrical connections are securely grounded for maximum safety.
By following these steps and taking the time to plan and execute your plumbing and electrical work correctly, you are paving the way for a successful shower installation. Remember to always prioritize safety and seek professional assistance when needed.
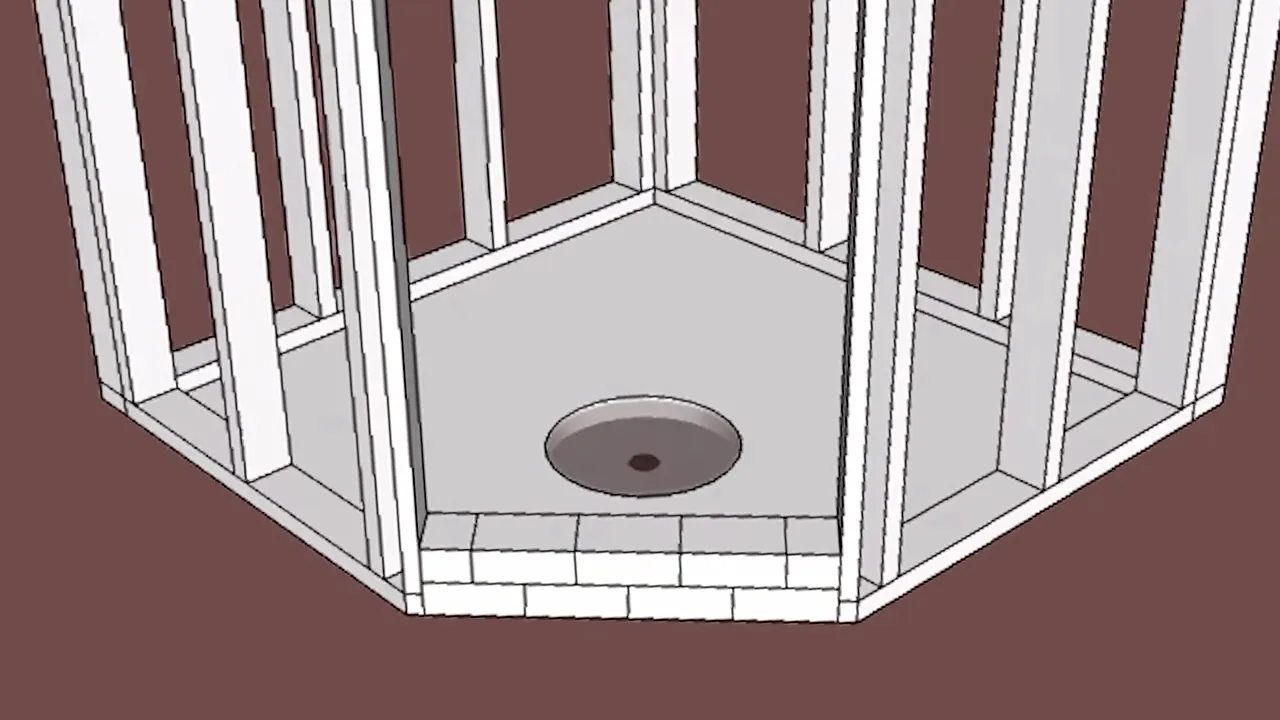
Step 4: Building The Shower Base And Walls
Now that you have completed the necessary preparations, it’s time to move on to building the shower base and walls. This crucial step requires attention to detail and precise execution to ensure a sturdy and leak-free shower.
Creating a Solid Base for the Shower
Before you can start building the shower walls, it is essential to create a solid base that will provide support and stability. A sturdy base will not only prevent water leakage but also ensure the longevity of your shower. Here’s how you can create a solid base for your shower:
1. Begin by measuring the dimensions of the shower area and mark it on the floor. This will serve as a guide while building the base.
2. Use a spirit level to check if the floor is level. If it’s not, you may need to make adjustments to ensure a flat surface.
3. Lay a layer of mortar mix on the floor, spreading it evenly using a trowel. This mortar mix will act as the base for the shower.
4. Place a shower pan over the mortar mix, ensuring that it fits snugly within the designated area. Press it down firmly to make sure it adheres well to the mortar.
5. Again, use a spirit level to check if the shower pan is level. Make any necessary adjustments by adding or removing mortar beneath the pan.
6. Leave the mortar to dry completely as per the manufacturer’s instructions before moving on to the next step.
Applying Waterproofing and Sealant to Prevent Leaks
Now that you have a solid base, it’s crucial to apply waterproofing and sealant to prevent any water leakage. Follow these steps to ensure a watertight shower:
1. Begin by cleaning the surface of the shower base and walls thoroughly. Remove any dust, debris, or loose particles.
2. Apply a layer of waterproofing membrane to the shower base and walls. Use a paintbrush or roller to ensure even coverage. Pay extra attention to corners and joints to prevent any potential leaks.
3. Allow the waterproofing membrane to dry completely before proceeding to the next step.
4. Once the waterproofing membrane is dry, apply a silicon-based sealant around the edges and joints of the shower base and walls. This will provide an extra layer of protection against water penetration.
5. Make sure to smooth out the sealant with a caulk gun or your finger to achieve a neat and clean finish.
By following these steps, you can significantly reduce the risk of water leakage and ensure a durable shower that will stand the test of time.
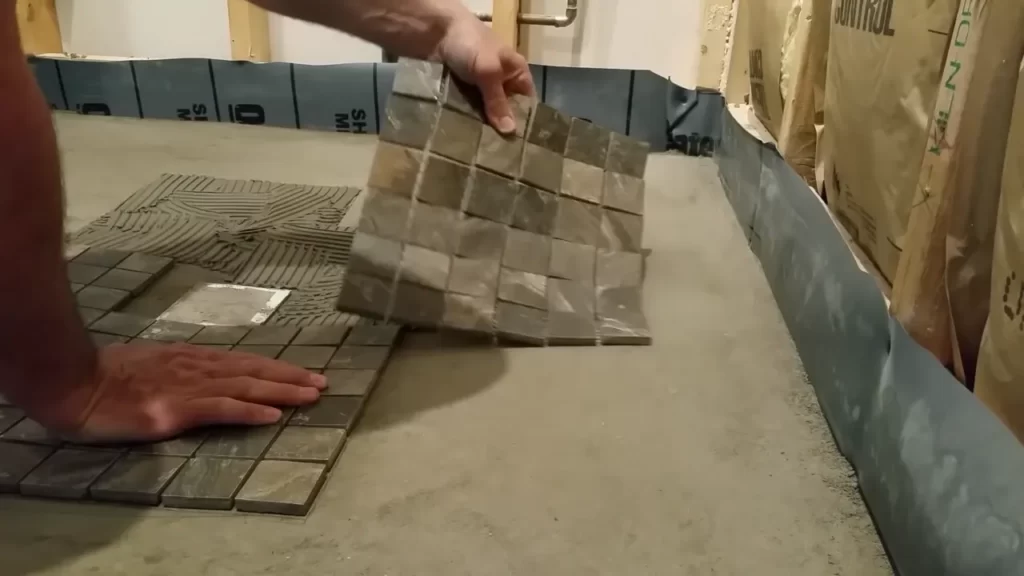
Installing the Shower Walls or Tiling for a Sturdy and Aesthetic Finish
Now that the base is complete, it’s time to install the shower walls or tile them for a sturdy and aesthetic finish. Here’s what you need to do:
1. Measure and cut the shower wall panels or tiles according to the dimensions of your shower area. Make sure to account for any fixtures such as showerheads and faucets.
2. Apply an adhesive or mortar to the back of each panel or tile, ensuring full coverage.
3. Start from the bottom and work your way up, applying the panels or tiles in a straight line. Use spacers to maintain an even gap between each piece.
4. Once all the panels or tiles are in place, use a spirit level to check if they are plumb and level. Make any necessary adjustments before the adhesive or mortar dries.
5. Allow the adhesive or mortar to dry completely as per the manufacturer’s instructions.
6. Finally, grout the gaps between the panels or tiles using a grout float. Make sure to remove any excess grout and smooth out the surface.
By following these steps, you can achieve both a sturdy shower and a visually pleasing finish that complements your bathroom’s aesthetics.
With the shower base and walls built and secured properly, you are now one step closer to completing your shower installation project. In the next step, we will focus on installing the shower fixtures and accessories to make your shower fully functional.

Step 5: Installing The Shower Fixtures And Accessories
Now that you have successfully completed the previous steps of installing a shower from scratch, it’s time to move on to the exciting part – installing the shower fixtures and accessories. This step brings all the necessary elements together to create a fully functional and stylish shower space. In this section, we will cover attaching the showerhead, handles, and faucets, setting up the shower controls and valves, and adding supplementary features like shower shelves and grab bars.
Attaching the showerhead, handles, and faucets
To create a pleasant showering experience, the first task is to attach the showerhead, handles, and faucets. Here’s how you can do it:
- Start by placing a rubber washer onto the shower arm and screw it into the pipe that protrudes from the wall. Ensure it is tightened securely but avoid over-tightening to prevent any damage.
- Next, attach the showerhead by screwing it onto the shower arm. Again, make sure it is firmly attached but not overly tightened.
- For the handles and faucets, refer to the manufacturer’s instructions as installation methods may vary. Generally, you will need to screw them onto the wall or into the pre-drilled holes.
Setting up the shower controls and valves
After installing the showerhead, it’s time to set up the shower controls and valves. These components allow you to regulate water temperature and flow. Follow these steps:
- Locate the hot and cold water supply lines and connect them to the appropriate valves on the shower controls. Use thread seal tape to ensure a tight and leak-free connection.
- Adjust the temperature limit stop, if available, to prevent scalding. This can typically be done by rotating a small mechanism located behind the handle.
- Test the functionality of the controls and valves by turning them on and off. Verify if the water is reaching the desired temperature and if the flow meets your preferences.
Adding supplementary features like shower shelves and grab bars
To further enhance the usability and convenience of your shower, consider adding supplementary features such as shower shelves and grab bars. These additions can improve organization and safety. Here’s how you can install them:
- For shower shelves, determine the desired location and mark it on the wall. Use a level to ensure the shelves will be straight. Then, drill holes and insert anchors before attaching the shelves using screws.
- For grab bars, identify the most suitable spots for installation, keeping in mind their purpose of providing stability and support. Make sure to secure them properly by using wall anchors and screws that are designed for the specific type of wall material.
By following these steps, you will successfully install the shower fixtures and accessories, bringing your shower installation project to completion. Take your time with each component, ensuring proper connections and secure installations. With everything in place, you can now look forward to enjoying refreshing showers in your newly installed shower.
Step 6: Testing And Fine-Tuning The Shower System
Once you have successfully completed the previous steps of installing a shower from scratch, it’s time to move on to the crucial step of testing and fine-tuning the shower system. This step ensures that your newly installed shower is not only functional but also provides a satisfying and comfortable showering experience. In this step, we will cover three important aspects:
Checking for any plumbing or electrical issues
Before fully using your newly installed shower, it is essential to check for any potential plumbing or electrical issues that may affect its performance. First, inspect all the connection points to ensure there are no leaks or loose parts. Tighten any loose connections and fix any leaks promptly. Additionally, make sure that the electrical components, such as the showerhead, lights, or controls, are properly installed and functioning correctly. Checking for any plumbing or electrical issues at this stage will save you from future headaches and ensure the longevity of your shower system.
Adjusting water pressure and temperature settings
One of the most important aspects of a comfortable shower experience is getting the water pressure and temperature just right. After turning on the water supply, take note of the water pressure and temperature. If the pressure is too low or too high, you may need to adjust it using the pressure regulator valve or consult a professional plumber for assistance. To adjust the temperature, start by setting the water heater temperature at a safe level and then experiment with the shower valve adjustments until you reach your desired temperature. This step is crucial to ensure that your showers are both refreshing and enjoyable every time.
Ensuring proper drainage and functionality of all components
Proper drainage is essential for preventing water damage and maintaining the performance of your shower system. Test the drainage by running the shower and ensuring that water is flowing down the drain without any blockages or slow draining. If you notice any issues, such as water pooling or slow drainage, it may be necessary to address them by inspecting and unclogging the drain. Additionally, check the functionality of all components, including the showerhead, faucets, and controls. Make sure that each component is working properly, and if you notice any defects or malfunctions, contact the manufacturer or a professional plumber for assistance.
By incorporating these steps into the installation process and thoroughly testing and fine-tuning your shower system, you can ensure a hassle-free and enjoyable shower experience for years to come. Take the time to address any plumbing or electrical issues, adjust water pressure and temperature settings, and ensure proper drainage and functionality of all components. By doing so, you can have the peace of mind knowing that your newly installed shower is not only visually appealing but also performs flawlessly.
Step 7: Adding The Finishing Touches And Cleaning Up
After all the hard work you’ve put into installing your shower from scratch, it’s time to put the final touches and ensure everything is clean and polished. In this step, we will focus on applying grout and caulking for a polished look, cleaning the shower area thoroughly, and celebrating your successful shower installation project!
Applying grout and caulking for a polished look
One of the essential steps to achieve a professional finish is applying grout and caulking around the shower area. Grout is used to fill the gaps between tiles, creating a seamless and finished appearance. Caulking, on the other hand, is applied to areas where tiles meet the shower fixtures or seams need to be sealed.
To apply grout, follow these steps:
- Clean the tile surface to remove any debris or dust.
- Mix the grout according to the manufacturer’s instructions.
- Using a grout float, spread the grout over the tile surface at a 45-degree angle.
- Work the grout into the gaps, ensuring they are completely filled.
- Use a grout sponge to wipe away any excess grout from the tiles.
- Allow the grout to dry for the recommended time.
- Finally, polish the tiles with a clean, dry cloth to remove any remaining haze.
After grouting, it’s time to apply caulking. Follow these steps:
- Clean the areas where caulking will be applied to remove dirt and debris.
- Using a caulking gun, apply an even bead of caulk along the edges of the shower fixtures or the seams.
- Smooth the caulk with a caulk smoothing tool or your finger, ensuring it adheres well and creates a neat finish.
- Allow the caulk to dry according to the manufacturer’s instructions.
Cleaning the shower area thoroughly
Now that you’ve completed the installation and added the finishing touches, it’s crucial to clean up the shower area thoroughly before you can fully enjoy your new shower. Cleaning not only ensures hygiene but also helps maintain the quality and longevity of your shower.
Follow these steps to clean your shower:
- Start by removing any construction debris, such as dust or grout residue.
- Use a mild cleaning solution suitable for your shower’s materials.
- Scrub the tiles, fixtures, and shower floor using a soft-bristle brush or sponge.
- Rinse thoroughly with clean water to remove any soapy residue.
- Dry the shower area with a clean towel or allow it to air dry completely.
- Finally, polish the fixtures and glass surfaces with a streak-free cleaner for a sparkling finish.
Celebrating your successful shower installation project!
Congratulations on successfully installing your shower from scratch! It’s time to celebrate your hard work and enjoy your brand-new shower. Step back and take in the satisfaction of a job well done.
You can now invite friends and family over to show off your impressive DIY skills. Take pride in the hours of dedication and effort you put into creating a beautiful and functional shower.
Remember, with proper care and maintenance, your newly installed shower will provide you with years of comfort and relaxation. Enjoy!
Frequently Asked Questions
How Hard Is It To Install Your Own Shower?
Installing your own shower can be challenging. It requires basic plumbing skills, tools, and knowledge of the installation process. However, with proper research and guidance, you can successfully install a shower. Remember to follow safety guidelines and consult a professional if needed for a smoother installation experience.
Can You Diy Your Own Shower?
Yes, you can DIY your own shower. It is possible to complete the project on your own and save money. However, keep in mind that it requires proper knowledge, skills, and tools. Ensure you plan and research thoroughly before starting the project.
How Much Does It Cost To Build A Shower From Scratch?
Building a shower from scratch can cost anywhere from $500 to $5,000. The total expense depends on factors such as the size of the space, materials used for tiles, fixtures, and labor charges. Contact a professional contractor for an accurate estimate tailored to your specific requirements.
Can You Install Your Own Walk-In Shower?
Yes, you can install your own walk-in shower. Just follow the instructions carefully and ensure you have the necessary tools and skills.
Conclusion
Installing a shower from scratch doesn’t have to be a daunting task. By following the step-by-step process outlined in this blog post, you can easily bring a brand new shower into your bathroom. From preparing the space to connecting the plumbing, each stage is crucial for ensuring a seamless installation.
Remember to always prioritize safety and take your time throughout the process. With this guide, you’ll be able to enjoy a refreshing and rejuvenating shower in no time. Happy installing!