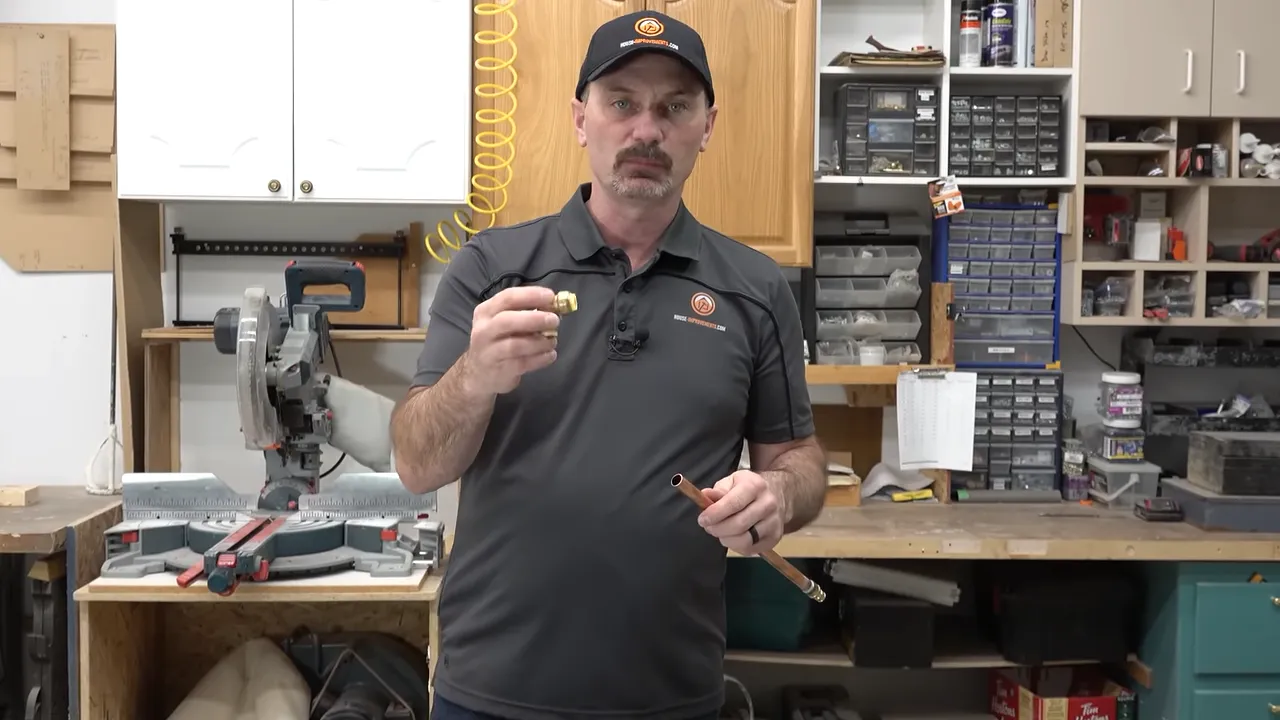
To install Pex to Copper, follow these steps: cut the Pex tubing and copper pipe, clean the ends, apply flux to the copper pipe, and solder the joints using a propane torch. Installing Pex to Copper is a straightforward process that requires a few simple steps.
Pex tubing and copper pipe are commonly used in plumbing systems, and connecting them together can be done easily with the right tools and techniques. This article will guide you through the process, ensuring a secure and leak-free connection. By following these steps, you’ll be able to confidently install Pex to Copper and enjoy the benefits of a reliable plumbing system in your home or business.
The Basics Of Pex To Copper Installation: A Step-By-Step Guide
The Basics of Pex to Copper Installation: A Step-by-Step Guide
Are you considering installing Pex to Copper in your plumbing system? This method has become increasingly popular due to its effectiveness and durability. In this step-by-step guide, we will walk you through the basics of Pex to Copper installation, ensuring a smooth and successful process.
Why Pex to Copper is an Effective Method
Before diving into the installation process, let’s first understand why Pex to Copper is such an effective method. Pex, also known as cross-linked polyethylene, is a flexible and durable tubing material that offers numerous advantages over traditional copper piping.
First and foremost, Pex is highly resistant to corrosion and scale buildup, which can be major issues with copper pipes. This ensures a longer lifespan for your plumbing system and minimizes the chances of leaks and costly repairs.
Pex is also more flexible than copper, making it easier to install in tight spaces and around corners. It requires fewer connections, reducing the potential for leaks and simplifying the overall installation process.
Additionally, Pex is an excellent insulator and helps to prevent heat loss, ultimately leading to energy savings. It also has better freeze resistance compared to copper, making it a suitable choice for colder climates.
Given these advantages, it’s no surprise that many homeowners and professionals are turning to Pex to Copper installations for their plumbing needs.
Tools and Materials You’ll Need
Before you begin the Pex to Copper installation, it’s important to gather all the necessary tools and materials. Here’s a list of what you’ll need:
- Pex tubing
- Copper fittings
- Pex crimp rings
- Pex crimp tool
- Pipe cutter
- Deburring tool
- Adjustable wrench
- Teflon tape
- Measuring tape
- Marker
- Pipe supports
- Pipe hangers
- Pipe insulation
Safety Precautions Before Getting Started
Prior to starting the installation, it’s crucial to take some safety precautions to ensure your well-being and the success of the project.
Firstly, always wear the appropriate safety gear, such as gloves and safety glasses, to protect yourself from any potential accidents or injuries.
Secondly, shut off the water supply to the area where you’ll be working. This will prevent any water flow and avoid any unwanted leaks during the installation process.
Lastly, make sure to read and follow the manufacturer’s instructions for all the tools and materials you’ll be using. This will ensure proper usage and prevent any damage or mishaps.

Step 1: Preparing The Copper Pipes
Before you can start installing Pex to copper pipes, it is crucial to properly prepare the existing copper pipes. This step ensures a secure connection and prevents any leaks or damage down the line. In this guide, we will walk you through the process of assessing the condition of existing copper pipes, cleaning and prepping them, as well as measuring and cutting them to the required length.
Assessing the Condition of Existing Copper Pipes
The first step in preparing your copper pipes for the installation of Pex is to assess their condition. This step is necessary to identify any damage or corrosion that may affect the performance of the new Pex piping. Inspect the pipes thoroughly, looking for any signs of leaks, cracks, or mineral buildup. If you notice any issues, it is important to address them before proceeding with the installation.
Cleaning and Prepping the Copper Pipes
Once you have assessed the condition of the copper pipes and made any necessary repairs, the next step is to clean and prep the pipes for the Pex installation. Start by wiping down the pipes with a clean rag or sponge to remove any dirt or debris. Then, use a pipe cleaning solution specifically designed for copper pipes to thoroughly clean their surfaces. This will ensure proper adhesion of the Pex fittings and prevent any potential leaks.
After cleaning, it is important to dry the pipes completely using a clean cloth or paper towel. Making sure the pipes are dry will allow the Pex fittings to bond securely, creating a watertight seal. Once the pipes are clean and dry, you are ready to move on to the next step.
Measuring and Cutting Copper Pipes to Length
The final step in preparing the copper pipes for Pex installation is to measure and cut them to the desired length. Begin by using a tape measure or a pipe measuring tool to accurately measure the length of pipes needed for the specific installation. Make sure to double-check your measurements to avoid any mistakes.
Using a pipe cutter or a hacksaw, carefully cut the copper pipes to the measured length. It is important to make clean, straight cuts to ensure a proper fit with the Pex fittings. After cutting, use a deburring tool to remove any burrs or rough edges from the cut ends of the pipes. This will provide a smooth surface for the Pex fittings to attach to.

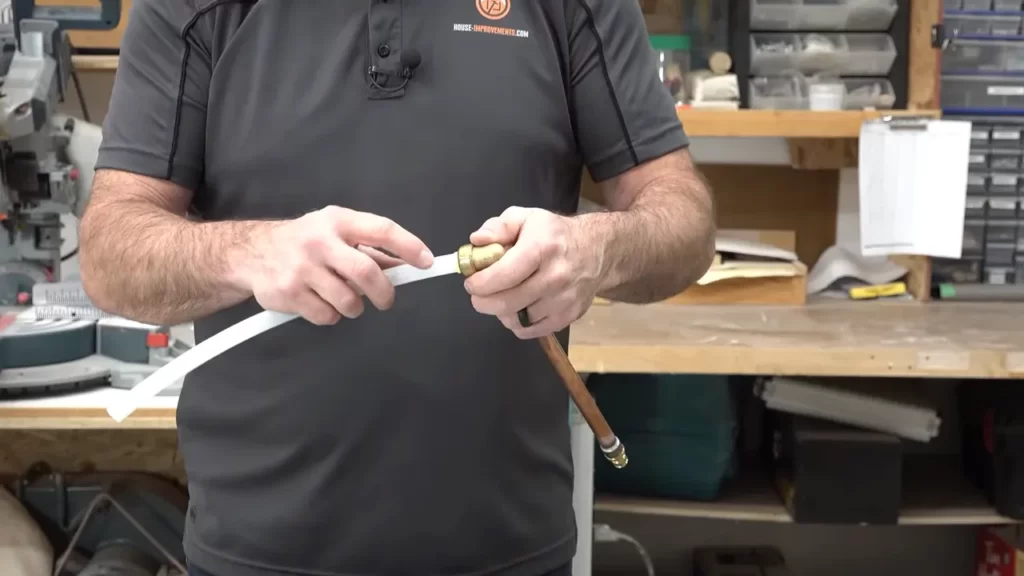
Step 2: Preparing The Pex Pipes And Fittings
<h3>Choosing the Right Pex Pipe for the Job</h3>
To ensure a successful installation, it’s crucial to choose the right Pex pipe for the job. There are different types of Pex pipes available in the market, such as Pex-A, Pex-B, and Pex-C. Each type has its own advantages and disadvantages, so it’s important to understand your specific needs before making a decision.
Pex-A pipes are known for their flexibility, making them suitable for applications where you need to bend the pipe around obstacles. Pex-B pipes are more rigid, making them ideal for straight runs or applications where you don’t need a lot of flexibility. On the other hand, Pex-C pipes are a more affordable option, but they may not be as durable as Pex-A or Pex-B pipes.
Consider factors like the temperature and pressure requirements of your project, as well as the local building codes. It’s always a good idea to consult with a professional to ensure you’re choosing the right Pex pipe for your specific needs.
<h3>Determining the Correct Size of Pex Pipe</h3>
Choosing the correct size of Pex pipe is critical to ensure efficient water flow and maximize system performance. The size of the Pex pipe you’ll need is determined by the flow rate and the pressure requirements of the fixtures you’re connecting.
To determine the correct size, you can refer to the manufacturer’s guidelines or use a sizing chart specifically designed for Pex pipes. These charts take into account factors such as the fixture type, distance from the water heater, and the desired flow rate.
It’s important to note that using an undersized Pex pipe can result in reduced water pressure, while an oversized pipe can lead to slower hot water delivery. So, take the time to accurately determine the correct size of Pex pipe you’ll need for your installation.
<h3>Prepping Pex Pipes and Fittings for Connection</h3>
Proper preparation of the Pex pipes and fittings is key to ensuring a leak-free and secure connection. Before making any connections, follow these steps to prep your Pex pipes and fittings:
1. Cut the Pex pipe:
Using a Pex pipe cutter, cut the Pex pipe to the desired length. Make sure the cut is clean and perpendicular to the pipe’s axis. Remove any burrs using a deburring tool or utility knife.
2. Mark the insertion depth:
On the end of the Pex pipe, mark the insertion depth using a permanent marker or Pex pipe gauge. This will help you ensure that the pipe is fully inserted into the fitting for a proper connection.
3. Slide the Pex fitting onto the pipe:
Take the Pex fitting and slide it onto the end of the Pex pipe. Make sure it goes all the way to the marked insertion depth.
4. Expand the Pex pipe:
If you’re using Pex-A or Pex-C pipes, use an expansion tool to expand the end of the pipe. This will allow for easy insertion of the fitting. If you’re using Pex-B pipes, skip this step.
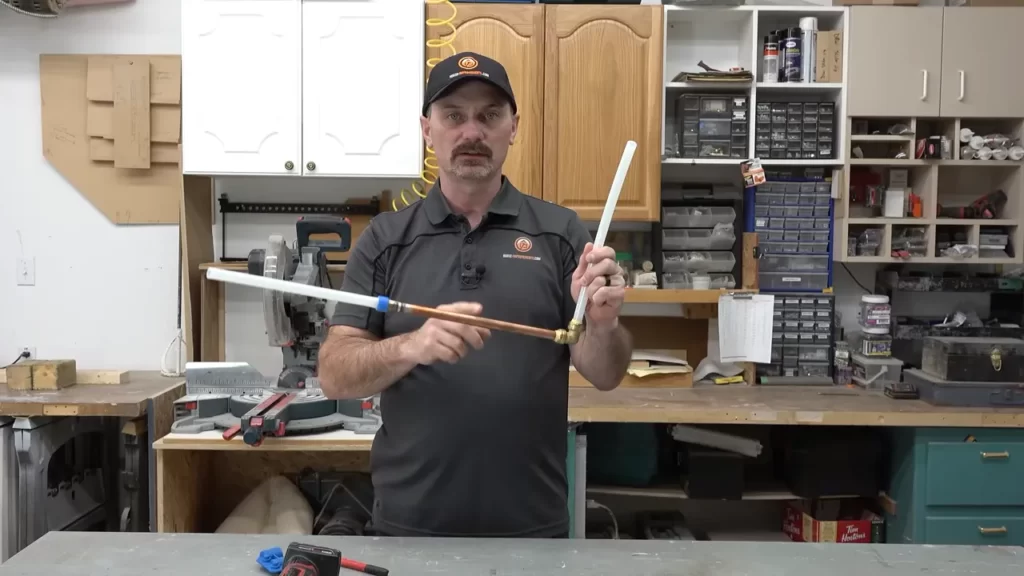
5. Insert the pipe into the fitting:
With the fitting in place, insert the expanded end of the Pex pipe into the fitting until it reaches the marked insertion depth. Make sure the pipe is fully seated in the fitting.
6. Secure the connection:
Using a crimping tool, crimp the Pex ring or clamp onto the Pex fitting to secure the connection. Make sure to follow the manufacturer’s instructions for the specific crimping tool you’re using.
Following these steps will ensure that your Pex pipes and fittings are properly prepped and ready for connection. This will help ensure a reliable and efficient Pex to copper installation.
<h3>Example Code for Connection Preparation</h3>
<code>
<p><pre>
Cut the Pex pipe using a Pex pipe cutter, removing any burrs with a deburring tool or utility knife.
Mark the insertion depth on the pipe using a permanent marker or Pex pipe gauge.
Slide the Pex fitting onto the end of the Pex pipe, ensuring it reaches the marked insertion depth.
Expand the Pex pipe if necessary, using an expansion tool for Pex-A or Pex-C pipes.
Insert the expanded end of the Pex pipe into the fitting until it reaches the marked insertion depth.
Secure the connection by crimping the Pex ring or clamp onto the fitting using a crimping tool.
</pre></p>
</code>
Step 3: Connecting Pex To Copper
Step 4: Testing And Inspecting The Installation
Once you have successfully connected the Pex to Copper system, the next crucial step is to test and inspect the installation. This ensures that everything is functioning properly and there are no leaks or issues that could potentially cause problems later on. In this step, we will cover three important aspects: conducting a pressure test to check for leaks, inspecting the connections for proper sealing, and verifying the flow and functionality of the Pex to Copper system.
Conducting a Pressure Test to Check for Leaks
One of the first things you need to do after installing Pex to Copper is to conduct a pressure test to check for any leaks. This test helps you identify any potential weak points in the connections and ensures that everything is properly sealed. To conduct the pressure test, follow these steps:
- Close all the valves that are connected to the Pex to Copper system.
- Attach a pressure gauge to one end of the system where the water supply is connected.
- Slowly open the valve to allow water pressure to build up in the system.
- Observe the pressure gauge and check for any drop in pressure, which could indicate a leak.
- If you notice a drop in pressure, carefully inspect the connections and make any necessary adjustments or repairs.
Inspecting the Connections for Proper Sealing
Another important step in testing and inspecting the Pex to Copper installation is to carefully inspect the connections for proper sealing. This step ensures that there are no loose or faulty connections that could lead to leaks or other issues. Here’s how you can inspect the connections:
- Visually check each connection for signs of water leakage.
- Verify that all fittings are securely fastened and tightened.
- If you notice any leaks or loose connections, tighten the fittings or replace them if necessary.
- Ensure that all connections are properly sealed with the appropriate Pex crimp rings or fittings.
- If needed, apply a plumbing sealant to ensure a watertight seal.
Verifying the Flow and Functionality of the Pex to Copper System
Lastly, it is crucial to verify the flow and functionality of the Pex to Copper system to ensure that it is operating correctly. This step allows you to assess whether the water is flowing smoothly without any disruptions or blockages. Here are some steps to follow:
- Open all the valves connected to the Pex to Copper system.
- Monitor the water flow from each fixture and check for any irregularities.
- If you notice any decrease in water pressure or flow, inspect the system for any obstructions or clogs.
- Ensure that hot water is flowing adequately through the system and that there are no temperature inconsistencies.
- If you encounter any issues, troubleshoot and make any necessary adjustments to restore the proper functionality of the Pex to Copper system.
By thoroughly testing and inspecting the Pex to Copper installation, you can identify and address any potential problems before they escalate. This ensures that your system operates efficiently and effectively for years to come.
Troubleshooting Tips And Common Mistakes To Avoid
When installing Pex to Copper connections, it’s important to ensure that everything is operating smoothly to prevent any potential issues in the future. In this section, we will discuss some troubleshooting tips and common mistakes to avoid when working with Pex to Copper connections.
Identifying and Resolving Leaks in Pex to Copper Connections
Leaking connections can be a major headache, but with proper troubleshooting techniques, they can be easily identified and resolved. Here are some tips to help you identify and resolve leaks:
- Inspect the connections: Start by closely examining each Pex to Copper connection for any signs of leakage. Look for water drips, dampness, or discoloration around the joints.
- Retighten the connections: If you identify any leaks, try retightening the connections. Use an adjustable wrench or pliers to gently tighten the nut on the Pex to Copper fitting. Be careful not to overtighten, as it may damage the connection.
- Apply pipe sealant: In some cases, leaks may persist even after tightening the connections. In such instances, applying pipe sealant to the threads of the fitting can help create a watertight seal. Make sure to use a sealant that is compatible with both Pex and Copper materials.
- Consider using a compression fitting: If the leaks persist despite your best efforts, you may want to consider using a compression fitting instead. Compression fittings provide a reliable and secure connection between Pex and Copper.
Addressing Potential Issues with Water Flow or Pressure
Problems with water flow or pressure can occur when installing Pex to Copper connections. Here are some tips to address these potential issues:
- Clear any blockages: If you notice a decrease in water flow or pressure, there may be a blockage in the Pex or Copper line. Inspect the pipes carefully and remove any debris or sediment that may be causing the obstruction.
- Check for kinks or bends: Sometimes, improper installation can result in kinks or bends in the Pex or Copper lines, restricting the water flow. Inspect the pipes for any abnormalities and straighten them if necessary.
- Ensure proper sizing: It’s crucial to use the right size of Pex and Copper pipes to allow for adequate water flow. Verify that the pipes you are using are compatible and appropriate for the water demand of your system.
Fixing Poorly Sealed Pex to Copper Joints
Poorly sealed joints can lead to leaks and other problems. Here are some steps to fix poorly sealed Pex to Copper joints:
- Disassemble the connection: Start by carefully disassembling the joint that is not properly sealed. Use a wrench or pliers to loosen the nut and remove the Pex from the Copper fitting.
- Clean the surfaces: Thoroughly clean the Pex and Copper surfaces that will be joined together. Any dirt, debris, or old sealant should be removed to ensure a proper seal.
- Apply fresh sealant: Apply a new layer of pipe sealant to the threads of the fitting. Use a brush or your finger to evenly distribute the sealant.
- Reassemble the connection: Once the sealant is applied, carefully reconnect the Pex to the Copper fitting. Use an adjustable wrench or pliers to tighten the nut until it is snug, but avoid overtightening.
By following these troubleshooting tips and avoiding common mistakes, you can ensure a successful installation of Pex to Copper connections. Remember to always double-check your work, and don’t hesitate to seek professional help if needed.
Additional Considerations For Pex To Copper Installation
Understanding the Benefits of Pex to Copper Conversion
Converting from Pex to Copper is a popular choice among homeowners who want to upgrade their plumbing systems. The switch offers several benefits that make it a worthwhile investment. Here are some key advantages of Pex to Copper conversion:
- Improved Durability: Copper pipes have a long-standing reputation for their durability. This material is less likely to corrode or leak, providing a reliable and long-lasting solution.
- Higher Heat Resistance: Copper pipes can withstand high temperatures, making them ideal for hot water applications. Unlike Pex, they won’t warp or degrade when exposed to heat, ensuring consistent water flow.
- Enhanced Water Quality: Copper is a natural biocide, which means it inhibits the growth of bacteria and fungi in your plumbing system. Choosing copper can help maintain cleaner and healthier water for you and your family.
- Environmentally Friendly: Copper is a recyclable material, making it an eco-friendly option. By opting for copper pipes, you can contribute to reducing waste and promoting sustainability.
Exploring Alternatives to Pex to Copper Connections
While Pex to Copper connections offer several advantages, it’s essential to consider all available options before making a final decision. Here are a few alternatives to Pex to Copper connections:
Copper to Copper Connections:
If your plumbing system already consists of copper pipes, using copper to copper connections may be the simplest and most compatible option. This method allows for a seamless transition and eliminates the need for additional materials.
Pex to Pex Connections:
If you’re looking for a more cost-effective alternative, connecting your existing Pex pipes using Pex to Pex connections can be a suitable choice. These connections are easy to install and provide a reliable joint.
Mixing Pex and Copper:
In certain situations, it may be viable to mix Pex and Copper pipes based on specific needs or budget constraints. However, it’s crucial to ensure compatibility and adhere to plumbing codes and regulations.
Hiring a Professional vs DIY Installation: Pros and Cons
When it comes to installing Pex to Copper connections, you have two options: hiring a professional or attempting a DIY installation. Each approach has its pros and cons, which should be taken into consideration. Here’s a closer look at both:
Hiring a Professional:
Pros:
- Expert Knowledge: Professionals have the necessary experience and expertise to handle complex installations, ensuring proper connections and minimizing the risk of errors or leaks.
- Time and Effort Saving: Hiring a professional allows you to focus on other tasks while they complete the installation. This option can prove particularly beneficial if you have a busy schedule.
- Peace of Mind: With a professional handling the installation, you can have peace of mind knowing that the job will be done correctly and according to industry standards.
Cons:
- Higher Cost: Hiring a professional may involve additional costs compared to a DIY installation. However, it’s important to weigh these costs against the potential risks and complications that can arise from mistakes made during a DIY project.
DIY Installation:
Pros:
- Cost Savings: Taking on the installation yourself can help save money, as you won’t have to pay for professional labor. However, it’s crucial to consider the potential risks and complications that may arise from a DIY project.
- Personal Satisfaction: Successfully completing a DIY installation can provide a sense of accomplishment and pride in your home improvement skills.
Cons:
- Risk of Mistakes: Without professional knowledge and experience, there is a higher risk of making mistakes during the installation process, such as improper connections or leaks. These errors can be costly and potentially lead to further plumbing issues down the line.
- Time and Effort: DIY installations can be time-consuming and require a significant amount of effort, especially if you’re not familiar with the process.
Ultimately, the decision between hiring a professional or going the DIY route depends on your comfort level, budget, and the complexity of the project. Assessing these factors can help you make an informed choice that ensures a successful Pex to Copper installation.
https://www.youtube.com/watch?v=VJff4gkX-3A&pp=ygUcSG93IHRvIEluc3RhbGwgUGV4IHRvIENvcHBlcg%3D%3D
Frequently Asked Questions
Can I Attach Pex To Copper?
Yes, you can attach PEX to copper. Use a PEX fitting and a copper crimp ring or stainless-steel clamp to connect the two materials. Follow manufacturer guidelines for proper installation.
What Is The Best Connection For Pex To Copper?
The best connection for PEX to copper is a PEX crimp connection. It provides a secure and leak-free joint between PEX tubing and copper fittings.
How Do You Connect Copper To Pex Using Sharkbite Fittings?
To connect copper to PEX using sharkbite fittings, follow these steps: 1. Ensure the PEX pipe is cut cleanly and straight. 2. Slide the sharkbite fitting onto the PEX pipe. 3. Push the fitting onto the copper pipe until it clicks.
That’s it! No soldering, crimping, or glue required.
Do You Lose Water Pressure Going From Copper To Pex?
No, you do not lose water pressure when switching from copper to PEX. PEX pipes have a larger interior diameter, allowing for increased water flow and maintaining pressure levels. This makes PEX an excellent alternative to copper for plumbing systems.
Conclusion
Installing PEX to copper pipes is a straightforward process that offers many benefits, including increased durability and flexibility. By following the steps outlined in this blog post, you can confidently make the switch and enjoy a more efficient and reliable plumbing system.
Remember to always adhere to safety guidelines and consult with professionals if needed. With this knowledge in hand, you can tackle any PEX to copper installation with ease and ensure your home’s plumbing system is in top-notch condition for years to come.