To install a punching bag, first, find a suitable location and install a heavy-duty wall mount securely. Then, attach the punching bag using strong chains and a swivel hook.
Choosing The Right Location For Your Punching Bag
When it comes to installing a punching bag, one of the most important factors to consider is choosing the right location. Finding the perfect spot in your home or gym can greatly enhance your training experience and ensure optimal safety. In this section, we will explore three key considerations when determining the ideal location for your punching bag.
Consider the available space in your home or gym
Before you begin the installation process, take a moment to evaluate the available space in your home or gym. You’ll want to ensure that you have enough room to comfortably maneuver around the punching bag without any obstructions. Whether you’re setting up the bag in a spare room, garage, or dedicated gym space, make sure to measure the dimensions carefully and choose a location where you can easily move around.
Find a spot with enough clearance for a full range of motion
When setting up your punching bag, it’s essential to find a spot with enough clearance for a full range of motion. Consider the height of the ceiling and the length of the bag to determine the minimum clearance needed. This will ensure that you can perform a variety of punches, kicks, and other strikes without any restrictions. Additionally, make sure there’s enough space around the bag to avoid accidentally hitting nearby walls or objects during your training sessions.
Ensure the area can support the weight and force of the bag
Another crucial aspect to consider when choosing the location for your punching bag is the structural integrity of the area. Punching bags can weigh anywhere from 50 to 100 pounds or more, and they will also receive significant force during your training sessions. It’s important to ensure that the area can support the weight and force of the bag to prevent any accidents or damage to your property.
If you’re installing the bag in your home, check the load-bearing capacity of the walls or ceiling where you plan to attach it. Consult with a professional if necessary to ensure that the chosen location is structurally sound. In a gym setting, consult with the facility manager or a professional installer to ensure that the area is suitable for the weight and force of the bag.
Note: Take into account any recommendations provided by the manufacturer regarding the installation process and weight capacity of the bag.
By considering the available space, clearance for a full range of motion, and the area’s ability to support the weight and force, you can choose a suitable location for your punching bag. Taking the time to find the right spot will enhance your training experience and provide a safe environment for your workouts.
Preparing Your Installation Tools And Materials
Before you dive into the exhilarating world of punching bag workouts, it is crucial to prepare your tools and materials for a seamless installation process. Having the right equipment at your disposal will not only make the installation easier but also ensure the safety and stability of your punching bag. Here are the essential tools and materials you need:
Gather the necessary tools
If you want your punching bag installation to be a breeze, make sure you have the following tools:
- A drill to make secure holes in the wall or ceiling
- A stud finder to locate the sturdy support beams for attaching your punching bag
- A measuring tape to ensure accurate measurements for placement
Acquire the materials needed
In addition to the tools, you will need a few materials to complete your punching bag installation:
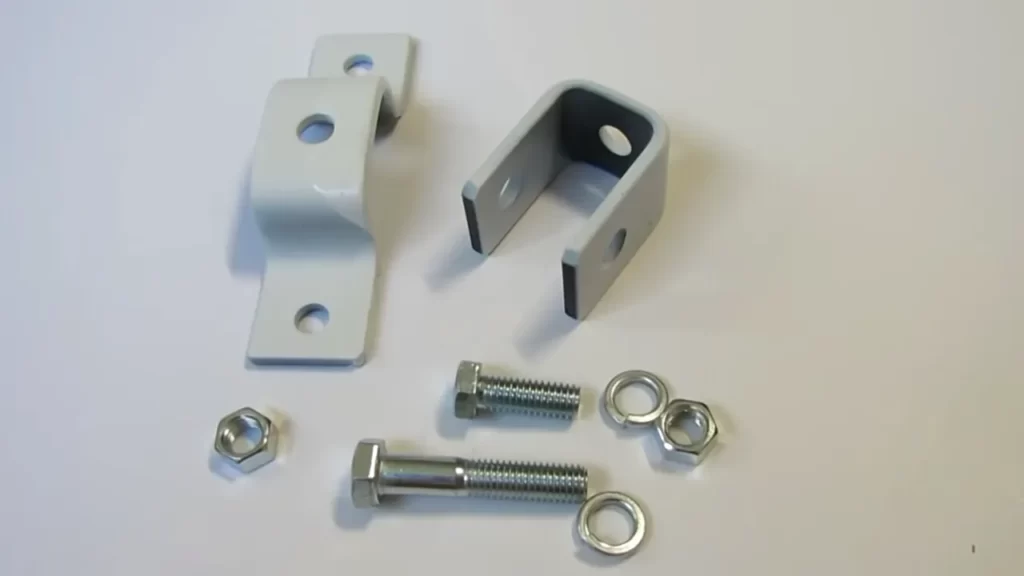
- A heavy-duty chain or mount to hang the punching bag securely
- Carabiners to connect the chain or mount to the punching bag
- Screws for securing the chain or mount to the wall or ceiling
Having the right materials ensures that your punching bag stays in place even during intense workout sessions.
Ensure you have a ladder or step stool
To reach higher areas where you need to install your punching bag, make sure to have a ladder or step stool on hand. This will help you safely access those hard-to-reach spots, avoiding any accidents or injuries.
By gathering the necessary tools and acquiring the right materials, you are setting yourself up for a successful punching bag installation. Once you have everything assembled, you’ll be ready to move on to the next steps and enjoy the benefits of a well-installed punching bag in the comfort of your own space.
Determining The Suitable Mounting Option For Your Bag
When it comes to setting up a punching bag at home, one of the most important factors to consider is the mounting option. Choosing the right mounting option not only ensures the safety and effectiveness of your training but also maximizes the use of your space. In this section, we will explore the different mounting options available, assess their advantages and limitations, and determine the specific mount type based on the bag weight and your personal preference.
Assess your space and decide between ceiling, wall, or free-standing mount
Before diving into the specific mount types, it’s essential to assess your space and determine the best location for your punching bag. Consider the dimensions of your room and the available mounting points. This will help you decide between a ceiling, wall, or free-standing mount.
Consider the advantages and limitations of each option
Now let’s discuss the advantages and limitations of each mounting option, so you can make an informed decision:
Ceiling Mount
Advantages:
- Requires minimal space, making it suitable for smaller rooms or apartments.
- Provides a stable and secure attachment for heavy bags.
Limitations:
- Requires a sturdy ceiling structure to support the weight of the bag.
- May limit the movement of the bag due to the fixed position.
Wall Mount
Advantages:
- Allows for greater bag movement compared to ceiling mounts.
- Frees up space on the floor for other activities.
Limitations:
- Requires a solid and load-bearing wall for secure installation.
- May limit bag movement if the wall mount is not adjustable or swivel-type.
Free-Standing Mount
Advantages:
- Offers flexibility as it can be moved to different locations.
- Doesn’t require drilling into walls or ceilings.
Limitations:
- Requires sufficient floor space to accommodate the base of the free-standing mount.
- May have stability issues if not properly weighted or secured.
Determine the specific mount type based on the bag weight and your personal preference
Now that you’re aware of the advantages and limitations of each mounting option, it’s crucial to determine the specific mount type based on the weight of your punching bag and your personal preference. Different bag weights may require different mounts such as a heavy-duty ceiling bracket, a sturdy wall mount, or a robust free-standing frame. Consider your training goals, the amount of space available, and any specific requirements you may have.
By assessing your space, considering the advantages and limitations of each option, and determining the specific mount type, you can confidently install your punching bag in the most suitable way for your needs. Remember to prioritize safety and ensure the stability and durability of your chosen mount. Now let’s move on to the next section to learn the step-by-step process of installing your punching bag.
Installing A Ceiling Mount For Your Punching Bag
When setting up a punching bag at home, one of the most crucial steps is installing a sturdy ceiling mount. The ceiling mount ensures proper support and stability for your punching bag, allowing you to train effectively and safely. Follow these simple steps to install a ceiling mount for your punching bag:
Locate a ceiling joist using a stud finder
To begin, you’ll need to find a strong ceiling joist to attach your ceiling mount. Using a stud finder, scan the ceiling surface until you locate a joist. Joists are typically made of wood or metal and provide the necessary support for your mount and bag. Once you’ve located a joist, mark its position on the ceiling using a pencil or a small piece of masking tape.
Mark the drilling points on the ceiling and pre-drill pilot holes
Next, mark the drilling points on the ceiling based on the specifications of your ceiling mount. Position the mount where you want it to be installed and mark the points where the screws will go. Using a measuring tape or ruler, ensure that the points are evenly spaced and aligned. Once you’ve marked the drilling points, it’s essential to pre-drill pilot holes. This step will prevent the ceiling from splitting or cracking when you insert the screws.
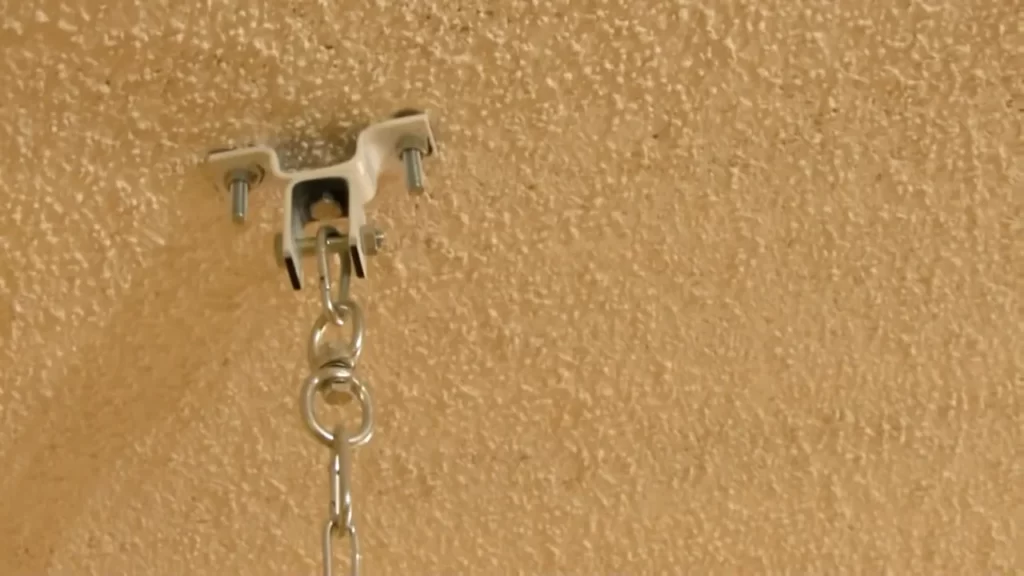
Attach the ceiling mount using screws and secure it firmly
Now that you have your pilot holes in place, it’s time to attach the ceiling mount. Place the mount over the pilot holes and align it with the markings on the ceiling. Using a screwdriver or drill, insert the screws through the holes in the mount and into the pilot holes. Make sure to tighten the screws firmly, ensuring that the mount is securely attached to the ceiling.
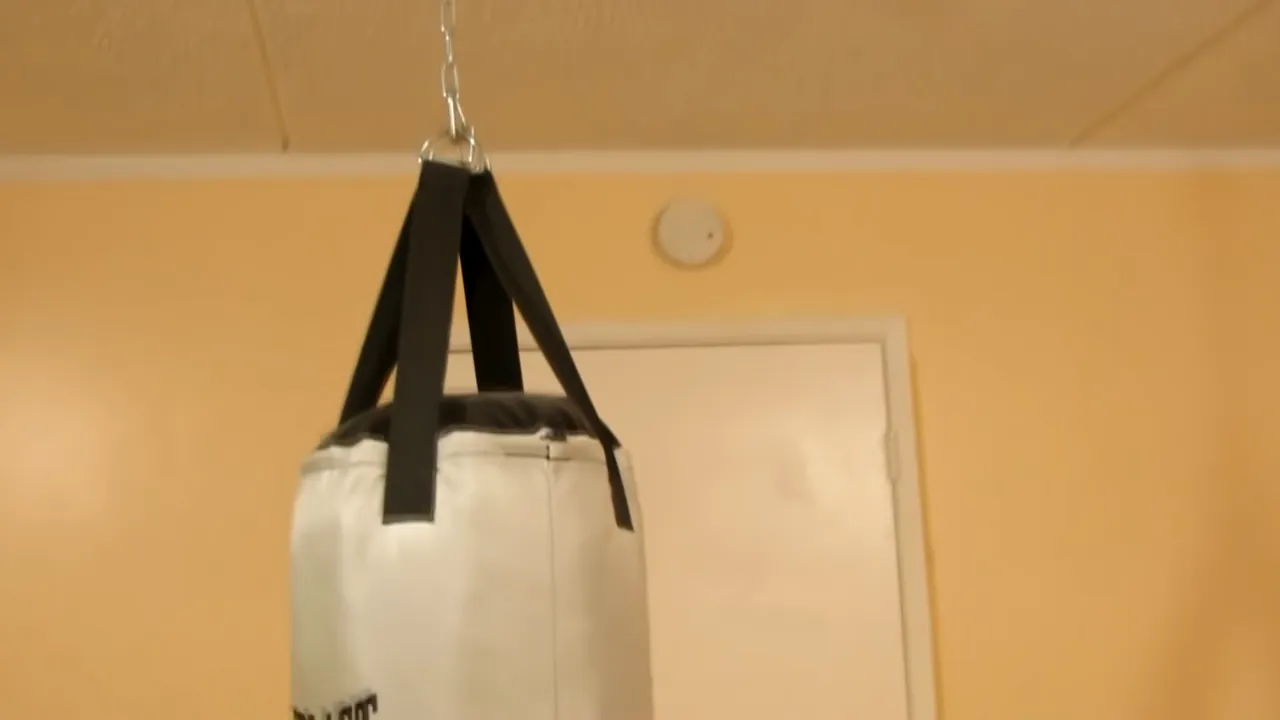
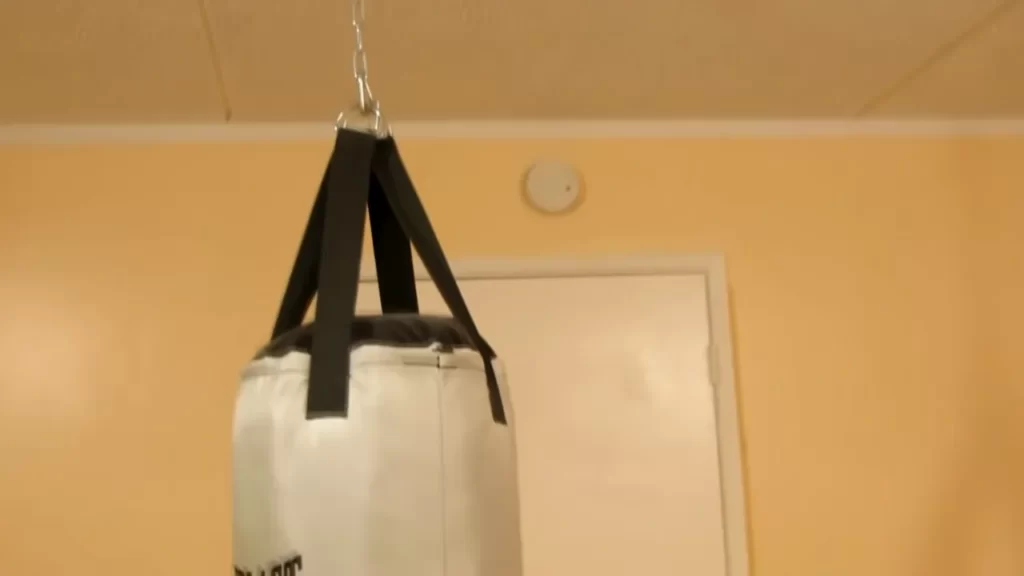
Attach the bag to the mount, ensuring it is properly aligned and sturdy
With the ceiling mount securely in place, it’s time to attach your punching bag. Make sure the bag is properly aligned with the mount to ensure a balanced and stable setup. Follow the instructions provided with your punching bag to attach it to the ceiling mount. Double-check that the bag is hanging at the desired height and that it feels sturdy when lightly pushed or pulled.
Installing a ceiling mount for your punching bag is a relatively simple process that can greatly enhance your training experience. By following these steps, you can ensure that your punching bag is securely mounted to your ceiling, allowing you to practice your strikes and improve your overall fitness and combat skills.
Setting Up A Wall Mount For Your Punching Bag
Installing a punching bag at home can be a great way to release stress and get a good workout. While freestanding punching bag stands are popular, setting up a wall mount can save space and provide a more stable and secure option. In this section, we will guide you through the process of setting up a wall mount for your punching bag, ensuring that it is properly installed and ready for action.
Locate a wall stud using a stud finder
Before you can begin installing your wall mount, you need to locate a wall stud to ensure proper support for your punching bag. A wall stud is a vertical framing member in a wall that provides structural support.
To locate a wall stud, you will need a stud finder tool. Here are the steps to follow:
- Place the stud finder against the wall and turn it on.
- Slowly move the stud finder horizontally across the wall.
- Pay attention to any beeping or flashing lights on the stud finder, indicating the presence of a wall stud.
- Mark the location of the stud using a pencil or a small piece of tape.
Measure and mark the desired height for your bag
Once you have located the wall stud, it’s time to measure and mark the desired height for your punching bag. The height will depend on your preference and the amount of space available in the room.
Here’s how to measure and mark the height:
- Stand next to the wall and extend your arm to the side.
- Make a fist with your hand and measure the distance from the floor to your clenched fist.
- Using a measuring tape, measure the same distance up from the floor and mark it on the wall with a pencil. This will be the desired height for your punching bag.
Install the wall bracket using screws and ensure it is level
With the height marked on the wall, it’s time to install the wall bracket for your punching bag. The wall bracket will provide a sturdy and secure base for your bag.
Follow these steps to install the wall bracket:
- Hold the wall bracket against the wall, aligning it with the height mark you made earlier.
- Using a drill, screw the wall bracket into the wall stud. Make sure to use screws that are suitable for the type of wall you have (e.g., concrete, drywall, etc.).
- Use a level to ensure that the wall bracket is perfectly straight and level.
Attach the bag to the bracket securely, making sure it hangs at the desired height
Now that the wall bracket is securely installed, it’s time to attach your punching bag to the bracket. This final step will ensure that your bag is properly hung at the desired height and ready for your next boxing session.
Follow these steps to attach the bag to the bracket:
- Securely hang the bag from the wall bracket using the provided chains or straps.
- Adjust the length of the chains or straps to ensure that the bag hangs at the desired height.
- Ensure that the bag is securely attached to the bracket and does not swing or move excessively.
With your wall mount installed and your punching bag securely attached, you are now ready to unleash your inner Rocky Balboa and enjoy some intense boxing workouts in the comfort of your home. Remember to always warm up before using the punching bag and practice proper punching technique to avoid injuries.
Assembling A Free-Standing Punching Bag Stand
Setting up a free-standing punching bag stand can provide you with a convenient and effective way to practice your boxing or martial arts skills at home. However, it’s important to follow the manufacturer’s instructions carefully to ensure a safe and secure installation. In this guide, we will walk you through the process of assembling a free-standing punching bag stand, from connecting the components to attaching the bag.
Follow the manufacturer’s instructions for assembling the stand
Before you start assembling the stand, always take the time to carefully read and understand the manufacturer’s instructions. These instructions will provide you with specific details about the assembly process, including the order in which the components should be connected and any tools that may be required. Following the manufacturer’s instructions ensures that you assemble the stand correctly and reduce the risk of accidents or damage to the equipment.
Ensure all components are securely connected
Once you have familiarized yourself with the instructions, it’s time to assemble the stand. Begin by identifying the different components and connecting them according to the guidelines provided. Use the appropriate bolts, screws, or fasteners to securely attach each part, ensuring that there is no wobbling or instability. Pay close attention to the connections between the base, uprights, and crossbars, as these are especially critical for stability. Double-check that all screws and bolts are tightened properly, using a wrench or screwdriver if necessary to ensure a snug fit.
If the stand includes adjustable features, such as height adjustments or angle settings, follow the instructions to set them up according to your preference. These adjustments can help personalize your training experience and allow you to practice different techniques more effectively.
Attach the bag to the stand, making sure it is balanced and stable
Now that your punching bag stand is assembled, it’s time to attach the bag. Carefully position the bag on the stand, ensuring that it is balanced and stable. This is crucial to prevent any tipping or toppling during your workout. Check that the bag hangs at a comfortable height, approximately at chin level when standing in your boxing stance. Use the provided straps, chains, or hooks to securely attach the bag to the stand, following the instructions provided by the manufacturer. Confirm that the attachments are strong and properly fastened, giving the bag a gentle shake to ensure it does not come loose.
Once everything is securely connected and the bag is in place, step back and take a moment to confirm that the entire set-up appears balanced and stable. Make any necessary adjustments to the height or angle to optimize your training experience. Remember to periodically inspect the stand and attachments for any signs of wear or loosening, tightening them as needed to maintain safety and performance over time.
Hanging Your Punching Bag Properly
Hanging your punching bag properly is crucial to ensure both your safety and the longevity of the equipment. Improper installation may result in accidents or damage to the bag and its mounting system. In this section, we will guide you through three important steps to help you hang your punching bag correctly: adjusting the height of the bag, ensuring even hanging, and testing stability.
Adjust the height of the bag to your preference
When installing your punching bag, it is essential to adjust the height to suit your preference and training needs. Consider the following factors:
- Choose an appropriate area where you have enough space to move around the bag comfortably.
- Stand in your basic fighting stance and measure the distance from the floor to your desired striking area on the bag.
- Use a measuring tape to determine the required length from the ceiling to achieve your desired height. This measurement will depend on factors such as your height and the type of strikes you plan to practice.
Once you have determined the ideal height, you can proceed to hang your punching bag at the desired location from the ceiling.
Ensure the bag hangs evenly and does not swing excessively
Properly distributing the weight of the bag and preventing excessive swinging are essential for a safe and effective punching bag installation. Here are steps to ensure even hanging:
- Attach a sturdy ceiling mount or a secure beam hook to the ceiling. Make sure it can hold the weight of your punching bag.
- Attach the chains or straps provided with the bag to the ceiling mount or hook.
- Check if the bag hangs parallel to the floor. If it does not, adjust the chains or straps until it hangs evenly.
- Ensure that the bag is centered and aligned properly with the mounting point to avoid any imbalance.
Checking the evenness of the hanging bag will prevent unnecessary stress on the mount and ensure a safer training environment.
Test the stability and adjust as needed to prevent any potential accidents
Before you start training, it is crucial to verify the stability of your punching bag installation and make any necessary adjustments. Follow these steps to test the stability:
- Put on your gloves and deliver light strikes to the bag while monitoring its movement.
- Observe if the bag swings excessively or if there are any signs of instability, such as the mount shifting or coming loose.
- If you notice any issues, stop using the bag immediately and make necessary adjustments to the installation. This may involve reinforcing the mount, tightening bolts, or readjusting the hanging straps or chains.
- Once you have addressed any stability concerns, you can resume your training with confidence.
Regularly inspect your punching bag’s installation for any signs of wear, damage, or instability. By ensuring its proper hanging, you can train safely and focus on improving your skills.
Testing And Adjusting Bag Height And Stability
Once you have successfully mounted your punching bag, it’s time to test and adjust its height and stability. This step is crucial to ensure you have an optimal setup that allows for effective training and reduces the risk of injury. In this section, we will guide you through the process of testing and adjusting your punching bag’s height and stability, so let’s get started!
Try a few test strikes to ensure the bag is at the desired height and doesn’t hit any obstacles
Now that your punching bag is securely in place, it’s time to see if the height is suitable for your needs. Stand in your preferred fighting stance and throw a few test strikes at the bag. Pay close attention to whether the bag is at the desired height and if it hits any obstacles, such as the ceiling or nearby furniture. Remember, the bag should be positioned at a height that allows you to throw punches and kicks comfortably without any restrictions or obstructions.
If you find that the bag is too low or too high, you will need to make adjustments. Lower the bag’s height by adjusting the length of the chain or straps that connect it to the mount or stand. Conversely, raise the bag’s height by lengthening the chain or straps. Take your time and make small adjustments until you achieve the ideal height.
Evaluate the bag’s stability and adjust the mount or stand if necessary
Once you have determined the right height for your punching bag, it’s important to evaluate its stability. Stand back and observe how the bag moves when you strike it. If you notice excessive swinging or wobbling, it indicates that the bag is not stable enough. This instability can impact the effectiveness of your training and compromise your safety.
To improve the bag’s stability, you may need to adjust the mount or stand. Check if all the bolts and screws are tightly fastened. If they are loose, tighten them using the appropriate tools. Additionally, ensure that the mount or stand itself is securely anchored to the wall or the floor. If necessary, reinforce the mounting brackets or add additional support to prevent any unwanted movement during your training sessions.
Fine-tune the height and stability until you achieve the ideal setup
Once you have made the initial adjustments to the height and stability of your punching bag, it’s time to fine-tune them until you achieve the ideal setup. Continuously test the bag by striking it with different intensity and techniques to see if it remains stable and at the desired height. If you notice any issues, don’t hesitate to make further adjustments, whether it’s tweaking the chain length, tightening the mount, or adding extra support.
Remember, the goal is to have a punching bag setup that allows for a comfortable and effective training experience. Keep testing and adjusting until you are satisfied with the bag’s height and stability. By taking the time to properly set up your punching bag, you’ll be able to enjoy a safe and productive workout every time!
Maintaining And Caring For Your Punching Bag
Once you have successfully installed your punching bag, it is important to understand how to properly maintain and care for it. Regular maintenance not only ensures the longevity of your punching bag but also ensures a safe and effective workout experience. In this section, we will discuss some essential steps to keep your punching bag in top-notch condition.
Regularly clean and wipe down the bag to remove sweat and dirt
One of the most crucial aspects of maintaining a punching bag is to regularly clean and wipe it down. Sweat and dirt can accumulate on the surface of the bag, creating an unhygienic environment and potentially damaging the bag. To keep your bag clean, follow these simple steps:
- Start by removing any accessories such as gloves or hand wraps from the bag.
- Using a mild soap or cleaning solution, dampen a cloth or sponge.
- Gently wipe down the entire surface of the bag, paying extra attention to heavily used areas.
- Once you have cleaned the bag, wipe it dry with a clean cloth or towel.
- Allow the punching bag to air dry completely before reattaching any accessories or using it again.
Inspect the mount or stand for any signs of wear or damage
Regularly inspecting the mount or stand of your punching bag is essential to ensure its stability and safety during workouts. Here’s how you can perform a basic inspection:
- Visually examine the mount or stand for any visible signs of wear or damage, such as cracks or loose screws.
- Tightly tighten any loose screws or bolts using a wrench or a screwdriver if necessary.
- If you notice any significant damage that cannot be repaired, it may be time to replace the mount or stand.
Check the bag’s straps, chains, or mounts for any wear and tear, and replace if needed
The straps, chains, or mounts that secure your punching bag can experience wear and tear over time due to the constant impact. It is important to regularly check these components for any signs of damage and replace them if needed. Follow these steps to ensure the safety and integrity of your bag:
- Inspect the straps, chains, or mounts for fraying, tears, or other visible signs of damage.
- If you notice any issues, replace the damaged component with a suitable replacement.
- Ensure that all connections are secure and tightened properly.
By following these maintenance practices, you can extend the lifespan of your punching bag and enjoy a safe and satisfying workout experience. Regular cleaning, inspecting the mount or stand, and checking the straps, chains, or mounts are simple yet effective ways to ensure the longevity and performance of your punching bag.
Frequently Asked Questions
Is It Safe To Hang A Punching Bag From The Ceiling?
Yes, it is safe to hang a punching bag from the ceiling as long as the ceiling is sturdy and can support the weight. Use proper mounting hardware and seek professional advice if needed to ensure safety.
How Do You Hang A Punching Bag?
To hang a punching bag, find a sturdy support beam or hook in your ceiling. Attach a heavy-duty mount or chain to the bag and secure it to the support. Make sure the mounting hardware is strong enough to hold the weight of the bag and avoid damaging your ceiling.
How Do You Attach A Boxing Bag To The Wall?
To attach a boxing bag to the wall, follow these steps: 1. Locate a suitable spot on the wall, ensuring it can support the bag’s weight. 2. Mark the spots for the wall brackets, using a measuring tape and level.
3. Drill the screws or anchors into the wall at the marked spots. 4. Attach the wall brackets to the screws or anchors. 5. Hang the boxing bag on the wall brackets securely.
How Do You Install A Freestanding Punching Bag?
To install a freestanding punching bag, start by assembling the base according to the manufacturer’s instructions. Then attach the bag to the base using the provided straps. Position the bag on a flat and stable surface. Finally, adjust the height and tightness of the straps to ensure proper stability.
Conclusion
Installing a punching bag doesn’t have to be a daunting task. By following the step-by-step instructions outlined in this blog post, you can easily set up your own punching bag at home. From choosing the right location to safely securing the equipment, these guidelines provide the necessary information for a successful installation.
So, don’t wait any longer—start enjoying your boxing workouts with a professionally installed punching bag.