To install a rain shower, first, find the ideal location on the bathroom wall, then mark and drill holes.
Factors To Consider When Selecting A Rain Shower Head
A rain shower head can transform your everyday shower into a luxurious spa-like experience. However, with so many options available in the market, it can be overwhelming to choose the perfect rain shower head for your bathroom. To help you make an informed decision, here are some crucial factors to consider when selecting a rain shower head:
Water Pressure and Flow Rate
One of the essential factors to consider when choosing a rain shower head is the water pressure and flow rate. The perfect rain shower head should provide a consistent flow of water at the right pressure. If the water pressure in your bathroom is low, it’s important to select a rain shower head specifically designed to work efficiently with low water pressure systems.
Similarly, if you have a high water pressure system, ensure that the rain shower head you choose can handle the water flow without causing any issues. Consider checking the product specifications or consulting with a professional plumber to determine the compatibility of the rain shower head with your water pressure and flow rate.
Size and Shape
The size and shape of the rain shower head can significantly impact your shower experience. Before making a purchase, measure the available space in your shower area to determine the appropriate size of the rain shower head. Keep in mind that larger shower heads typically provide a more immersive rain-like experience, while smaller ones may be better suited for bathrooms with limited space.
In addition to size, consider the shape of the rain shower head. Options range from square and rectangular to round and oval. The shape you choose should complement the overall design and aesthetics of your bathroom. Think about the existing fixtures and fittings to ensure a cohesive and visually appealing look.
Material and Finish
The material and finish of the rain shower head not only contribute to its durability but also affect its appearance. Common materials used for rain shower heads include stainless steel, brass, and plastic.
Stainless steel rain shower heads are highly durable and resistant to corrosion, making them ideal for long-lasting performance. Brass rain shower heads offer a classic and elegant look while being highly durable. Plastic rain shower heads, on the other hand, are more affordable and lightweight, but may not be as durable as their metal counterparts.
When it comes to the finish, options range from chrome and brushed nickel to oil-rubbed bronze and matte black. Consider the overall style of your bathroom and select a finish that complements the existing fixtures and fittings for a seamless look.
Essential Tools For Rain Shower Installation
Proper installation of a rain shower requires the use of specific tools to ensure a smooth and successful process. Whether you are a DIY enthusiast or a professional plumber, having the right tools at your disposal is crucial. In this section, we will discuss the essential tools you need to install a rain shower. These tools will make the installation easier, safer, and more efficient, allowing you to enjoy the luxurious experience of a calming rain shower.
Adjustable Wrench
An adjustable wrench is undoubtedly one of the most important tools for rain shower installation. This versatile tool allows you to secure and loosen various plumbing fittings, ensuring a tight and leak-free connection. With an adjustable wrench, you can tighten nuts and bolts, making it an essential tool for connecting the showerhead and other components to the water supply lines. Make sure to choose an adjustable wrench that can fit the different sizes of fittings commonly used in shower installations.
Teflon Tape
Teflon tape, also known as plumber’s tape, plays a vital role in preventing leaks in your rain shower installation. This thin, white tape is applied to the threads of pipe fittings to create a watertight seal. It helps to prevent water from leaking out, ensuring that your rain shower functions properly. Applying Teflon tape is simple – just wrap it around the threads of the pipe fittings in a clockwise direction. Be sure to apply a sufficient amount of tape to create a tight seal.
Pliers
Pliers are versatile tools that come in handy during rain shower installation. These tools allow you to grip, twist, and remove different types of nuts, bolts, and fasteners. Pliers provide you with the necessary grip and leverage to tighten or loosen fittings when connecting the various components of your rain shower system. Consider using channel-lock pliers or adjustable pump pliers, as they offer a wide range of adjustment options to fit different sizes of fittings.
Screwdriver
A screwdriver is a must-have tool for rain shower installation, particularly when working with screws and fasteners. It comes in various types, such as flathead and Phillips-head screwdrivers, depending on the type of screws being used. Screwdrivers allow you to tighten or loosen screws during the installation process, ensuring that all the components are securely attached. Invest in a high-quality screwdriver set that includes different sizes and types to suit your specific needs.
By having these essential tools ready, you can install your rain shower with confidence, knowing that you have everything you need for a successful installation. Remember to always follow the manufacturer’s instructions and take necessary safety precautions while working. With the right tools and a little effort, you’ll soon be enjoying the luxurious and refreshing experience of a rain shower in the comfort of your own bathroom.
Materials Required For Rain Shower Installation
Installing a rain shower can greatly enhance your showering experience. To ensure a successful installation, it is important to gather the necessary materials. In this section, we will discuss the key materials required for rain shower installation.
Rain Shower Head
The rain shower head is the centerpiece of your rain shower setup. It is important to choose a high-quality rain shower head that is compatible with your existing plumbing system. Look for a rain shower head that offers a wide spray pattern for a soothing and luxurious shower experience.
Shower Arm and Flange
The shower arm and flange are essential components that connect the rain shower head to the plumbing system. The shower arm extends from the wall and holds the rain shower head in place, while the flange provides a finished look by covering the hole in the wall where the shower arm is mounted.
Pipe Sealant
Pipe sealant, also known as plumber’s tape or Teflon tape, is used to create a watertight seal when connecting the shower arm to the plumbing system. Apply a few wraps of pipe sealant tape to the threaded end of the shower arm before screwing it into the wall pipe to prevent leaks.
Plumbers Tape
In addition to pipe sealant, plumbers tape is another essential material for rain shower installation. Wrap a few layers of plumbers tape around the threaded ends of the pipes to ensure a tight seal and prevent any water leakage.
Silicone Caulk
Silicone caulk is used to seal the gaps between the shower arm and the wall pipe, as well as the flange and the wall. This prevents water from seeping into the wall and causing damage. Apply a bead of silicone caulk around these areas and smooth it with your finger for a clean and seamless finish.
Step 1: Prepare The Shower Area
Remove the Existing Shower Head
Before you begin installing your rain shower, you’ll need to remove the existing shower head. This is a crucial first step to prepare the shower area.
To remove the existing shower head, follow these easy steps:
- Locate the connection between the shower head and the shower arm.
- Using an adjustable wrench, grip the shower arm firmly while unscrewing the shower head in a counterclockwise direction.
- Continue unscrewing until the shower head is completely detached from the shower arm.
- Once the shower head is removed, set it aside for later use or dispose of it responsibly.
Clean the Shower Arm
With the existing shower head removed, it’s essential to clean the shower arm to ensure a smooth installation of your rain shower. Here’s how you can effectively clean the shower arm:
- Inspect the shower arm for any debris or mineral buildup.
- If you notice any debris or mineral buildup, use a soft cloth or sponge to gently scrub it away.
- For stubborn residue, you can use a mild cleaning solution or vinegar to dissolve it. Make sure to rinse the shower arm thoroughly afterwards.
- Once the shower arm is clean and free from any obstruction, dry it completely with a clean cloth. This will ensure a secure and leak-free connection with your new rain shower.
Step 2: Apply Pipe Sealant And Plumbers Tape
In the second step of installing a rain shower, it is crucial to apply pipe sealant and plumbers tape to ensure a tight and secure connection. This step is vital for preventing any leaks or water damage in the future. Let’s explore each of these tasks in detail:
Wrap the Threads of the Shower Arm with Plumbers Tape
To begin, take the plumbers tape and start wrapping it around the threads of the shower arm. Make sure to wrap it in a clockwise direction, ensuring a tight and even coverage. The purpose of the plumbers tape is to create a watertight seal and prevent any leakage.
Apply Pipe Sealant to Ensure a Tight Seal
In addition to using plumbers tape, it is essential to apply pipe sealant to further secure the connection. Pipe sealant, also known as thread sealant or pipe dope, is a type of adhesive that helps create a tight seal between threaded pipe joints. It fills in any gaps or irregularities, ensuring a leak-free connection.
Before applying the pipe sealant, make sure the threads of both the shower arm and the rain shower head are clean and dry. Then, using a brush or your finger, apply a thin coat of pipe sealant to the threads of the shower arm. Be sure to spread it evenly and cover the entire threaded area.
Once the pipe sealant is applied, carefully screw the rain shower head onto the shower arm. Make sure not to cross-thread it, as this can lead to leaks. Use a wrench or adjustable pliers to tighten it securely, taking care not to overtighten.
By following these steps and applying both plumbers tape and pipe sealant, you can ensure a tight and secure connection between your rain shower head and the shower arm. This will help prevent any unwanted leaks and ensure a pleasant and enjoyable showering experience. So, let’s move on to the next step and complete the installation of your rain shower!
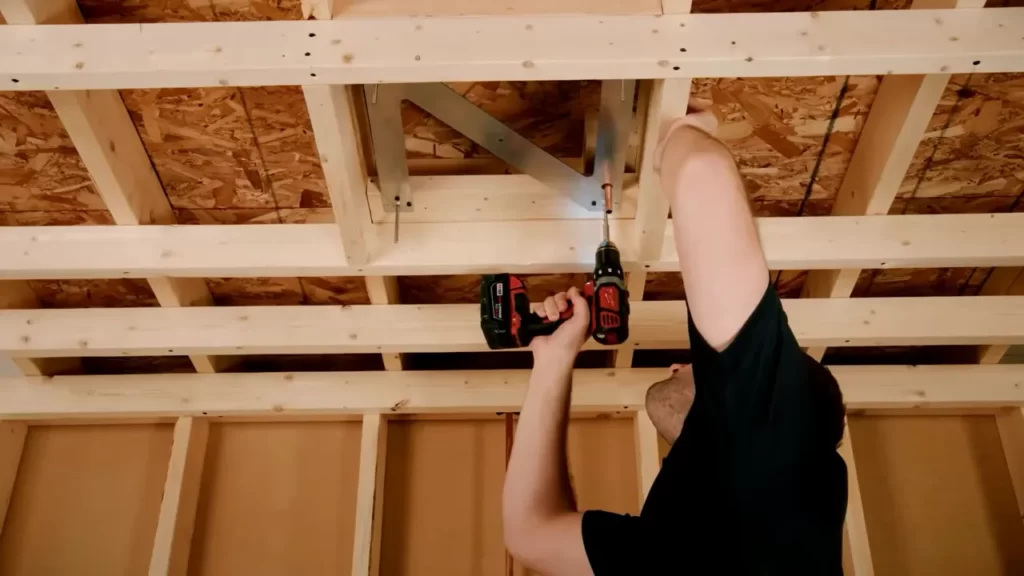
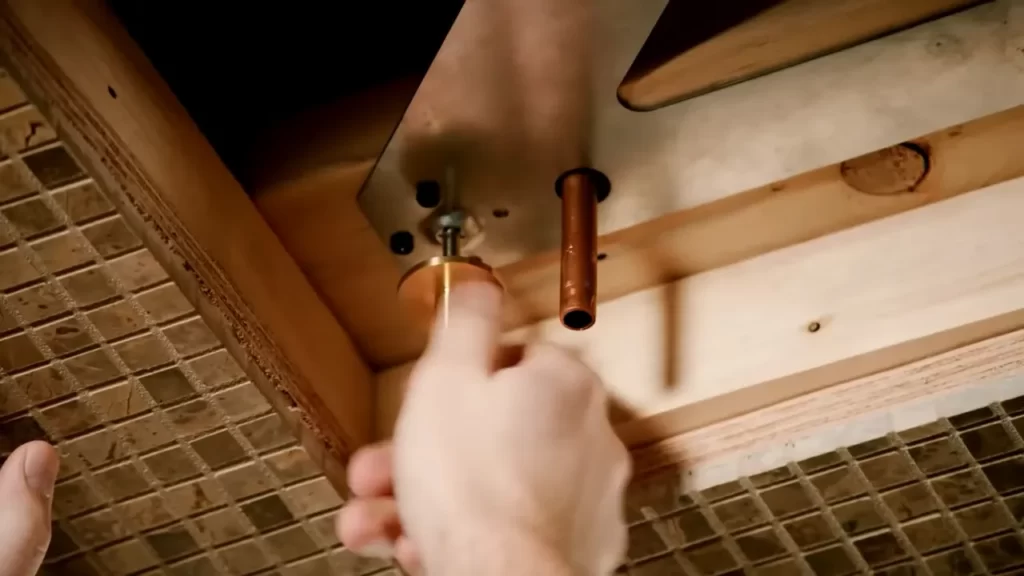
Step 3: Mount The Shower Arm And Flange
Once you have successfully prepared the wall and installed the shower valve, it’s time to move on to mounting the shower arm and flange. This step is crucial as it ensures that the rain shower head is securely attached and able to deliver a luxurious showering experience. Take a look at our easy-to-follow guide below to learn how to mount the shower arm and flange with confidence.
Attach the Flange to the Shower Arm
To start, attach the flange to the shower arm before inserting it into the wall pipe. The flange serves as a decorative cover to hide any rough edges or gaps between the wall and pipe. Here’s how you can complete this step smoothly:
- First, apply a thin layer of plumber’s tape to the threaded end of the shower arm. Plumber’s tape helps to create a watertight seal and prevent any potential leaks.
- Next, carefully screw the flange onto the shower arm until it’s snugly fitted. Ensure that the flange is aligned properly and facing in the right direction to maintain a visually appealing look.
- Once the flange is securely attached, use a wrench to tighten it just enough to prevent any movement. Be cautious not to overtighten, as it may damage the shower arm or flange.
Remember, the flange should be positioned in a way that complements the design of your shower area. Take a moment to step back and assess the aesthetics of the flange installation before proceeding to the next step.
Insert the Shower Arm into the Wall Pipe
With the flange attached, it’s time to insert the shower arm into the wall pipe. This crucial step ensures a stable connection between the shower arm and the plumbing system. Follow these steps to successfully insert the shower arm:
- Apply a small amount of plumber’s tape to the threads on the end of the shower arm. This tape acts as a barrier and enhances the seal to avoid any potential water leaks.
- Slowly and carefully insert the shower arm into the wall pipe. Ensure that you feel some resistance, indicating a secure fit.
- Continue twisting the shower arm clockwise until it is fully inserted. Tighten it securely enough to avoid any wobbling or movement, but be cautious not to overtighten.
- Take a moment to verify that the shower arm is level with the wall and aligned properly. Adjust as necessary to ensure a seamless connection.
By following these steps, you can confidently mount the shower arm and flange, creating a secure foundation for your rain shower head. With the installation complete, you’re one step closer to experiencing the ultimate showering indulgence. Stay tuned for the next step in our series, where we will guide you through the installation of the rain shower head itself.
Step 4: Install The Rain Shower Head
Now that you’ve successfully attached the shower arm to the wall and connected the plumbing, it’s time to complete the installation by attaching the rain shower head. This final step will bring the luxurious rain shower experience to your bathroom.
Attach the Rain Shower Head to the Shower Arm
To begin, take your rain shower head and place it onto the end of the shower arm. Make sure that the threads on the shower arm and the rain shower head match up properly. This will ensure a snug and secure fit.
Next, hold the rain shower head firmly in one hand while using your other hand to tighten the connection. Start by turning the rain shower head clockwise onto the shower arm. Keep turning until you feel resistance.
Hand-tighten the Connection
Using just your hand, continue to tighten the rain shower head onto the shower arm. It’s important not to over tighten, as this can damage the connection or cause leaks. Once the rain shower head feels secure and no longer turns easily, it’s tight enough.
If you find that the rain shower head doesn’t fit properly onto the shower arm, you may need to use a wrench for a stronger grip. However, be cautious not to overtighten and risk damaging the shower head or the plumbing.
Once the rain shower head is securely attached, turn on the water supply to test for any leaks. If you notice any dripping or water escaping from the connection, carefully tighten the connection a bit more until the leak stops.
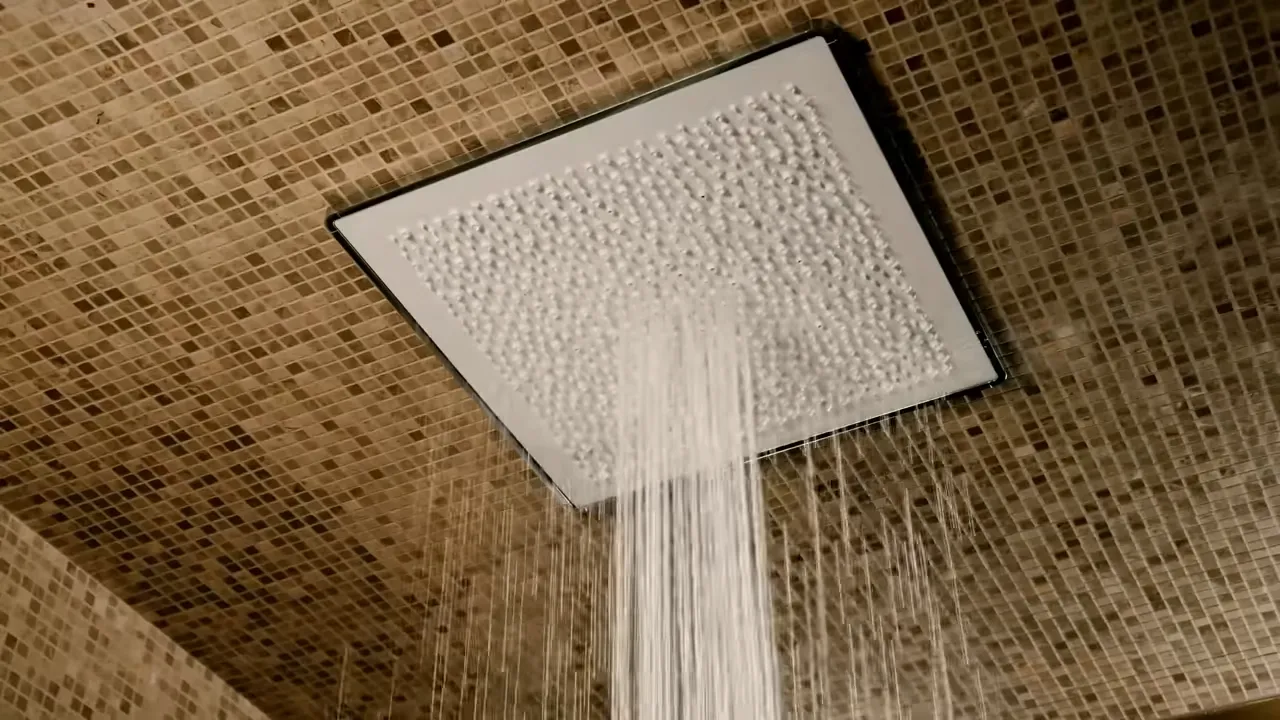
Now, you’re ready to enjoy the soothing and invigorating experience of a rain shower. Step into your shower and let the water cascade down from above, enveloping you in a refreshing and rejuvenating downpour.
Congratulations! You’ve successfully installed your rain shower head, bringing a touch of luxury to your daily shower routine.
Step 5: Adjust The Angle Of The Rain Shower Head
Once you have successfully installed your rain shower head, it’s time to adjust the angle to ensure a perfect shower experience. This step is crucial as it determines the direction and coverage of the water flow. Follow these instructions to easily adjust the angle of your rain shower head:
Position the Rain Shower Head to the Desired Angle
The first step in adjusting the angle is positioning the shower head to the desired angle. Determine the direction in which you want the water to flow, whether you prefer a straight line or an angled position for a wider coverage. Once you have decided, carefully hold the shower head and shift it in the desired direction.
Tighten the Swivel Joint to Secure the Position
After positioning the rain shower head to your preferred angle, it’s essential to tighten the swivel joint to secure the position. The swivel joint is responsible for holding the shower head in place and preventing any accidental movements during your shower. To do this, use your hand to firmly hold the joint and rotate it clockwise until you feel resistance. Ensure that the joint is tight enough to eliminate any chances of slippage during usage.
By adjusting the angle of your rain shower head and securing it in place, you can enjoy a personalized shower experience tailored to your preferences. Whether you prefer a focused stream or a wide coverage, taking the time to properly adjust the angle will ensure a satisfying shower each time.
Step 6: Test For Leaks And Adjustments
Once you have successfully installed your rain showerhead, the final step is to test for any potential leaks or adjustments that may be needed. This step is crucial to ensure the proper functioning of your new shower system. Here’s what you need to do:
Turn on the Water Supply
Before you can test for leaks, you’ll need to turn on the water supply to your shower. This can usually be done by turning the handle or lever on your shower valve. Be sure to turn it on gently to avoid any sudden surges of water that could cause problems. Once the water is flowing, you can proceed to the next step.
Check for Leaks and Proper Flow
With the water running, carefully inspect the connections between the showerhead and the shower arm for any signs of leaks. Look for any water drips or drops and ensure that everything is tightly sealed. If you notice any leaks, you may need to tighten the connections with a wrench or add some plumbers tape to create a secure seal.
Next, evaluate the flow of water from the rain showerhead. Stand directly under the showerhead and assess the water pressure and coverage. It should provide a steady stream of water that evenly covers your body. If you notice any issues with the flow, such as low pressure or uneven distribution, you may need to make some adjustments.
Make Necessary Adjustments
To adjust the flow or pressure of the rain showerhead, check the manufacturer’s instructions for any specific guidelines. Often, there will be a flow restrictor or a pressure valve that can be removed or adjusted. This can allow more water to flow through the showerhead and improve the overall experience. Be careful not to make any drastic changes that could damage your plumbing system. If you’re unsure, consult a professional plumber for guidance.
Additionally, you may want to consider the height and angle of the rain showerhead. Ensure that it is positioned at a comfortable height for optimal use. You can adjust the angle by loosening the swivel joint and repositioning it to your desired angle. This will ensure that the water falls directly onto your body, providing a relaxing and invigorating shower experience.
In conclusion, by following these steps and testing for leaks and making necessary adjustments, you can ensure that your rain showerhead installation is a success. Taking the time to carefully inspect and fine-tune your new shower system will result in a luxurious and satisfying shower experience every time. So go ahead, turn on the water and enjoy the rejuvenating sensation of rain falling from above.
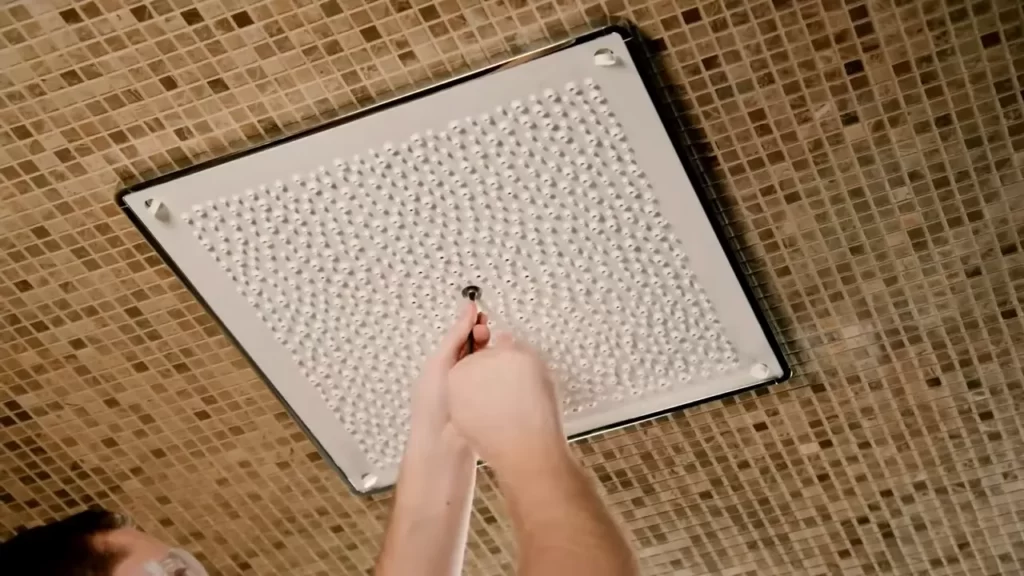
Step 7: Apply Silicone Caulk For A Finished Look
Now that you have successfully installed your rain shower, it’s time to give it that polished, professional finish. Applying silicone caulk is an essential step in ensuring that your rain shower is properly sealed and protected against water damage. This step not only adds aesthetic appeal but also prevents any water from leaking behind the shower flange.
Apply Silicone Caulk Around the Flange
To begin, you’ll need a tube of high-quality waterproof silicone caulk and a caulk gun. Start by cutting the tip of the caulk tube at a 45-degree angle to create an opening. Then, load the cartridge into the caulk gun and squeeze a small amount of caulk onto a scrap piece of cardboard to prime the gun.
Next, carefully apply a thin, even bead of caulk around the shower flange, ensuring a continuous seal. Make sure to follow the manufacturer’s instructions on the caulk tube for the best results. It’s crucial to apply the caulk evenly and without any gaps to ensure a watertight seal.
Smooth and Wipe Off Any Excess Caulk
Once you’ve applied the caulk, use a caulk smoothing tool or your finger to smooth the caulk and create a neat finish. Start at one end of the bead and run your smoothing tool along the caulk in one continuous motion, applying slight pressure. This step helps to remove any air bubbles and ensures a clean, professional-looking seal.
After smoothing the caulk, use a damp cloth or sponge to wipe off any excess caulk from the shower surface. Be careful not to disturb the caulk line while cleaning. This final step will give your rain shower that flawless, finished appearance.
Allow the caulk to cure according to the manufacturer’s instructions before using your rain shower. This will typically take around 24 hours. Once cured, your rain shower is ready to provide you with a luxurious and refreshing shower experience every time.
Regular Cleaning And Descaling
Regular cleaning and descaling are essential to keep your rain shower performing at its best. Over time, mineral deposits can build up on the showerhead, affecting water flow and reducing its effectiveness. Fortunately, removing these deposits and maintaining a clean showerhead is a relatively simple process that will help ensure a refreshing and invigorating shower experience every time.
Removing Mineral Deposits
Mineral deposits can accumulate on your rain shower due to the minerals present in your water supply. These deposits can cause clogs and reduce the water pressure, affecting the shower’s performance. To remove the mineral deposits:
- Start by unscrewing the rain showerhead from the arm. Use an adjustable wrench if necessary.
- Inspect the showerhead for any visible mineral deposits or debris.
- Gently scrub the showerhead with a soft brush or toothbrush to remove the mineral deposits. Be careful not to scratch or damage the surface.
- Rinse the showerhead thoroughly with warm water to remove any remaining debris.
Using Vinegar or Descaling Solutions
If the mineral deposits are stubborn and difficult to remove, you can use vinegar or a descaling solution to help break them down:
- Fill a plastic bag or container with equal parts white vinegar and water. Alternatively, you can use a commercial descaling solution following the manufacturer’s instructions.
- Place the showerhead in the bag or container, ensuring that it is fully submerged in the vinegar or descaling solution.
- Leave the showerhead to soak for at least 30 minutes or overnight for better results.
- After soaking, remove the showerhead from the vinegar or descaling solution and scrub it gently with a brush to dislodge any remaining deposits.
- Rinse the showerhead thoroughly with warm water to remove any traces of vinegar or descaling solution.
Regularly cleaning and descaling your rain shower will not only improve its performance but also extend its lifespan. By following these simple steps, you can ensure that your rain shower continues to provide you with a luxurious and invigorating shower experience.
Checking For Leaks And Plumbing Issues
When installing a rain shower, it is essential to thoroughly check for any leaks or plumbing issues to ensure a smooth and hassle-free experience. By taking the time to inspect connections and seals and addressing leaks promptly, you can prevent potential problems and maintain the efficiency of your rain shower system.
Inspecting Connections and Seals
One of the crucial steps in checking for leaks and plumbing issues is inspecting the connections and seals of your rain shower. Properly installed and secured connections are vital to prevent any water leakage. Make sure that all the joints are tightly sealed and there are no visible cracks or gaps in the pipes or fittings. Additionally, check the rubber washers or O-rings as these components play a significant role in preventing leaks.
If you notice any loose connections or damaged seals during the inspection, it is essential to address them immediately. Tighten any loose connections with a wrench, ensuring they are secure. If there are damaged seals or washers, make sure to replace them with new ones to guarantee a proper seal and prevent any potential leaks.
Addressing Leaks Promptly
Leakage can cause significant damage if left unnoticed or unaddressed. Therefore, it is crucial to address any leaks promptly. A small drip or a minor leakage may seem inconsequential, but it can potentially lead to mold growth, water damage, or even structural issues over time.
To identify leaks, carefully examine the joints, connections, and pipes. Look for any signs of water pooling, dampness, or discoloration. If you notice any leaks, determine the source and take immediate action to fix the problem. This could involve tightening loose connections, replacing damaged seals or washers, or even seeking professional plumbing assistance if necessary.
Remember, even a well-installed rain shower system can experience leaks or plumbing issues over time due to regular wear and tear. Therefore, it is essential to conduct periodic checks and inspections to identify and address any potential leaks or plumbing problems promptly.
By inspecting connections and seals and addressing leaks promptly, you can ensure the optimal functioning of your rain shower and enjoy a refreshing and luxurious shower experience without any worries.
Troubleshooting Common Rain Shower Problems
Installing a rain shower can enhance your showering experience and give your bathroom a luxurious feel. However, like any other plumbing fixture, rain showers can sometimes encounter issues. In this section, we will discuss some common rain shower problems and how to troubleshoot them. By following these steps, you can ensure that your rain shower performs optimally and provides you with a relaxing and refreshing shower every time.
Low Water Pressure
One of the most common issues that people face with rain showers is low water pressure. If you notice that the water flow from your rain showerhead is weak, there are a few possible causes. Here are some troubleshooting steps to resolve the low water pressure problem:
- Check the water pressure in your entire household. If the low water pressure is affecting multiple faucets and showerheads, the issue might be with the main water supply. You may want to contact a professional plumber to assess and fix the problem.
- Inspect the rain showerhead for any clogs. Over time, mineral deposits and debris can accumulate inside the showerhead and restrict the water flow. Remove the showerhead and soak it in a solution of vinegar and water to dissolve any deposits. Rinse it thoroughly before reattaching it to the shower arm.
- Ensure that the water valves leading to the rain shower are fully open. Sometimes, the valves may not be turned on completely, leading to low water pressure.
- If you have a water flow regulator installed in your rain shower, try removing it. These regulators are designed to reduce water consumption, but they can also limit the water pressure. By removing the regulator, you may be able to increase the water pressure.
Uneven Water Distribution
Another problem that can occur with rain showers is uneven water distribution. If you notice that the water flow is concentrated in certain areas and weaker in others, here are some troubleshooting steps to address the issue:
- Check the showerhead for any blockages. Use a toothbrush or a small brush to remove any mineral deposits or debris that may be obstructing the water spray. Pay extra attention to the nozzles and ensure that they are clear of any build-up.
- Inspect the shower arm and ensure that it is straight and properly aligned. If the shower arm is bent or misaligned, it can affect the water distribution. Use pliers or an adjustable wrench to tighten any loose connections and straighten the arm if necessary.
- Consider installing a rain showerhead with adjustable nozzles. This will allow you to customize the water distribution according to your preferences and avoid any uneven flow.
By following these troubleshooting steps, you can resolve common rain shower problems and enjoy a reliable and satisfying shower experience. Remember to regularly clean and maintain your rain shower to prevent any future issues. With proper care, your rain shower will continue to provide you with a spa-like showering experience for years to come.
Frequently Asked Questions
Can You Install A Rain Shower?
Yes, you can install a rain shower in your bathroom. It provides a refreshing experience and mimics the feeling of standing in the rain. Installing a rain shower is a great way to enhance your bathing routine and add a touch of luxury to your space.
How Much Does It Cost To Put In A Rain Shower?
The cost of installing a rain shower varies depending on the specific model and additional plumbing requirements. Generally, you can expect to spend between $200 and $500 for the rain showerhead, plus the cost of installation by a professional plumber.
What Do I Need To Install A Rain Shower Head?
To install a rain shower head, you’ll need a few items. First, make sure you have enough space in your shower for the larger head. Next, check if your water pressure is suitable for a rain shower. You’ll also need a shower arm extension to securely attach the rain shower head.
Finally, gather the necessary tools, including an adjustable wrench and plumber’s tape, to complete the installation.
Can You Install A Rain Shower Head On A Regular Shower?
Yes, you can easily install a rain shower head on a regular shower.
Conclusion
Installing a rain shower is a simple and effective way to elevate your daily showering experience. With the right tools and steps outlined in this blog post, anyone can successfully install a rain shower in their bathroom. By following the instructions and considering the important factors such as water pressure and positioning, you can enjoy the soothing sensation of raindrops cascading down from above.
Get started with your rain shower installation today and transform your bathroom into a luxurious oasis.