To install a pebble shower floor, first, prepare the surface by removing any existing flooring and ensuring it is clean and level. Then, spread a layer of thin-set mortar over the shower pan and press the pebble tiles into the mortar, ensuring an even and consistent coverage.
Understanding The Importance Of Pebble Selection
Understanding the Importance of Pebble Selection
When it comes to installing a pebble shower floor, one of the most crucial aspects is selecting the right pebbles for the job. The pebbles not only enhance the aesthetic appeal of the shower floor but also provide comfort and safety. Considering the wide variety of options available in terms of size, shape, and color, it is essential to understand the importance of pebble selection before making a decision. This article will delve into the factors that need to be considered, the various size and shape options, as well as the color variations available.
Factors to Consider
Before diving into the specific elements of pebble selection, there are a few factors to keep in mind. First and foremost, the durability of the pebbles is vital. Since the shower floor is subjected to constant water exposure and foot traffic, it is crucial to choose pebbles that can withstand these conditions. Additionally, the texture of the pebbles plays a role in providing a comfortable and slip-resistant surface. Pebbles with a rough texture are ideal in this regard. Lastly, the ease of maintenance should be considered, as you want pebbles that are easy to clean and maintain their appearance over time.
Size and Shape Options
When it comes to pebble shower floors, there is a wide range of size and shape options to choose from. The size of the pebbles can range from small to large, and each size has its own unique appearance and functionality. Smaller pebbles, typically around 1/2 inch, create a smoother and more even surface, making them comfortable to walk on. On the other hand, larger pebbles, around 3/4 inch or bigger, provide a more natural and textured look.
Moreover, the shape of the pebbles also influences the overall effect of the shower floor. Pebbles can come in a variety of shapes, such as round, flat, or a combination of both. Round pebbles offer a more traditional and softer feel, while flat pebbles provide a modern and sleek look. Choosing the right size and shape requires considering the desired aesthetic and comfort level.
Color Variations
Color plays a significant role in the overall appearance and feel of a pebble shower floor. From earthy tones to vibrant shades, there are numerous color variations to choose from. Earthy tones like brown, grey, and beige offer a natural and calming ambiance, blending seamlessly with various bathroom styles. Vibrant colors like blue, green, or even multicolored pebbles add a unique and eye-catching touch, making the shower floor a focal point in the bathroom.
When selecting the color of the pebbles, consider the overall color scheme of the bathroom and how you want the shower floor to contribute to the overall design. It is important to choose a color that complements the existing elements while providing the desired visual impact.
In conclusion, understanding the importance of pebble selection is essential for a successful installation of a pebble shower floor. Considering factors such as durability, texture, and maintenance, as well as exploring the size, shape, and color options available, will help you make an informed decision. By carefully selecting the pebbles, you can create a visually appealing, comfortable, and safe shower floor that enhances the overall aesthetics of your bathroom space.
Preparing The Shower Floor For Installation
Before installing a pebble shower floor, it is crucial to properly prepare the surface to ensure a sturdy and long-lasting installation. This involves inspecting the existing floor, repairing any damage, and cleaning and leveling the surface. By taking these steps, you can create a solid foundation for your pebble shower floor, allowing it to look beautiful and perform well for years to come.
Inspecting the Existing Floor
Begin by closely examining the current shower floor to identify any issues that need to be addressed. Look out for cracks, loose tiles, or any signs of water damage. These problems should be resolved before the pebble floor is installed to avoid further issues down the line.
Repairing Any Damage
If you notice any cracks or loose tiles during the inspection, it is crucial to repair them properly. Use a suitable filler or adhesive to fix cracks and replace any damaged tiles. It’s essential to allow sufficient time for the repairs to fully dry before proceeding to the next step.
Cleaning and Leveling the Surface
Now that the repairs are complete, it’s time to thoroughly clean the shower floor. Remove any dirt, grime, or soap residue using a mild cleaner suitable for the surface material. This will ensure that the pebbles adhere properly and create a seamless appearance.
After cleaning, check the surface for any uneven areas or dips. These imperfections can prevent the pebbles from laying flat or cause poor drainage. If you identify any inconsistencies, use a leveling compound to even out the surface. Follow the manufacturer’s instructions while applying the compound and allow sufficient time for it to dry completely.
Additionally, pay attention to the drain area. Ensure that it is clean and free of any debris that could obstruct proper water flow. A properly leveled shower floor with a clean and functional drain will provide a solid base for your pebble installation.
By inspecting the existing floor, repairing any damage, and cleaning and leveling the surface, you have successfully prepared your shower floor for the installation of a pebble shower floor. This diligent preparation is essential for ensuring a successful and durable installation that will transform your shower into a luxurious oasis.
Gathering The Necessary Tools And Materials
Installing a pebble shower floor can be a rewarding DIY project that adds a touch of natural beauty to your bathroom. Before you start the installation process, it’s important to gather all the necessary tools and materials. This will not only ensure a smooth installation process but also help prevent unnecessary delays and frustration. In this section, we’ll provide you with a comprehensive list of tools and materials you’ll need, as well as some safety precautions to keep in mind.
List of Tools
Before you begin the installation, it’s essential to have the right tools on hand. Here’s a list of tools you’ll need:
| Tool | Description |
| Measuring tape | To measure and mark the area for installation |
| Utility knife | To cut the pebble sheets and trim the edges |
| Trowel | To apply thinset adhesive |
| Grout float | To apply and smooth the grout |
| Grout sponge | To remove excess grout and clean the surface |
| Bucket | To mix the thinset adhesive and grout |
| Notched trowel | To create even ridges in the thinset adhesive |
| Protective goggles | To protect your eyes from debris |
| Gloves | To protect your hands |
| Dust mask | To protect your respiratory system from dust |
Materials Needed
In addition to the tools, you’ll also need the following materials:
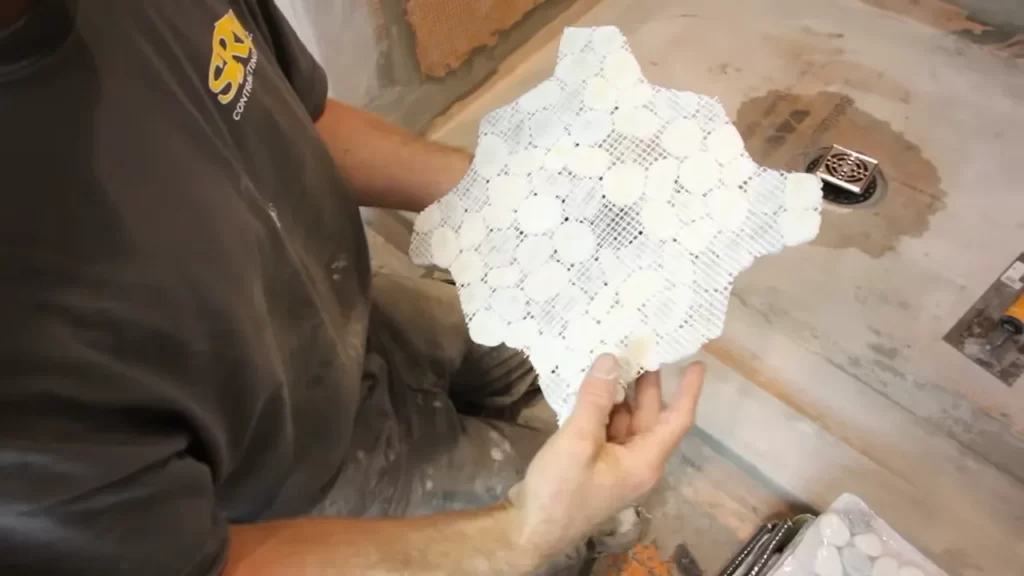
- Pebble sheets
- Thinset adhesive
- Grout
- Waterproofing membrane
- Notched trowel
- Sealer
Safety Precautions
Prior to starting your installation, it’s crucial to take certain safety precautions to protect yourself:
- Wear protective goggles to shield your eyes from any flying debris
- Use gloves to safeguard your hands from cuts or irritation caused by the materials
- Put on a dust mask to prevent inhalation of any dust particles
By following these safety precautions, you can minimize any potential risks and ensure a safe and successful pebble shower floor installation.
Applying The Mortar Base
Mixing the Mortar
To start applying the mortar base for your pebble shower floor, you first need to mix the mortar. Follow these steps:
- Prepare your workspace by covering it with a plastic sheet or drop cloth to protect the floor.
- Gather the necessary materials, including the mortar mix, a bucket, a mixing paddle, and water.
- Pour the dry mortar mix into the bucket, ensuring that it is free of any lumps.
- Add water to the mixture gradually, while continuously mixing it with the paddle.
- Continue adding water and mixing until you achieve a thick, paste-like consistency.
- Make sure there are no dry pockets of mortar left in the mixture.
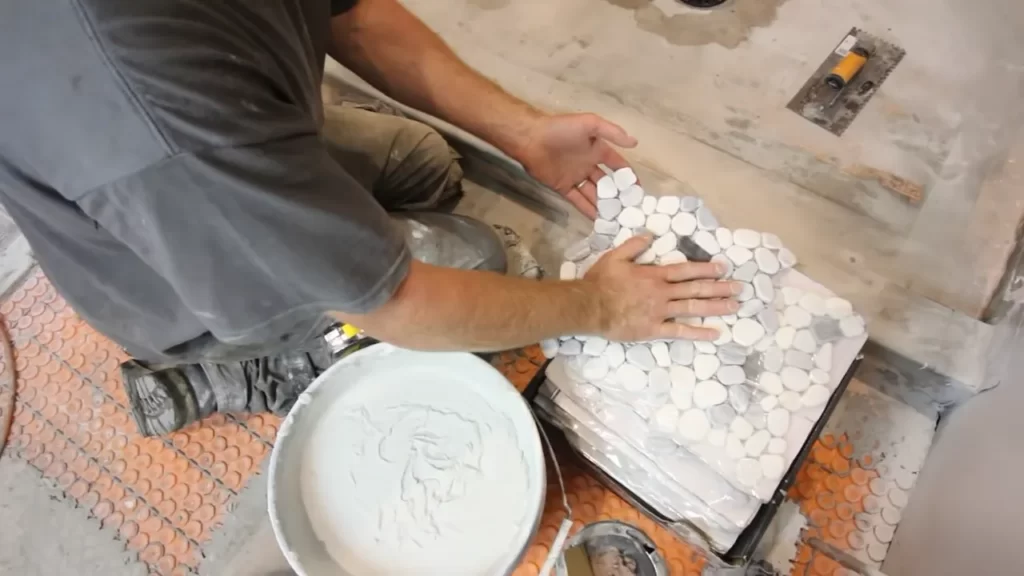
Applying the First Layer
Once the mortar is properly mixed, it’s time to apply the first layer onto the shower floor. Follow these steps for a seamless installation:
- Start by using a notched trowel to spread the mortar onto the shower floor.
- Work in small sections to ensure that the mortar doesn’t dry out before you can place the pebbles.
- Hold the trowel at a 45-degree angle and apply consistent pressure to achieve an even layer of mortar.
- Spread the mortar evenly, taking care to keep the layer thickness as uniform as possible.
- Be mindful of the drain area, ensuring that the mortar is evenly applied around it.
Smoothing and Leveling the Mortar
After applying the first layer of mortar, it’s important to smooth and level it to create a solid base. Follow these steps:
- Using a straight-edged trowel, begin smoothing the mortar by gently pressing it against the shower floor.
- Move the trowel in a back-and-forth motion to create an even surface.
- Pay special attention to sloping the mortar towards the drain area to ensure proper water drainage.
- Check the levelness of the mortar using a bubble level or a straight edge, making any necessary adjustments.
- Allow the mortar to cure for the recommended time, typically 24 to 48 hours, before proceeding with the pebble installation.
Remember, applying the mortar base correctly is crucial for the success of your pebble shower floor installation. By following these steps, you’ll lay down a solid foundation for the pebbles and ensure a long-lasting, beautiful finish.
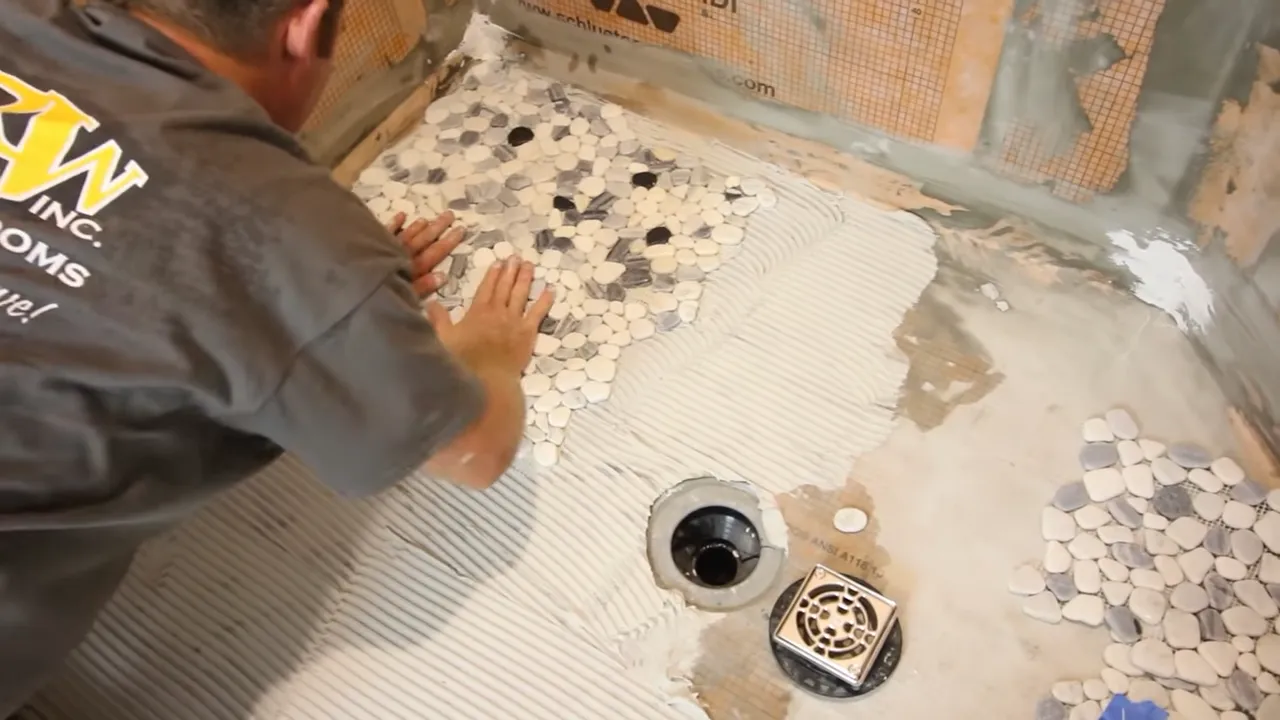
Placing The Pebbles
Creating an Accent Pattern
Once you have prepared the shower floor and laid the pebble tile underlayment, it’s time to start placing the pebbles. One way to create an eye-catching design is by incorporating an accent pattern. This will not only add visual interest but also allow you to highlight specific areas of the shower floor. Here’s how you can go about it:
- Begin by determining the desired location for your accent pattern. It can be placed in the center, along the edges, or in any other position you prefer.
- Next, carefully select the pebbles that you want to use as part of the accent pattern. These pebbles can be of a different color or shape compared to the rest of the tiles, creating a striking contrast.
- Once you have your chosen pebbles ready, lay them out in the desired pattern on a separate surface, such as a table or the shower floor itself. This will help you visualize how the pattern will look before permanently installing it.
- After finalizing the layout, transfer the pebbles onto the shower floor. Make sure to press them firmly into the thinset adhesive, ensuring they are securely placed.
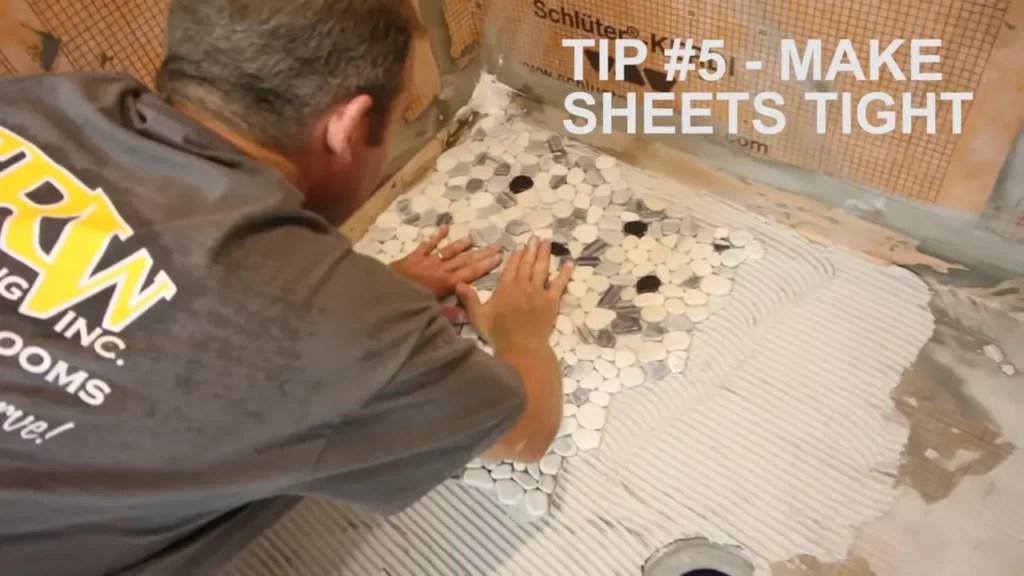
Spacing the Pebbles
Spacing the pebbles properly is crucial to achieve a visually appealing and durable shower floor. Here’s a step-by-step guide on how to ensure the pebbles are spaced evenly:
- Start by placing the first row of pebbles along one edge of the shower floor. It’s best to begin at the lowest point or closest to the drain.
- Leave a small gap between each pebble, approximately 1/8 to 1/4 inch, to allow for the grout later on. This gap will prevent the pebbles from rubbing against each other, minimizing the risk of cracking.
- Continue placing the pebbles row by row, using spacers if necessary to maintain consistent spacing. A tile spacer can be helpful to ensure even gaps between the pebbles.
- Be mindful of the overall pattern and alignment of the pebbles as you work your way across the shower floor. Regularly step back and check for any inconsistencies or areas that require adjustment.
Filling in the Gaps
Once all the pebbles are placed, it’s time to fill in the gaps between them with grout. This step will not only enhance the aesthetic appeal of the pebble shower floor but also provide stability and durability. Follow these steps to achieve a professional finish:
- Mix the grout according to the manufacturer’s instructions. It should have a consistency similar to peanut butter.
- Using a grout float, spread the grout over the pebbles, making sure to push it into the gaps.
- Hold the float at a 45-degree angle and work the grout into the crevices using a sweeping motion. Try to fill the gaps completely without leaving any air pockets.
- Once the grout is applied, wipe off the excess using a wet sponge or cloth. Rinse the sponge or cloth frequently to ensure a clean finish.
- Allow the grout to dry for the recommended time specified by the manufacturer.
By following these steps, you can install a pebble shower floor with precision and achieve a stunning result. Remember to take your time, double-check your pattern and spacing, and invest in quality materials for a long-lasting and visually captivating shower floor.
Sealing And Finishing Touches
Once you have successfully installed your pebble shower floor, it’s time to move on to the essential steps of sealing and adding those finishing touches. Sealing your pebble shower floor is crucial as it helps protect the surface from water damage, stains, and mold growth. Additionally, proper sealing also enhances the overall appearance of your shower floor, making it more visually appealing. In this section, we will guide you through the process of applying sealer, cleaning any excess sealer, and conducting final inspections and touch-ups.
Applying Sealer
Applying sealer to your pebble shower floor is a vital step in the installation process. It helps prevent the formation of water stains, as well as protects the pebbles from discoloration caused by continuous exposure to moisture. Here’s a step-by-step guide on how to properly apply sealer to your pebble shower floor:
- Start by thoroughly cleaning the shower floor to remove any dirt or debris.
- Allow the floor to completely dry before applying the sealer.
- Apply a thin, even coat of sealer to the pebble surface using a paint roller or brush.
- Make sure to cover all the pebbles and the grout lines between them.
- Allow the sealer to penetrate the pebbles for the recommended time mentioned on the sealer packaging.
- After the recommended time, wipe off any excess sealer with a clean cloth or sponge.
- Let the sealer cure for the specified amount of time before using the shower.
Cleaning Any Excess Sealer
During the process of applying sealer, it’s common to have some excess sealer on the surface of the pebbles or in the grout lines. Failure to clean off this excess sealer can result in an uneven finish and make your shower floor appear dull. Follow these steps to clean any excess sealer effectively:
- With a dry cloth or sponge, gently wipe away any excess sealer from the pebble surface.
- Be careful not to press too hard as you could remove sealer from the grout lines.
- If there is excess sealer on the grout lines, use a soft brush or toothbrush to remove it gently.
- Continue cleaning until the surface appears smooth and even.
Final Inspections and Touch-Ups
The final step in sealing and finishing your pebble shower floor involves conducting thorough inspections and making any necessary touch-ups to achieve a flawless result. Here’s what you need to do:
- Inspect the entire shower floor carefully to identify any missed spots or areas where the sealer is not evenly applied.
- If you find any such areas, reapply sealer using a small paintbrush or roller.
- Allow the touch-up areas to cure for the recommended time before using the shower.
- Once the sealer is completely cured, perform a final inspection to ensure the surface is evenly protected and visually appealing.
Regular Cleaning Routine
Cleaning and maintaining a pebble shower floor is essential to keep it looking clean, hygienic, and beautiful. Following a regular cleaning routine is the key to ensuring your pebble shower floor maintains its pristine condition for years to come. In this section, we will discuss the recommended cleaning products, techniques to avoid, and tips for preventing mildew and mold growth.
Recommended Cleaning Products
To effectively clean your pebble shower floor, it’s important to use the right cleaning products. Here are some recommended products:
- A mild liquid soap or a pH-neutral cleaner: These are gentle on the pebble surface and won’t cause any damage.
- A soft-bristle brush or non-abrasive sponge: These will help scrub away dirt without scratching the pebbles.
- Vinegar or lemon juice: These natural ingredients can be used to remove stains and mineral deposits.
- A squeegee or microfiber cloth: These are great for wiping down the shower floor and preventing water spots.
Remember to always test any new cleaning product on a small, inconspicuous area of your pebble shower floor before using it extensively.
Techniques to Avoid
While cleaning your pebble shower floor, there are certain techniques you should avoid to prevent any damage:
- Avoid using abrasive cleaners or harsh chemicals: These can scratch or etch the pebble surface, compromising its appearance.
- Do not use wire brushes or abrasive sponges: These can cause scratches and damage the pebbles.
- Avoid excessive scrubbing: Gentle scrubbing is sufficient to remove dirt and stains without causing any harm.
By avoiding these techniques, you can maintain the longevity and beauty of your pebble shower floor.
Preventing Mildew and Mold Growth
Mildew and mold growth can be a common problem in wet areas like showers. Here are some tips to prevent their growth on your pebble shower floor:
- After each use, thoroughly rinse the pebble shower floor to remove any soap scum or residue that can contribute to mold and mildew growth.
- Ensure proper ventilation in your bathroom to keep excessive moisture at bay.
- Consider using a squeegee or a towel to dry the shower floor after each use.
- Regularly inspect and address any leaks or water seepage issues that can create a damp environment ideal for mold and mildew.
- Apply a mold and mildew resistant sealer to the pebble shower floor to provide an additional layer of protection.
By following these preventative measures, you can keep your pebble shower floor clean and free from mold or mildew.
Dealing With Stains And Build-Up
Installing a pebble shower floor can add a stunning natural element to your bathroom, but over time, you may encounter stains and build-up that can detract from its beauty. To keep your pebble shower floor looking pristine, it’s important to know how to effectively deal with stains and build-up. In this section, we will provide you with step-by-step instructions to remove hard water stains, tackle soap scum and residue, and address stubborn build-up on your pebble shower floor.
Removing Hard Water Stains
Hard water stains can be stubborn and unsightly, but with the right approach, you can easily eliminate them from your pebble shower floor. Follow these simple steps to get rid of hard water stains:
- Mix equal parts of white vinegar and water in a spray bottle.
- Spray the solution directly onto the stained areas of your pebble shower floor.
- Allow the vinegar mixture to sit on the stains for about 10 minutes.
- Scrub the stains gently with a soft-bristle brush or sponge.
- Rinse the area thoroughly with clean water.
- Dry the floor with a clean towel or allow it to air dry.
The acidic properties of white vinegar help break down the mineral deposits responsible for hard water stains, leaving your pebble shower floor spotless and sparkling.
Tackling Soap Scum and Residue
Soap scum and residue can build up over time on your pebble shower floor, creating a dull and grimy appearance. Follow these steps to effectively tackle soap scum and residue:
- Mix equal parts of warm water and mild liquid dish soap in a bucket or basin.
- Dip a soft sponge or cloth into the soapy solution.
- Gently scrub the soap scum and residue on your pebble shower floor.
- Rinse the area thoroughly with clean water.
- Wipe the floor dry with a clean towel or allow it to air dry.
The combination of warm water and gentle dish soap helps to loosen and remove soap scum and residue, restoring the natural beauty of your pebble shower floor.
Addressing Stubborn Build-up
If your pebble shower floor has stubborn build-up that is resistant to regular cleaning methods, try this effective technique to address the problem:
- In a small bowl, combine baking soda and water to create a thick paste.
- Apply the paste directly to the areas with stubborn build-up.
- Allow the paste to sit for about 15 minutes.
- Gently scrub the build-up using a soft-bristle brush or sponge.
- Rinse the area thoroughly with clean water.
- Dry the pebble shower floor with a clean towel or allow it to air dry.
The abrasive nature of baking soda combined with its natural cleaning properties helps to break down and remove stubborn build-up, leaving your pebble shower floor looking fresh and renewed.
Preventative Maintenance Tips
Proper maintenance is crucial to keep your pebble shower floor looking and functioning its best. By following a few simple preventative maintenance tips, you can ensure that your shower floor remains in excellent condition for years to come. Regular inspections and repairs, avoiding harsh chemicals, and proper drain maintenance are all essential aspects of keeping your pebble shower floor in top shape.
Regular Inspection and Repair
Regular inspections of your pebble shower floor are an important part of preventative maintenance. By routinely examining the floor, you can identify any potential issues like loose pebbles, cracks, or mold growth and address them promptly. Inspecting the floor allows you to catch any problems early on, preventing them from worsening and potentially causing further damage.
If you notice any loose pebbles, carefully remove them and apply a suitable adhesive to secure them back in place. Cracks should be repaired using a specialized pebble floor repair kit, following the manufacturer’s instructions. Additionally, if you find any signs of mold or mildew, clean the affected areas using a mild, non-abrasive cleaner to prevent it from spreading.
Avoiding Harsh Chemicals
Using harsh chemicals on your pebble shower floor can cause damage, leading to discoloration or erosion of the pebbles over time. To prevent this, it is important to use gentle, non-abrasive cleansers when cleaning your shower floor. Avoid products containing bleach, ammonia, or abrasive agents, as they can strip away the protective sealant and cause the pebbles to lose their luster.
To clean your pebble shower floor effectively, mix a small amount of mild cleaner with warm water. Gently scrub the surface using a soft-bristle brush or sponge, taking care not to scrub too hard as this can dislodge or damage the pebbles. Rinse thoroughly with clean water and dry the floor with a soft towel to prevent water spots and promote better drainage.
Proper Drain Maintenance
Ensuring that your shower drain is functioning properly is essential for the longevity of your pebble shower floor. Over time, hair, soap scum, and other debris can accumulate in the drain, causing it to clog and impede water drainage. This can lead to water pooling on the shower floor, which can be damaging to the pebbles and potentially create a slipping hazard.
To prevent drain clogs, it is recommended to use a drain cover or hair catcher to catch debris before it enters the drain. Regularly remove any collected hair or debris from the cover to maintain proper water flow. Additionally, consider periodically using a drain cleaner suitable for your specific plumbing system to remove any buildup and keep the drain clear.
By following these preventative maintenance tips, you can ensure that your pebble shower floor remains beautiful, durable, and functional for years to come. Incorporate these practices into your cleaning routine to keep your shower floor looking as good as new and to avoid costly repairs or replacement in the future.
Frequently Asked Questions
What Kind Of Grout Do You Use For A Pebble Shower Floor?
For a pebble shower floor, use sanded grout to fill the gaps. The sand in the grout helps it adhere better and provides stability to the pebbles. This type of grout is best suited for areas with wider joints and uneven surfaces like pebble floors.
Should Pebble Shower Floor Be Sealed?
Yes, it is important to seal a pebble shower floor. Sealing helps prevent water damage and keeps the pebbles in place. It also makes cleaning easier and prolongs the lifespan of the floor.
Is Pebble Stone Good For A Shower Floor?
Yes, pebble stone is a good choice for a shower floor. It provides a natural and slip-resistant surface. Its texture offers a gentle foot massage feel, and it is durable and easy to clean. The pebble stones also add aesthetic appeal to the shower area.
What Is The Slope For A Pebble Shower Floor?
The slope for a pebble shower floor is typically 1/4 inch per foot to ensure proper drainage and prevent pooling water.
Conclusion
Installing a pebble shower floor can add a touch of natural elegance to your bathroom. With the right tools and techniques, this DIY project is well within your reach. From preparing the substrate to laying the pebbles and applying a sealant, this guide has covered all the necessary steps.
By following these instructions, you can create a stunning and durable pebble shower floor that will stand the test of time. So go ahead and give your bathroom an upgrade with this unique and stylish flooring option.