To install a floating shelf in the shower, use waterproof adhesive for a secure attachment. The process involves cleaning the wall, marking the desired position, applying adhesive to the bracket, and carefully attaching the shelf.
Waterproof silicone caulk can be used to seal the joints for added durability and water resistance. Installing a floating shelf in the shower can provide valuable storage space and add a touch of modernity to your bathroom. This versatile and stylish option allows you to keep your essentials easily accessible while keeping your shower area organized and clutter-free.
However, it is important to follow the proper installation steps to ensure a secure and long-lasting attachment. In this guide, we will cover the step-by-step process of how to install a floating shelf in the shower, including tips on selecting the right materials and ensuring waterproofing for optimal performance. Let’s dive in!
Planning And Preparation
Installing a floating shelf in your shower can be a great way to add additional storage space while giving your bathroom a modern and organized look. However, before diving into the installation process, proper planning and preparation are essential to ensure a successful project. This section will guide you through the necessary steps to assess your shower space, select the right floating shelf design, and gather all the required tools and materials.
Assessing the Shower Space
The first step in installing a floating shelf in your shower is to assess the available space. Before purchasing a shelf, consider the dimensions of your shower area and the specific location where you want to install the shelf. Take measurements of the wall space, keeping in mind any fixtures or obstacles that might interfere with the installation. By accurately assessing the shower space, you can select a shelf that fits perfectly and enhances the overall aesthetic of your bathroom.
Selecting the Right Floating Shelf Design
Once you have measured your shower space, it’s time to select the ideal floating shelf design. Consider the style and theme of your bathroom, whether it’s modern, rustic, or minimalist. Look for a shelf that complements the existing fixtures and color scheme. Additionally, consider the materials used to construct the shelf. For a shower environment, it’s important to choose a waterproof and moisture-resistant material, such as teak or stainless steel. By carefully selecting the right design, you can ensure that your floating shelf not only adds functionality but also enhances the overall visual appeal of your shower.
Gathering the Necessary Tools and Materials
Before starting the installation process, make sure you have all the necessary tools and materials at hand. This will save you time and frustration during the project. Below is a list of the essential tools and materials you will need:
| Tools | Materials |
|---|---|
| – Drill | – Floating shelf |
| – Level | – Wall anchors |
| – Tape measure | – Screws |
| – Pencil or marker | – Waterproof adhesive |
| – Wall stud finder | – Waterproof sealant |
| – Screwdriver or screw gun |
Ensuring you have all the necessary tools and materials beforehand will make the installation process smoother and more efficient. Once you have gathered everything you need, you are ready to move on to the next steps of installing your floating shelf in the shower.
Preparing The Shower Area
Before you can install a floating shelf in your shower, it’s important to properly prepare the area. This involves cleaning and drying the shower walls, marking the shelf placement, and ensuring proper wall support. By following these steps, you can ensure that your floating shelf is securely installed and will be able to hold your toiletries and other shower essentials.
Cleaning and Drying the Shower Walls
The first step in preparing the shower area is to thoroughly clean and dry the walls. Remove any soap scum, mold, or mildew using a suitable cleaning solution and a scrub brush. Be sure to pay extra attention to the area where the shelf will be installed to ensure a clean and smooth surface. Once the walls are clean, rinse them with water and allow them to dry completely before proceeding.
Marking the Shelf Placement
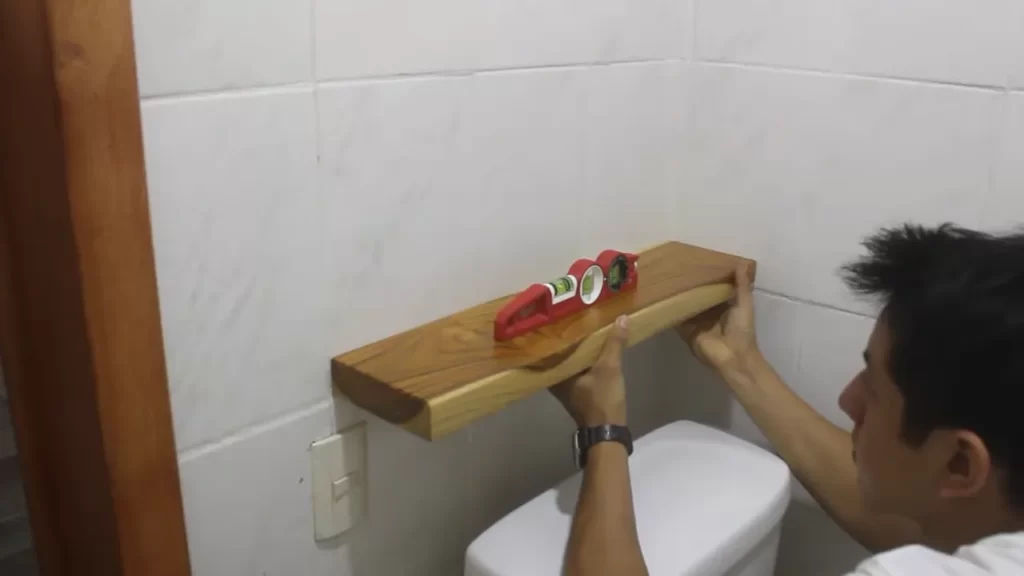
Once the walls are dry, the next step is to mark the placement of the floating shelf. Measure the desired height at which you want the shelf to be installed and use a pencil to mark the spot on both walls. Use a level to ensure that the marks are perfectly horizontal and evenly spaced. This will help to ensure that the shelf is properly aligned and balanced.
Ensuring Proper Wall Support
Before you can install the floating shelf, it’s important to ensure that the shower walls have proper support. Check if there are any studs or beams behind the marked spots on the walls. Studs provide the necessary support for heavy shelves, while hollow areas require additional support such as wall anchors or toggle bolts. It’s crucial to choose the right anchors or bolts that are suitable for your shower wall material, such as tile or fiberglass. Consult the manufacturer’s instructions or seek professional advice if you are unsure.
Once you have determined the appropriate support, follow the manufacturer’s instructions for installing the anchors or toggle bolts. Carefully secure them to the wall at the marked spots.
By following these steps, you can ensure that your shower area is properly prepared for the installation of a floating shelf. Cleaning and drying the shower walls, accurately marking the shelf placement, and ensuring proper wall support will help to ensure a secure and stable installation. In the next section, we will discuss the actual installation process for the floating shelf in the shower.
Installing The Floating Shelf
Adding a floating shelf in your shower can provide a convenient space for storing shower essentials and adding a touch of style to your bathroom. If you’re wondering how to install a floating shelf in your shower, you’ve come to the right place. In this guide, we’ll take you through the step-by-step process of installing a floating shelf in your shower to ensure stability and functionality.
Anchoring the Shelf Brackets
Before attaching the shelf to the brackets, it’s crucial to anchor the shelf brackets securely to the shower wall. This will provide the necessary support for your floating shelf. Here’s how to do it:
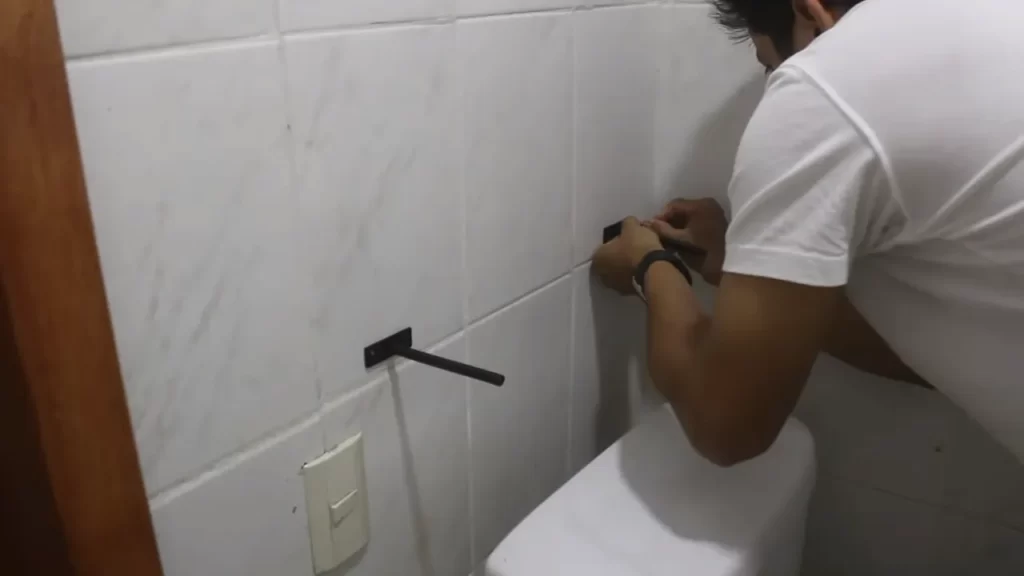
- Start by determining the desired height and position of your floating shelf. Use a pencil to mark where the brackets will be installed.
- Locate the wall studs behind the shower tiles using a stud finder. Mark the center of each stud on the wall.
- With a drill and an appropriate drill bit, create pilot holes at the marked positions. These holes should align with the center of the wall studs.
- Insert wall anchors into the pilot holes. These anchors will ensure that the brackets are firmly attached to the wall.
- Align the brackets with the wall anchors and screw them into place using a screwdriver or drill. Ensure that the brackets are level and tightly secured.
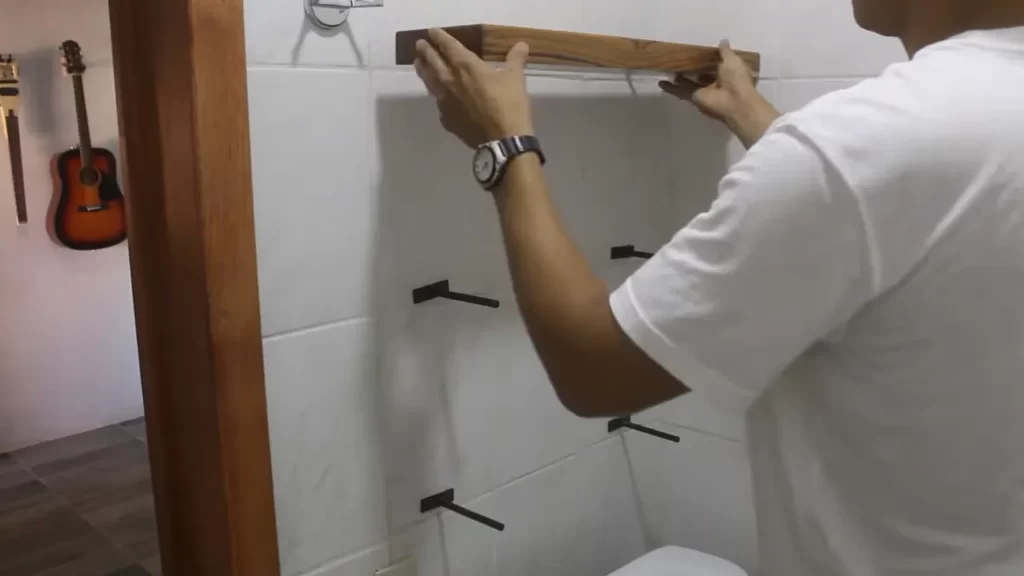
Attaching the Shelf to the Brackets
After anchoring the shelf brackets, the next step is to attach the actual floating shelf to the brackets. Follow these steps:
- Place the floating shelf onto the brackets, ensuring that it is centered and level.
- Using screws or mounting hardware provided with the shelf, secure the shelf to the brackets. Make sure to follow the manufacturer’s instructions for the specific type of floating shelf you are installing.
- Double-check the alignment of the shelf to ensure it is securely attached.
Securing the Shelf for Stability
Once the shelf is attached to the brackets, it’s essential to secure it properly for stability and to prevent any accidents. Here are some additional steps:
- Apply a bead of waterproof silicone caulk along the edges of the shelf where it meets the wall. This will provide a watertight seal and help prevent moisture from seeping behind the shelf.
- Use a level to ensure the shelf is still straight and adjust if necessary.
- Check the stability of the shelf by putting weight on it and gently shaking it. If there is any wobbling or movement, reinforce the brackets by installing additional screws or brackets as needed.
By following these steps, you can confidently install a floating shelf in your shower, providing a stylish and functional storage solution for all your bathroom needs.
Aesthetic Considerations
Aesthetic considerations play a crucial role in creating a visually pleasing and attractive shower space. When it comes to installing floating shelves in the shower, paying attention to the aesthetic elements can greatly enhance the overall look and feel of the bathroom. In this section, we will discuss three important factors to consider when it comes to the aesthetics of floating shelf installation: painting or finishing the shelf, choosing decorative items for display, and maintaining the cleanliness of the shelf.
Painting or Finishing the Shelf
Painting or finishing the floating shelf can significantly impact its appearance and complement the overall color scheme of your bathroom. Before proceeding with this step, ensure that the shelf is properly sanded and free from any imperfections. Then, choose a paint or finish that is moisture-resistant to prevent damage from the constant exposure to water in the shower.
When it comes to painting, you can either match the shelf to the color of your bathroom walls for a seamless look, or opt for a contrasting color to create a focal point. An important tip to remember is to choose a paint or finish that is easy to clean and maintain. This will ensure that your shelf remains visually appealing for years to come.
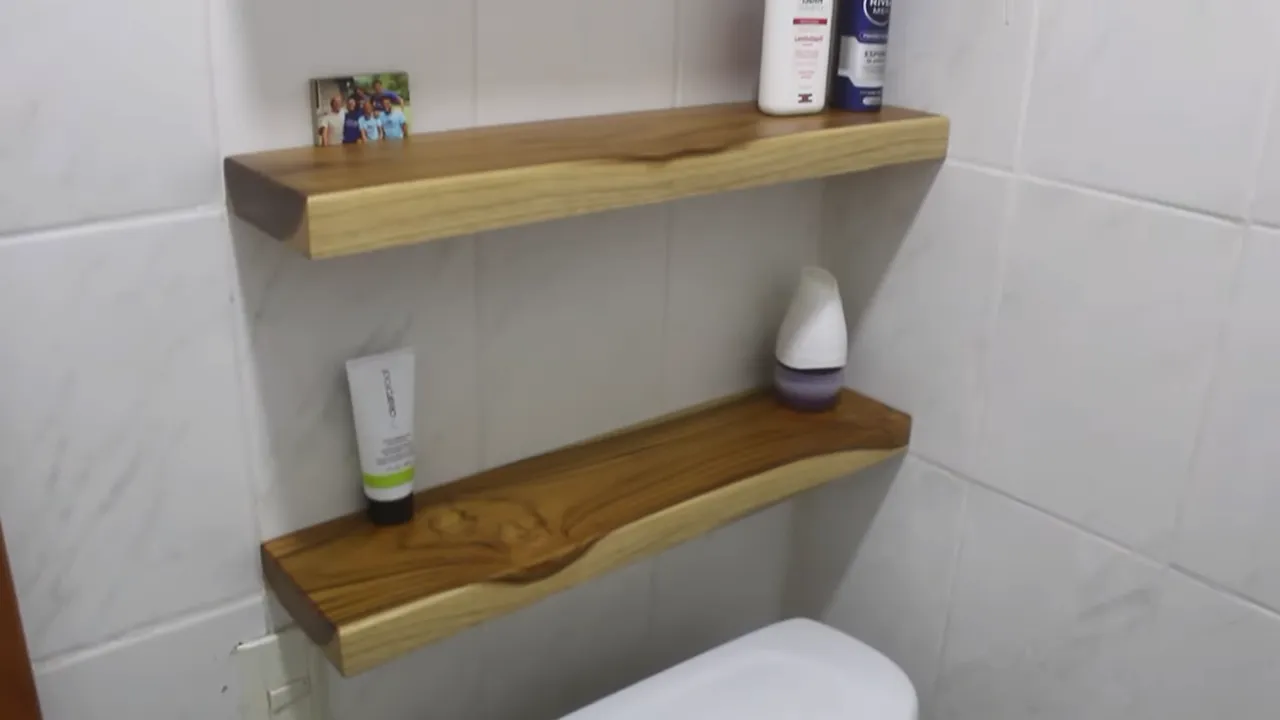
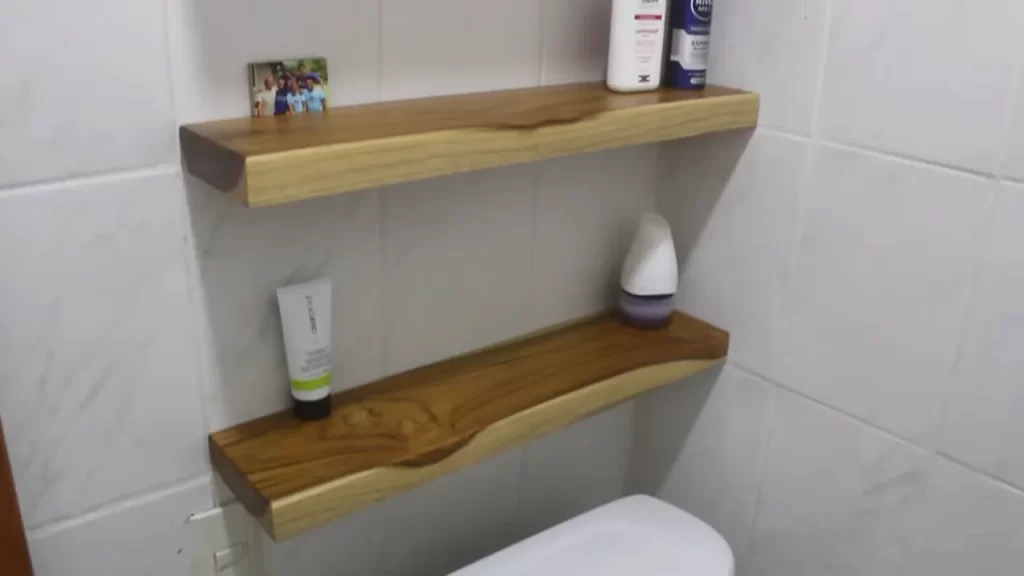
Choosing Decorative Items for Display
Once you have installed the floating shelf, it’s time to consider the decorative items that will be displayed on it. Choosing the right items can add personality and style to your shower space. When selecting decorative pieces, consider the following:
- Opt for items that are moisture-resistant and can withstand the humid environment of the shower. This includes materials such as ceramic, glass, and stainless steel.
- Choose items that complement the overall theme of your bathroom. Whether you prefer a minimalist, rustic, or contemporary look, selecting decorative pieces that align with your chosen aesthetic will create a harmonious atmosphere.
- Consider the size and scale of the items. A cluttered shelf can appear overwhelming, so select a few key pieces that make a statement without overcrowding the space.
Maintaining the Shelf’s Cleanliness
Keeping your floating shelf clean and free from grime and residue is essential to preserve its aesthetic appeal. Here are some tips to maintain the cleanliness of your shelf:
- Regularly wipe the shelf with a mild, non-abrasive cleaner to remove any soap scum or watermarks. Avoid using harsh chemicals that could damage the finish.
- Use a squeegee or a microfiber cloth after each shower to remove excess water from the shelf, preventing the formation of water spots.
- Consider using clear silicone caulk to seal any gaps or joints between the shelf and the wall, preventing the accumulation of moisture.
| Aspect | Considerations |
|---|---|
| Painting or Finishing the Shelf | Choose a moisture-resistant paint or finish. Match or contrast with the bathroom’s color scheme. Opt for easy-to-clean options. |
| Choosing Decorative Items for Display | Select moisture-resistant materials. Align with the bathroom’s theme. Avoid overcrowding the shelf. |
| Maintaining the Shelf’s Cleanliness | Regularly clean with mild, non-abrasive cleaner. Wipe off excess water. Seal gaps with clear silicone caulk. |
Safety And Maintenance Tips
Ensuring the Shelf’s Weight-Bearing Capacity
Before installing floating shelves in your shower, it is crucial to evaluate the weight-bearing capacity of the wall. This step is essential to ensure the safety of your shelving unit and prevent any accidents or damage in the future. Here are a few tips to help you determine the shelf’s weight-bearing capacity:
- Check the manufacturer’s guidelines: Most floating shelves come with weight specifications provided by the manufacturer. Make sure to read and follow these guidelines carefully to avoid overloading the shelf.
- Assess the wall structure: Take note of the type of wall you have in your bathroom. Different wall materials have varying weight-bearing capacities. For example, drywall may not be as sturdy as concrete or tile. If you’re unsure, consult a professional to assess your wall’s strength.
- Distribute weight evenly: When placing items on your floating shelf, distribute the weight evenly to prevent any excessive strain on specific areas. Avoid overloading the shelf with heavy objects that may exceed its weight limit.
Regular Cleaning and Decluttering
Maintaining cleanliness and avoiding clutter in your shower area is crucial to keep your floating shelf in tip-top condition. Here are some maintenance tips to help you keep your shelf clean and organized:
- Wipe down the shelf regularly: Clean your floating shelf with a mild household cleaner and a soft cloth. This will remove any soap scum, residue, or other buildup that can accumulate over time.
- Declutter frequently: Regularly assess the items on your floating shelf and declutter as needed. Remove any expired products, unused items, or anything that may be causing unnecessary weight or clutter on the shelf.
- Consider waterproof storage solutions: To prevent water damage on your floating shelf, opt for waterproof containers or baskets to store your shower essentials. These will help contain any leaks or spills and make cleaning easier.
Addressing Water and Moisture Issues
Water and moisture are major concerns when it comes to installing a floating shelf in the shower. To protect your shelf and ensure its longevity, follow these important tips:
- Apply waterproof sealant: Prior to installation, apply a waterproof sealant to the edges and surfaces of both the shelf and the shower wall. This extra layer of protection will help repel water and moisture, preventing potential damage.
- Proper ventilation: A well-ventilated shower area can help minimize moisture buildup. Ensure your bathroom has adequate ventilation through the use of exhaust fans or windows. Proper ventilation will help reduce the risk of mold or mildew growth, which can negatively impact your floating shelf.
- Regular maintenance checks: Periodically inspect the area around and beneath your floating shelf for any signs of water damage, mold, or mildew. If you notice any issues, take immediate action to address them to prevent further damage to your shelf and surrounding area.
Troubleshooting And Common Challenges
If you’re planning to install floating shelves in your shower, you may encounter a few common challenges along the way. But don’t worry! With the right techniques and tools, you can easily overcome these hurdles and enjoy the convenience and aesthetics that a floating shelf brings to your bathroom. In this section, we will discuss some troubleshooting tips to help you deal with uneven shower walls, fix loose or wobbly shelves, and replace damaged or worn-out shelving supplies.
Dealing with Uneven Shower Walls
Uneven shower walls can present a challenge when installing floating shelves. However, there are a few techniques you can employ to ensure a level and secure installation.
- Before installing the shelves, measure the height and width of the shower wall to determine any variations. Use a spirit level to identify the high and low points.
- If the wall has significant variations, consider using shims to even out the surface. Shims are thin strips of wood or plastic that can be inserted behind the shelf brackets to level them.
- Alternatively, you can use adjustable shelf brackets that can be adjusted to accommodate uneven walls. These brackets come with screws that can be loosened or tightened to ensure a level installation.
- Always double-check the levelness of the shelves once they are installed. If you notice any discrepancies, adjust the brackets or shims accordingly until you achieve a balanced and sturdy shelf.
Fixing Loose or Wobbly Shelf
Over time, your floating shelf may become loose or wobbly, compromising its stability. Address this issue promptly to prevent accidents and further damage.
- First, check the tightness of the screws that secure the shelf brackets to the wall. Use a screwdriver to tighten any loose screws.
- If the problem persists, consider using wall anchors. Wall anchors provide additional support and stability, especially if the shelf brackets are attached to drywall. Insert the wall anchors into the designated holes and then screw the brackets securely into place.
- Another option is to use adhesive products specifically designed for securing floating shelves. Make sure to follow the manufacturer’s instructions and apply the adhesive evenly to the back of the shelf before mounting it on the wall.
- Regularly inspect your shelves for any signs of loosening and tighten the screws or reinforce them with wall anchors or adhesive when necessary.
Replacing Damaged or Worn-out Shelving Supplies
Over time, shelves can become damaged or worn-out due to moisture and frequent use. When this happens, it’s crucial to replace them promptly to maintain a safe and functional shower space.
| Supplies | Instructions |
|---|---|
| Remove old shelf | Begin by removing the damaged or worn-out shelf. Use a screwdriver to unscrew any brackets or hardware that secure it to the wall. |
| Choose new shelf | Select a new floating shelf that is suitable for your shower space and matches your existing decor. Consider materials that are resistant to moisture and can withstand the humid conditions of a bathroom. |
| Install new shelf | Follow the manufacturer’s instructions to install the new shelf. Ensure that the brackets or hardware are securely attached to the wall and that the shelf is level. |
| Test stability | Once the new shelf is installed, give it a gentle shake to ensure it is stable and secure. Make any necessary adjustments to the brackets or shelf placement if needed. |
By following these troubleshooting tips, you can overcome common challenges when installing floating shelves in your shower. With careful planning and proper installation techniques, you’ll have a functional and stylish storage solution that enhances your bathroom’s convenience and aesthetics.
Frequently Asked Questions
Can You Add A Shelf To An Existing Shower?
Yes, it is possible to add a shelf to an existing shower. This can provide additional space for storing shower products and can be installed by attaching it securely to the wall of the shower. Consult with a professional to ensure proper installation and compatibility with your shower.
Where Do You Put Shelves In The Shower?
Install shelves in the shower in convenient spots according to personal preference. Common placements include the corner, on the wall opposite the showerhead, or within reach while bathing. Ensure the shelves are securely attached and won’t obstruct movement in the shower.
What Kind Of Adhesive For Shower Shelves?
Use a waterproof adhesive specifically designed for shower shelving. It should be able to withstand moisture, steam, and high humidity. Ensure the surface is clean and dry before applying the adhesive for better adhesion.
Are Shower Shelves A Good Idea?
Shower shelves are a great idea for organizing and decluttering your shower space. They provide convenient storage for your toiletries and keep them within reach. With various designs and materials available, you can find one that suits your bathroom style while keeping things neat and tidy.
Conclusion
Installing a floating shelf in your shower is a simple yet effective way to add storage and style to your bathroom. By following the step-by-step instructions outlined in this blog post, you can easily achieve a modern and functional shower space.
Remember to choose the right materials and tools, measure carefully, and ensure proper installation. With a bit of effort and creativity, you can enjoy the benefits of a floating shelf in your shower for years to come.