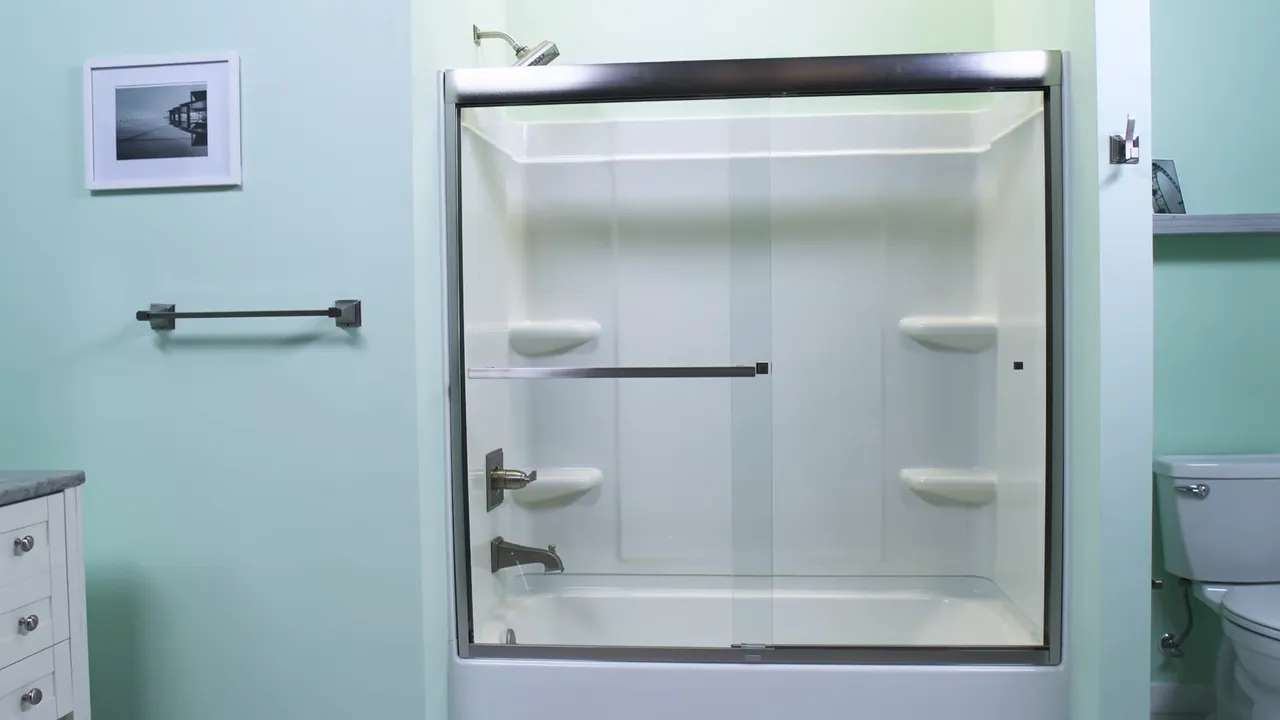
To install a shower door on a tub, measure the width of the opening, attach the side jambs, install the top track, and hang the door.
Selecting The Perfect Shower Door Design
When it comes to installing a shower door on your tub, selecting the perfect design is crucial to enhancing the overall look and functionality of your bathroom. With a wide variety of options available in the market, it can be overwhelming to make a decision. However, by considering a few essential factors and understanding the popular shower door styles for tubs, you can make an informed choice that perfectly matches your needs and preferences.
Factors to Consider When Choosing a Shower Door
Choosing the right shower door involves considering several factors to ensure the best fit for your tub. Here are some key factors you should keep in mind:
- Size and Style of Your Bathroom: It’s essential to consider the size and style of your bathroom when selecting a shower door. Analyze the available space, the overall aesthetic of your bathroom, and whether you want a door that opens inward or outward. This will help you determine which design suits your bathroom best.
- Budget: Budget plays a significant role in any home improvement project. Determine how much you are willing to spend on a shower door and explore options within that range. Remember, there are plenty of affordable shower door designs that still offer excellent quality and visual appeal.
- Maintenance and Cleaning: Consider the level of maintenance and cleaning required for the shower door you are considering. Some designs may have intricate details, which can be challenging to clean. Opt for easy-to-clean materials and designs that fit well with your lifestyle.
- Privacy and Light: Evaluate your privacy needs and the amount of natural light you desire in your bathroom. Some shower door designs offer frosted or textured patterns that provide privacy without compromising on light transmission.
- Water Containment: The primary purpose of a shower door is to contain water within the tub area. Ensure the design you choose effectively prevents water leakage and provides a watertight seal for a hassle-free shower experience.
Popular Shower Door Styles for Tubs
Now that you have a better understanding of the factors to consider, let’s explore some popular shower door styles for tubs:
| Shower Door Style | Description |
|---|---|
| Sliding Shower Doors | Sliding shower doors are a classic choice for tubs. They offer ease of use and sleek aesthetics. With smooth gliding mechanisms, these doors maximize space efficiency and are suitable for bathrooms with limited space. |
| Pivot Shower Doors | Pivot shower doors swing open in a single direction, typically outward. They are known for their elegant appearance and are suitable for larger bathroom spaces. Pivot doors can be installed with hinges on either side, allowing for flexibility in design. |
| Framed Shower Doors | Framed shower doors feature a metal frame around the glass panels, providing structural support and a polished finish. These doors are highly durable and widely available in various styles and finishes, making them adaptable to different bathroom aesthetics. |
| Frameless Shower Doors | Frameless shower doors provide a modern and minimalist look to your bathroom. They are constructed with thick tempered glass and offer a seamless appearance, enhancing the overall visual appeal. Frameless doors pair well with contemporary and open-concept bathroom designs. |
With these popular styles as a starting point, you can begin to envision how each one would complement your tub and bathroom aesthetics. Consider the pros and cons, along with the factors mentioned earlier, to make a well-informed decision that will significantly enhance your showering experience.
Remember, when installing a shower door on your tub, it’s essential to prioritize both functionality and design to create a space that perfectly suits your needs and reflects your personal style.

Preparing The Tub For Installation
When installing a shower door on a tub, proper preparation is key to ensure a successful installation. One of the first steps in preparing the tub for installation is cleaning and removing any existing shower doors. It’s important to start with a clean surface to ensure the new shower door adheres properly. Additionally, measuring the dimensions of the tub area is crucial to ensure the shower door fits properly. This involves taking accurate measurements of the width and height of the tub area. By following these steps, you can ensure a smooth and successful installation of your new shower door.
Cleaning and Removing Any Existing Shower Doors
Before installing a new shower door, it’s important to thoroughly clean the tub and remove any existing shower doors. This will create a clean, smooth surface for the new shower door to adhere to. To clean the tub, start by removing any accessories or items that may be in the way. Then, use a mild detergent or cleaning solution and a sponge or soft cloth to scrub the tub surface. Pay close attention to any areas of built-up soap scum or mold.
After the tub is clean, it’s time to remove any existing shower doors. This step may vary depending on the type of shower doors you have. If you have sliding doors, carefully remove them from the track by lifting them up and out. If you have hinged doors, you will need to unscrew the hinges from the wall or frame.
Measuring the Dimensions of the Tub Area
Accurate measurements are crucial when installing a shower door on a tub. Before purchasing a new shower door, take the time to measure the width and height of the tub area. This will ensure that the shower door fits properly and functions correctly. Use a tape measure to measure the width of the tub from wall to wall, as well as the height from the top of the tub to the ceiling or the desired height of the shower door.
Once you have the measurements, it’s a good idea to write them down and double-check them before purchasing the new shower door. Having accurate measurements will make the installation process much smoother and ensure that the new shower door fits perfectly.
Gathering The Necessary Tools And Materials
Gathering the necessary tools and materials is an essential step when it comes to installing a shower door on a tub. Having the right tools at hand will ensure a smooth and successful installation process. Additionally, using the right materials is crucial for long-lasting and safe results. In this blog post, we will guide you through the list of tools needed and the required materials for a successful shower door installation on a tub.
List of tools needed for the installation process:
Before you begin the installation, it is important to have the following tools ready:
- Measuring tape
- Level
- Pencil or marker
- Power drill
- Drill bits
- Phillips screwdriver
- Utility knife
- Caulking gun
- Masking tape
- Hammer
These tools will help you accurately measure, mark, drill, and secure the shower door onto the tub.
Required materials for a successful installation:
In addition to the tools mentioned above, you will also need the following materials:
- Shower door kit (including door panels, hinges, handles, and screws)
- Shower door bottom sweep
- Shower door side seals
- Clear silicone caulk
- Shims (if necessary)
- Plastic anchors (if needed)
The shower door kit will typically include all the necessary hardware for installation. The bottom sweep and side seals are important for preventing water leakage. Clear silicone caulk will be used to seal gaps and ensure a watertight finish. Shims may be required to level the tub and provide stability for the installation. Plastic anchors may also be necessary to anchor the screws securely into the wall, if applicable.
By gathering these essential tools and materials before you begin the installation process, you will be well-prepared to take on the task of installing a shower door on your tub. In the next section, we will guide you through the necessary preparations before starting the installation.
Installing The Shower Door Track
When it comes to installing a shower door on a tub, one of the most important steps is securing the shower door track. The track provides stability and ensures that your shower door operates smoothly. In this section, we will guide you on how to properly install the shower door track, including marking the correct position and securing it securely to the tub.
Marking the Correct Position for the Track
Before you can install the shower door track, it’s crucial to mark the correct position on the tub. Start by cleaning the tub surface to remove any dirt or debris that could affect the adhesion of the track. Once the surface is clean and dry, measure the width of the tub and mark the midpoint using a pencil or marker.
Next, measure the height at which you want the track to be installed. It’s essential to consider the height of your shower enclosure and the desired clearance for the door. Mark this height on both sides of the midpoint line, ensuring the measurements are level and parallel to the tub’s edge.
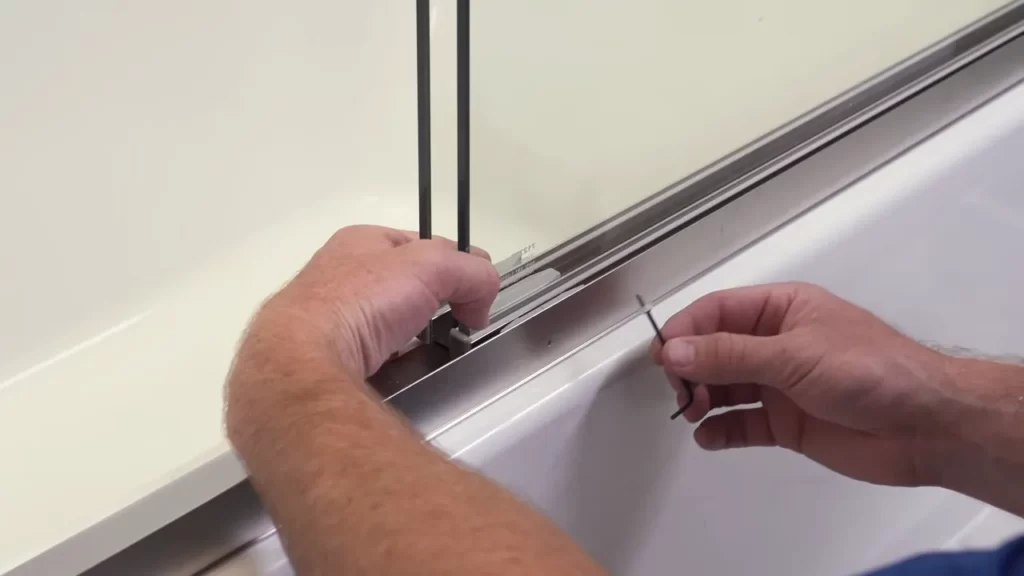
Securing the Track to the Tub Securely
Once you have marked the correct position for the shower door track, it’s time to secure it to the tub. The method of securing the track may vary depending on the specific type of shower door and track you are using. However, we will provide you with general guidelines that apply to most installations.
- Clean the marked areas on the tub with an appropriate cleaner to remove any residue or grease that could hinder the adhesion of the track.
- Apply a high-quality adhesive or silicone caulk to the back of the shower door track. Be generous with the amount of adhesive, ensuring full coverage.
- Align the track with the marked position on the tub, pressing firmly to create a strong bond between the track and the tub surface.
- Use a level to check the alignment of the track and make any adjustments necessary to ensure it is perfectly level and straight.
- Secure the track in place by using screws or brackets, following the manufacturer’s instructions. Make sure to use the appropriate tools and tighten the screws securely to prevent any loosening over time.
Once the track is securely attached to the tub, allow the adhesive or caulk to cure according to the manufacturer’s instructions. This usually involves a waiting period of 24 to 48 hours before you can proceed with installing the shower door itself.
In conclusion, installing the shower door track is a critical step in the process of installing a shower door on a tub. By marking the correct position and securing the track securely, you ensure a sturdy and long-lasting installation. Follow the steps outlined in this section, and you’ll be one step closer to enjoying a beautiful and functional shower in your bathroom.
Assembling And Mounting The Shower Door Panels
If you’re ready to transform your bathroom into a stylish and functional space, installing a shower door on your tub is a great place to start. Not only does it add a touch of elegance, but it also helps to keep the water where it belongs. Here, we’ll guide you through the process of assembling and mounting the shower door panels, ensuring a secure and seamless installation.
Putting together the shower door panels
Before you can mount the shower door panels, you need to assemble them first. The exact assembly process may vary depending on the type of shower door you have, so it’s important to refer to the manufacturer’s instructions. However, here are some general steps to follow:
- Start by attaching the bottom rail or track to the tub’s edge. Use the provided screws or adhesive to secure it in place. Make sure it is level and aligned properly.
- Next, position the vertical side frames. These frames typically have pre-drilled holes to accommodate the door panels. Place the frame’s bottom end into the bottom track and insert the top end into the top track. Double-check that the frames are plumb and level before proceeding.
- If your shower door has multiple panels, repeat the previous step for each additional panel. Ensure that the panels align correctly and that there is enough space between them for smooth operation.
- Attaching the door handle or knob is usually the final step in panel assembly. Position the handle according to your preference and secure it tightly using the provided screws or hardware.
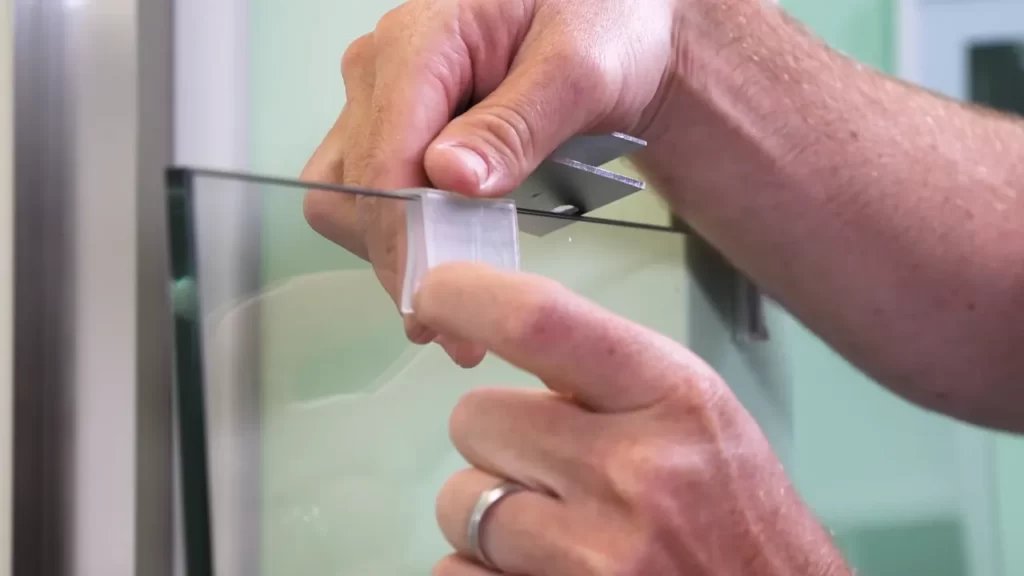
Mounting the panels to the track
Now that you have assembled the shower door panels, it’s time to mount them onto the track. The track acts as a guide, allowing the panels to slide smoothly. Here’s how you can do it:
- Carefully lift the first panel and align its wheels or rollers with the track. Slide the panel along the track, ensuring that it moves effortlessly from one end to the other. Adjust the rollers if needed to achieve a proper fit.
- Repeat the same process for the remaining panels, if applicable. Take your time to ensure each panel is securely mounted and slides smoothly along the track.
- Once all the panels are in place, carefully test the sliding action to make sure everything functions as intended. Adjustments may be necessary to achieve optimal performance.
- Finally, tighten any screws or hardware that may have loosened during the installation process. Inspect the door panels and track for any signs of misalignment or issues that need attention. Making small adjustments now can prevent bigger problems down the road.
By following these steps, you can assemble and mount your shower door panels with confidence. Remember to refer to the manufacturer’s instructions for specific guidance and recommendations. Now, you’re one step closer to enjoying a beautiful and functional shower space!
Adjusting And Ensuring Proper Alignment
One of the vital steps in installing a shower door on a tub is adjusting and ensuring proper alignment. This process ensures that the door panels fit perfectly and open and close smoothly. In this section, we will discuss some effective techniques for aligning the shower door panels, as well as how to check for smooth opening and closing.
Techniques for Aligning the Shower Door Panels
Proper alignment of the shower door panels is crucial for a seamless installation. Here are some techniques to help you achieve the desired alignment:
- Measure and mark: Start by measuring the dimensions of your shower opening and mark the positions where the door panels will be mounted. Use a measuring tape and a level to ensure accurate measurements and straight lines.
- Adjust the hinges: Most shower doors come with adjustable hinges to accommodate various angles and sizes. Use a screwdriver to loosen the hinge screws and align the panels as needed. Once aligned, tighten the screws.
- Use shims: If the panels still don’t align properly, you can use shims to make minor adjustments. Place the shims between the panels and the wall or tub to achieve the desired alignment. Trim any excess shim material for a neat finish.
- Check for levelness: To ensure the panels are aligned horizontally, use a level to check for levelness. Adjust the panels as necessary to achieve a level position. This will ensure that your shower door opens and closes smoothly.
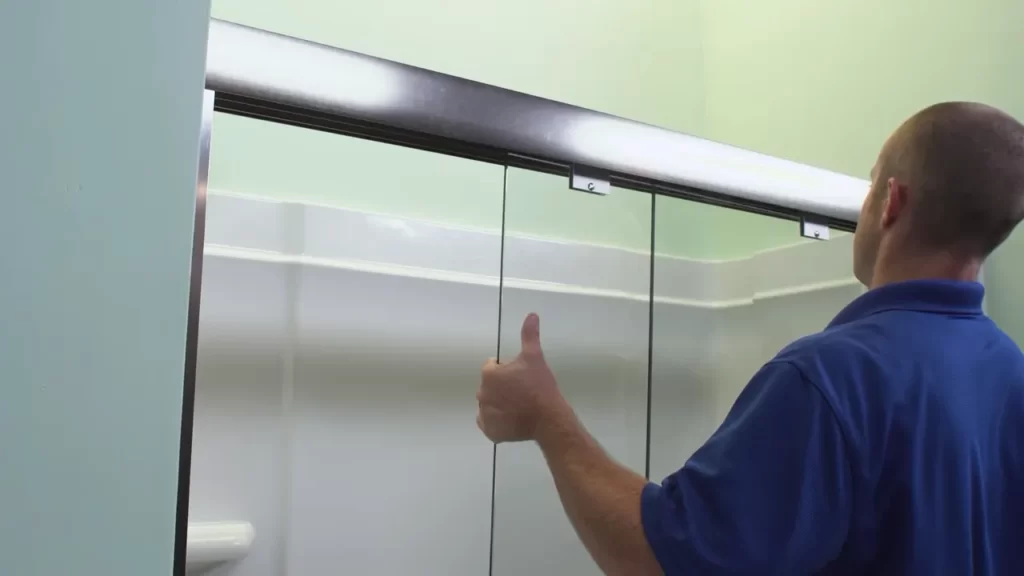
Checking for Smooth Opening and Closing
Once you have aligned the shower door panels, it’s important to check for smooth opening and closing. Follow these steps to ensure proper functionality:
- Test the hinges: Open and close the door panels several times to test the hinges. They should move smoothly without any resistance or binding. If you notice any issues, double-check the alignment and adjust if necessary.
- Inspect the seals: While opening and closing the door, pay attention to the seals. They should create a tight seal when the door is closed, preventing water from leaking out of the shower area. Make sure the seals are properly aligned and in good condition.
- Check for gaps: As you open and close the door, carefully observe for any gaps between the panels and the tub or walls. These gaps can lead to water leakage. If you spot any gaps, make further adjustments to achieve a snug fit.
By following these techniques and checking for smooth opening and closing, you can ensure that your installed shower door on the tub is aligned correctly and functions flawlessly.
Sealing And Waterproofing
Applying waterproof sealant to prevent leaks
If you want to ensure that your shower door on tub installation is leak-free, applying a waterproof sealant is a crucial step. A sealant creates a protective barrier and prevents water from seeping through cracks and gaps, keeping your bathroom dry and free from potential water damage.
Before applying the sealant, make sure that the surface is clean and dry. Remove any dirt, dust, or debris from the areas you are going to seal. This will ensure better adhesion and a longer-lasting seal.
When selecting a sealant, choose one specifically designed for wet environments and suitable for the materials you are working with. Silicone sealants are often the best choice for shower door installations, as they offer excellent water resistance and flexibility.
Once you have chosen the right sealant, follow these steps to apply it:
- Load the sealant into a caulking gun and cut the tip to the desired size.
- Hold the gun at a 45-degree angle and apply a continuous bead of sealant along the edges and gaps that need sealing.
- Smooth the sealant with a caulk smoother or your finger, ensuring it fills all the gaps completely.
- Wipe away any excess sealant with a damp cloth.
Allow the sealant to cure according to the manufacturer’s instructions before testing the shower door for leaks. This typically takes around 24 hours.
Best practices for sealing all edges and gaps
Properly sealing all edges and gaps is key to achieving a watertight shower door on tub installation. Here are some best practices to ensure a tight seal:
- Carefully inspect the edges and gaps around the shower door and tub for any visible cracks or openings.
- Fill larger gaps with a backer rod or foam tape before applying the sealant. This will help prevent the sealant from sinking into the gap and ensure a more effective seal.
- Apply the sealant generously and make sure it extends beyond the edges of the gaps for maximum coverage.
- Work in small sections to prevent the sealant from drying out before it can be smoothed.
- Use a caulk smoother or a wet finger to ensure the sealant is evenly distributed and fills all the gaps completely.
- Regularly check the sealed areas for signs of wear or damage, and reapply the sealant as needed.
- Remember that the quality of the sealant and the thoroughness of the application directly impact the effectiveness of the seal, so take your time and don’t rush this step.
By following these best practices and using a high-quality waterproof sealant, you can ensure that your shower door on tub installation remains leak-free for years to come!
Cleaning And Maintenance Tips
Proper cleaning and maintenance of your shower door are essential to keep it looking stylish and prolong its lifespan. By following these tips, you can maintain the elegance and functionality of your shower door.
How to keep your shower door looking stylish and clean
To ensure your shower door remains stylish and clean, follow these steps:
- Regularly wipe down your shower door after each use to remove soap scum, water spots, and any other residues. This prevents build-up and keeps your door looking pristine.
- Use a squeegee or a microfiber cloth to dry your shower door after cleaning. This helps prevent water spots and streaks, leaving your door crystal clear.
- Apply a glass cleaner or a mixture of vinegar and water to remove any stubborn stains on the glass. Use a soft cloth or a sponge for gentle scrubbing.
- Avoid using abrasive cleaners or harsh chemicals as they can damage the glass and its hardware. Stick to mild cleansers that are safe for glass surfaces.
- Frequently clean the door’s tracks and hinges to prevent any buildup of dirt or grime that may affect its functionality.
- For framed shower doors, clean the metal frames with a mild soap solution and a soft cloth. Rinse thoroughly and dry to prevent any water stains.
Maintenance tips for prolonging the lifespan of your shower door
To ensure your shower door lasts for years to come, follow these maintenance tips:
- Regularly inspect the door’s seals and gaskets for any signs of wear or damage. Replace them promptly to maintain the door’s water-tightness.
- Check the door’s hardware, such as hinges and handles, for any loose or damaged parts. Tighten screws and bolts as necessary or seek professional help for repairs.
- Avoid slamming or forcefully closing the shower door, as it can strain the hinges and potentially cause them to break.
- Keep the tracks clean and free from debris. This ensures smooth operation and prevents any issues with the door’s sliding mechanism.
- If your shower door has a protective coating, periodically reapply it to maintain its effectiveness in repelling water and preventing stains.
By following these cleaning and maintenance tips, you can keep your shower door looking stylish, clean, and in optimal condition. Regular care and attention will help prolong its lifespan and ensure a refreshing and enjoyable shower experience every time.
Troubleshooting Common Installation Issues
Dealing with misalignment or uneven installation
One of the most common issues you may encounter when installing a shower door on a tub is misalignment or uneven installation. This can lead to a less than desirable aesthetic and even functional problems. However, there are some simple troubleshooting steps you can follow to address these issues and ensure a properly installed shower door.
If you notice that your shower door is not aligned properly or is hanging unevenly, the first step is to check the level of the tub itself. Use a level to determine if the tub is positioned correctly and adjust as necessary. Once you have confirmed that the tub is level, you can proceed with the following steps:
- Inspect the shower door frame: Examine the frame of the shower door to identify any visible signs of misalignment or unevenness. Look for uneven gaps, gaps between the frame and the wall, or any warping or bending of the frame. If you identify any issues, you may need to adjust or straighten the frame to ensure proper alignment.
- Check the hinges and rollers: The hinges and rollers of the shower door play a crucial role in its functionality and alignment. Make sure the hinges are properly attached and tightened, and that the rollers are aligned and moving smoothly along the track. If necessary, adjust or replace hinges and rollers to achieve the desired alignment.
- Tighten screws and bolts: Loose screws and bolts can contribute to misalignment or uneven installation. Inspect all screws and bolts securing the shower door components and tighten them as needed. This will help stabilize the door and ensure it is properly aligned.
Fixing common problems during installation
During the installation process, you may encounter some common problems that can impact the effectiveness and appearance of your shower door. By addressing these issues promptly, you can ensure a successful installation. Here are some troubleshooting steps to consider:
- Sealing gaps and leaks: One common issue is the presence of gaps or leaks around the shower door. To fix this, apply a high-quality silicone sealant along the edges of the door frame. This will create a watertight seal and prevent any water from escaping.
- Adjusting the door sweep: The door sweep is the bottom seal of the shower door that prevents water from seeping out onto the bathroom floor. If you notice water leaking under the door, adjust the door sweep so that it securely contacts the tub surface. This will help create a tight seal and prevent any leaks.
- Proper alignment of panels: If you are installing a shower door with multiple panels, ensure that they are aligned correctly. Use a level to check for any discrepancies and make necessary adjustments. This will ensure a visually appealing and functional installation.
Addressing these common installation issues will not only improve the overall look and functionality of your shower door but also help in preventing any future problems. By following these troubleshooting steps, you can enjoy a seamless shower experience and a beautifully installed shower door on your tub.
Frequently Asked Questions
Can You Install A Shower Door Over Tub?
Yes, you can install a shower door over a tub.
Can You Put A Shower Glass Door On A Tub?
Yes, you can put a shower glass door on a tub. It is a practical and stylish option that can help contain water and give your bathroom a sleek look.
Can You Put A Sliding Shower Door On A Bathtub?
Yes, you can install a sliding shower door on a bathtub. It is a convenient option for saving space and providing easy access to the bathtub.
Can I Install A Shower Door Myself?
Yes, you can install a shower door yourself. Just follow the installation instructions carefully, use the right tools, and take necessary safety precautions. However, if you’re not confident in your DIY skills, it’s recommended to hire a professional for the job.
Conclusion
To sum up, installing a shower door on a tub may seem daunting at first, but it can be easily accomplished with the right tools and techniques. By following the step-by-step instructions provided in this blog post, you can transform your bathroom and enhance the functionality and aesthetic appeal of your tub.
Remember to measure accurately, choose the right door, and take your time during installation. With proper care and maintenance, your new shower door will provide years of enjoyment. Upgrade your bathroom today and enjoy the benefits of a sleek and modern shower door on your tub.