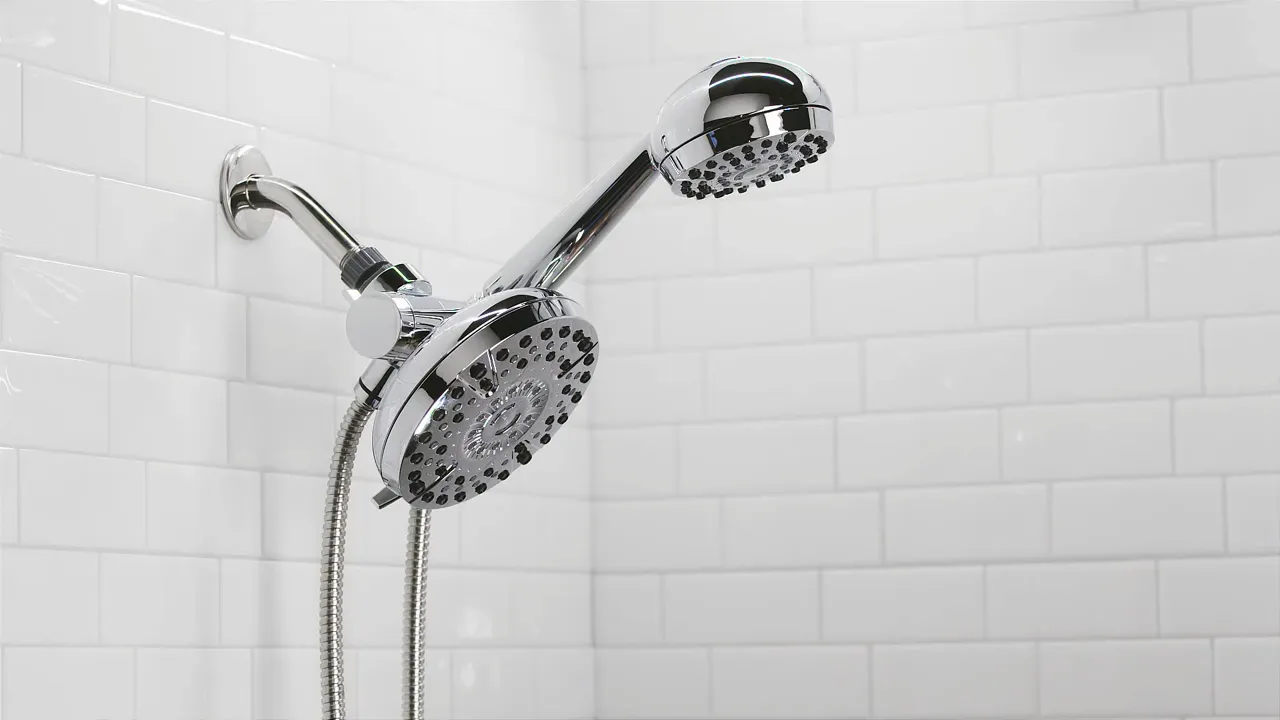
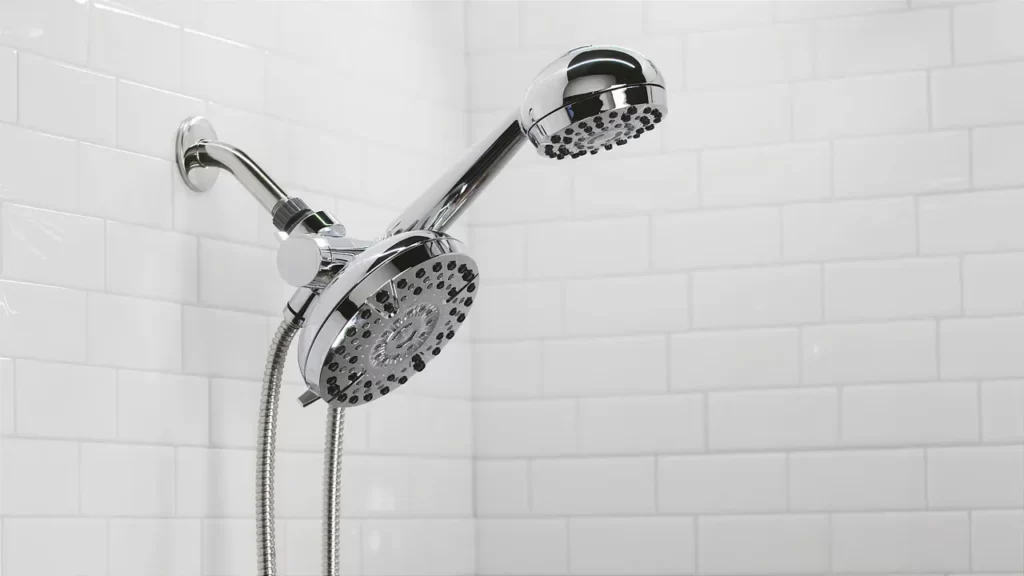
Installing a dual shower head is straightforward. Here’s a concise guide to help you through the process.
Transforming your standard shower into a luxurious spa-like experience is easier than you might think. A dual shower head allows you to enjoy multiple water streams simultaneously, delivering a relaxing and refreshing showering experience. With some basic tools and a few simple steps, you can have a dual shower head installed in no time.
This article will provide you with a concise guide on how to install a dual shower head, making your daily showers more enjoyable and invigorating. So, let’s dive right in and get started on the installation process.
Why Install A Dual Shower Head: Benefits And Advantages
Why Install a Dual Shower Head: Benefits and Advantages
Are you tired of your average, mundane shower experience? Upgrade your bathroom and transform your daily routine by installing a dual shower head. Not only does a dual shower head provide a luxurious and invigorating shower experience, but it also offers a range of benefits and advantages that will enhance your bathing routine. In this article, we will explore the top reasons why you should consider installing a dual shower head in your bathroom. From an enhanced shower experience to time-saving benefits and versatile customization options, a dual shower head is a true game-changer.
Enhanced Shower Experience
Imagine stepping into your shower and being enveloped in a cascade of warm, gentle rain from one shower head, while the second one delivers a powerful and invigorating massage. With a dual shower head, you can achieve just that. The combination of different spray patterns and water pressures provides a spa-like experience right in the comfort of your own bathroom. Whether you want to relax after a long day or wake up feeling refreshed and energized, a dual shower head offers a wide range of settings to suit your mood and preferences.
Time-Saving
In today’s fast-paced world, time is of the essence. One of the key advantages of a dual shower head is the ability to save time during your daily routine. With two shower heads at your disposal, you can quickly rinse off shampoo and conditioner without having to constantly move around or adjust the water temperature. This ensures a more efficient showering experience, allowing you to get ready and start your day in no time. Say goodbye to those minutes wasted waiting for the water to rinse off, and hello to a streamlined shower routine.
Versatility and Customization
Every individual has their own unique preferences when it comes to the type of showering experience they enjoy. With a dual shower head, you have the ability to customize and tailor your shower to meet your specific needs. Whether you prefer a gentle rainfall, a pulsating massage, or a combination of both, a dual shower head offers a variety of spray patterns and intensity levels to choose from. Additionally, many dual shower heads come with adjustable angles, allowing you to direct the water precisely where you want it. This versatility ensures that each member of your household can find their perfect shower setting, making your bathroom a personalized haven of relaxation.
In conclusion, the installation of a dual shower head in your bathroom offers a multitude of benefits and advantages. From an enhanced shower experience that mimics a spa-like setting, to time-saving features and versatile customization options, a dual shower head transforms your everyday bathing routine into a luxurious and personalized experience. Upgrade your bathroom today and indulge in the ultimate showering bliss with a dual shower head.
Step 1: Gather Necessary Tools And Materials
Before you begin installing a dual shower head, it’s important to gather all the necessary tools and materials. This step will ensure that you have everything you need within arm’s reach, allowing you to complete the installation smoothly and efficiently. Here are the essential items you’ll need:
Adjustable Wrench
An adjustable wrench is a must-have tool for installing a dual shower head. This versatile tool will come in handy when you need to tighten or loosen nuts and bolts during the installation process. Its adjustable jaws make it suitable for various sizes of fittings, ensuring a secure and leak-free connection.
Plumber’s Tape
Plumber’s tape, also known as Teflon tape, is an essential material that helps prevent leaks. This thin, white tape acts as a sealant when wrapped around pipe threads, providing a tight and secure connection. It’s important to apply plumber’s tape correctly to ensure a watertight seal between the shower head and the shower arm.
Screwdriver
A screwdriver is another tool you’ll need for the installation process. It will come in handy when removing or tightening screws that hold the shower head components together. Having a screwdriver with a comfortable grip and a variety of interchangeable bits will make the process easier and more efficient.
Dual Shower Head Kit
Of course, you can’t install a dual shower head without the kit itself. Your dual shower head kit should include all the necessary components, such as the main shower head, handheld shower head, diverter valve, shower arm, and any additional fittings. Make sure you have all the parts before you start the installation process.
By gathering these tools and materials beforehand, you’ll be well-prepared to install your new dual shower head. This will save you time and ensure a smooth installation process.
Step 2: Prepare The Existing Shower Pipe
Now that you have gathered all the necessary tools and materials, it’s time to prepare the existing shower pipe for the installation of your new dual shower head. This step involves turning off the water supply, removing the existing shower head, and cleaning the threaded pipe.
Turn off the Water Supply
The first thing you need to do is locate the water shut-off valve for your shower. This valve is usually located near the shower handle or in the basement if you have one. Once you have located the valve, turn it clockwise to shut off the water supply to your shower. This will prevent any water from flowing while you work on the installation.
Remove the Existing Shower Head
With the water supply turned off, it’s time to remove the existing shower head. Place a cloth or towel over the shower arm to protect it from any scratches or damage. Then, using an adjustable wrench, grip the shower head firmly and turn it counterclockwise to loosen it. Once it’s loose, you can easily unscrew the shower head by hand. Set it aside for now.
Clean the Threaded Pipe
After removing the shower head, you’ll notice a threaded pipe protruding from the wall. This is where the dual shower head will be attached. Before you can install the new shower head, it’s essential to clean the threaded pipe to ensure a secure and leak-free connection.
Using a rag or sponge, remove any dirt, debris, or old plumber’s tape from the threaded pipe. Make sure to wipe both the exterior and interior of the pipe thoroughly. If the pipe is rusty or has stubborn residue, you can use a wire brush to scrub it clean. Once the pipe is clean and dry, you’re ready to move on to the next step of the installation.
Preparing the existing shower pipe is a crucial step in installing a dual shower head. By turning off the water supply, removing the existing shower head, and cleaning the threaded pipe, you’re ensuring a smooth and successful installation. Now that the preparation is complete, you’re ready to move on to the next step: attaching the dual shower head to the pipe.
Step 3: Install The Mounting Bracket
Now that you have prepared the shower arm and attached the thread seal tape, it’s time to move on to the next step, which is installing the mounting bracket. The mounting bracket is responsible for holding the dual shower head securely in place, ensuring you have a sturdy and well-positioned showering experience.
Position the Adjustable Bracket
The first thing you need to do is determine the ideal position for the adjustable bracket. This bracket allows you to customize the height and angle of the dual shower heads according to your preference. To find the right position, consider factors such as your height, the height of other household members, and the desired water flow coverage.
Once you have decided on the position, mark the spot on the shower wall where the bracket will be installed. Use a pencil or a removable marker for the marking to avoid leaving permanent stains on the wall.
Attach the Mounting Bracket securely
Now it’s time to attach the mounting bracket to the shower wall. Before you begin, make sure you have the necessary tools and hardware, including a drill, screws, and a screwdriver. Refer to the instruction manual provided with the dual shower head set for specific details regarding the mounting bracket installation.
- Using a drill and an appropriate drill bit, create pilot holes at the marked spot on the shower wall. These pilot holes will act as guides for the screws when you attach the mounting bracket.
- Take the mounting bracket and place it over the pilot holes. Make sure the bracket is level and centered according to the marked spot.
- Insert the screws through the bracket holes and into the pilot holes. Use a screwdriver to tighten the screws, ensuring the mounting bracket is securely fixed to the wall.
Once you have attached the mounting bracket, double-check its stability by giving it a gentle tug. It should feel firmly in place, ready to support the weight of the dual shower head.
With the mounting bracket securely installed, you are now ready to move on to the next step, which is connecting the shower hoses and securing the dual shower heads. Stay tuned for Step 4 of our guide where we will guide you through this process.
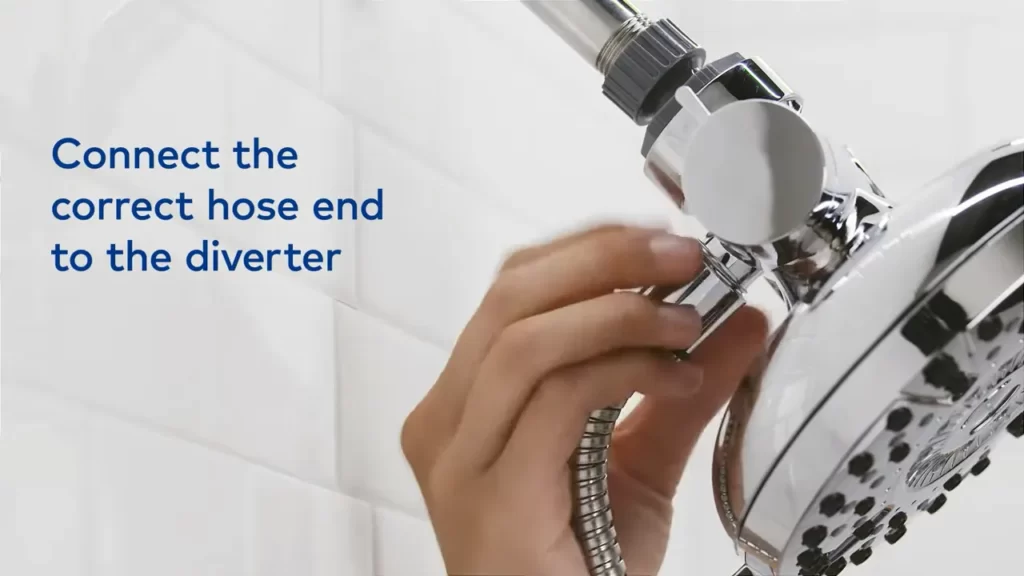
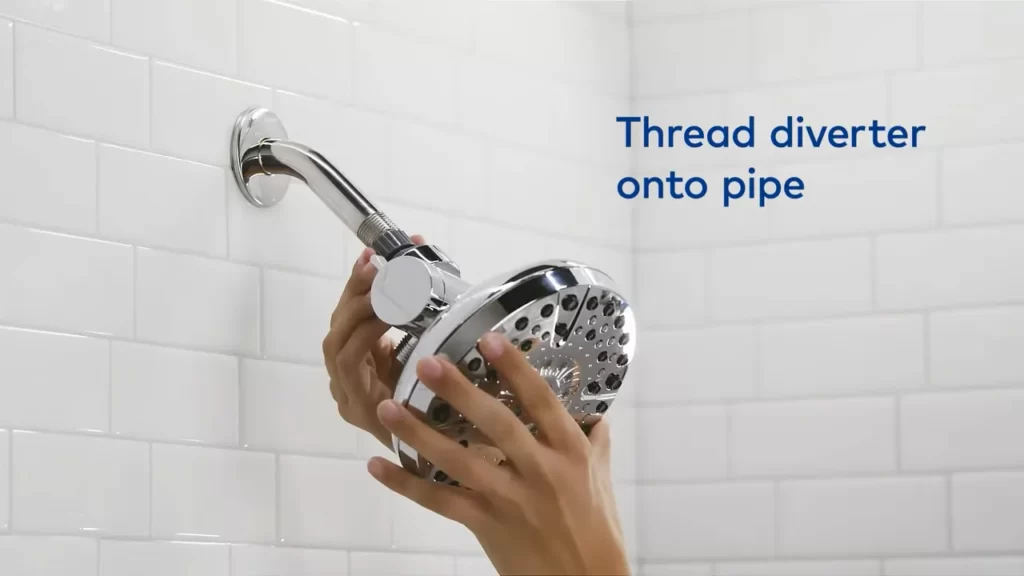
Step 4: Connect The Dual Shower Head
Once you have successfully installed the mounting bracket and prepared the shower arm, it is time to connect the dual shower head. This step will ensure that both shower heads function properly and provide you with the ultimate shower experience.
Apply Plumber’s Tape to the Threads
The first thing you need to do is apply plumber’s tape to the threads of the shower arm. This thin, white tape is designed to create a watertight seal between the shower arm and the shower head, preventing any leakage. To apply the tape, simply wrap it around the threads in a clockwise direction. Make sure to cover the entire length of the threads with the tape, overlapping each loop slightly.
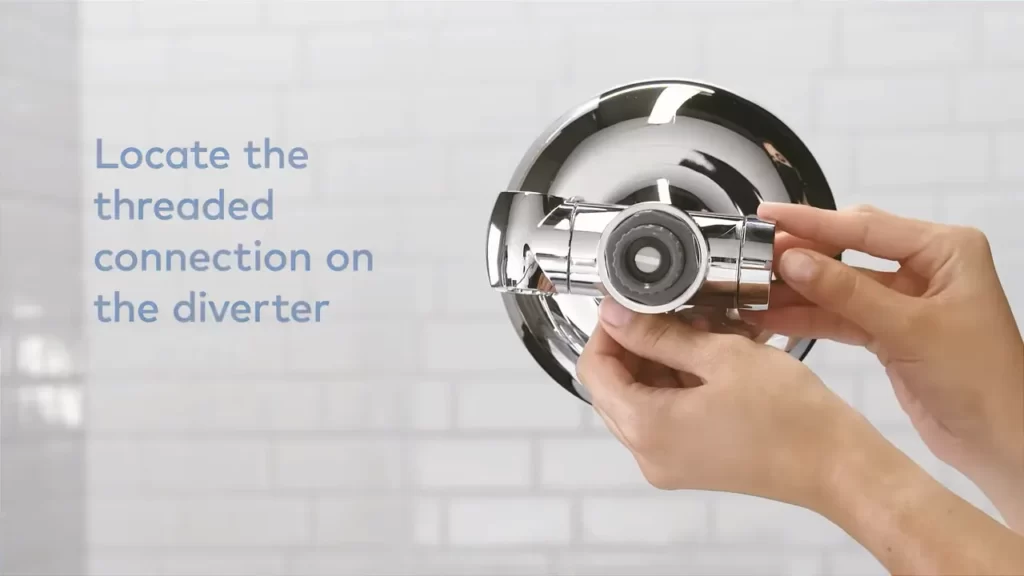
Connect the Dual Shower Head to the Mounting Bracket
Next, it’s time to connect the dual shower head to the mounting bracket. Start by screwing the larger shower head onto the threaded end of the shower arm, making sure it is securely attached. Then, take the smaller shower head and connect it to the side of the larger head. Many dual shower heads come with a built-in diverter valve, which allows you to switch between using one or both shower heads. If your shower head has a diverter valve, make sure it is properly aligned and connected according to the manufacturer’s instructions.
Tighten the Connections
With the dual shower head attached to the mounting bracket, it’s time to tighten the connections to ensure a secure fit. Use an adjustable wrench or pliers to carefully tighten the nuts on the mounting bracket and the shower head. Be cautious not to overtighten, as it can damage the threads or cause leaking. Once you have tightened all the connections, give the shower head a gentle tug to ensure it is firmly in place.
Now that you have successfully connected the dual shower head, you are one step closer to enjoying a luxurious and invigorating shower experience. In the next step, we will cover how to test the functionality and make any necessary adjustments to ensure optimal performance.
Step 5: Test And Adjust The Dual Shower Heads
Turn on the Water Supply
Once you have installed the dual shower heads and made sure everything is securely tightened, it’s time to test the water supply. To do this, turn on the water supply by fully opening the main valve or knob. Be prepared for some water to initially shoot out as the pressure builds up. Make sure to hold a towel or cloth over the shower heads to prevent any potential water spray from getting on you or the surrounding area.
Check for Leaks and Tighten if Needed
After turning on the water supply, carefully inspect the installation for any leaks. Check the areas where the shower heads connect to the shower arm and the areas where the hoses connect to the shower heads. Look for any signs of water leakage, such as dripping or pooling water. If you notice any leaks, use an adjustable wrench to tighten the connections further. Be cautious not to over-tighten, as it may cause damage to the fittings.
Adjust the Angle and Height of the Shower Heads
Once you have ensured there are no leaks, you can move on to adjusting the angle and height of the shower heads. This step is crucial in achieving the perfect shower experience. Each person has their own preference, so take the time to customize the angle and height for maximum comfort.
Start by adjusting the angle of the shower heads. Hold the shower heads and rotate them until they face the desired direction. Whether you prefer the water to hit you directly or at an angle, find the position that suits you best. Keep in mind that it’s also important to adjust the height of the shower heads to accommodate different users.
To adjust the height, loosen the wing nuts or brackets located on the shower heads. Gently slide the shower heads up or down the shower arm to the desired height. Once you have found the ideal position, tighten the wing nuts or brackets to secure the shower heads in place. Ensure that both shower heads are adjusted to the same height for a balanced water flow.
Final Thoughts
Testing and adjusting the dual shower heads is the final step in the installation process. By turning on the water supply, checking for leaks, and customizing the angle and height of the shower heads, you can ensure a satisfying shower experience for everyone. Don’t forget to refer to the manufacturer’s instructions for any specific guidance or recommendations. Now that you have successfully installed and adjusted your dual shower heads, you can enjoy the luxurious and refreshing feeling of dual streams of water cascading down on you.
Step 6: Enjoy The Dual Shower Head Experience!
Introduction
Step 6: Enjoy the Dual Shower Head Experience! Now that you have successfully installed your dual shower head, it’s time to sit back, relax, and indulge in the luxurious experience it offers. In this section, we will explore how you can personalize and customize your shower to suit your preferences, as well as discover the incredible relaxing benefits of using a dual shower head.
Personalize and Customize Your Shower
With a dual shower head, you have the opportunity to create a showering experience that is tailored to your liking. Here are a few ways to personalize and customize your shower:
- Adjust the Water Flow: Most dual shower heads come with adjustable settings that allow you to control the water flow. Whether you prefer a gentle rainfall or a powerful massaging spray, you can easily adjust the water pressure to your desired level.
- Switch Between Shower Heads: One of the great advantages of a dual shower head is the ability to switch between the two shower heads. You can have both heads on simultaneously for a truly invigorating experience, or use them separately for individualized showering preferences.
- Explore Different Spray Patterns: Dual shower heads often offer various spray patterns, such as rain, massage, mist, and pulsating. Experiment with different patterns to find the one that provides the ultimate relaxation for you.
Discover the Relaxing Benefits
Using a dual shower head brings along a multitude of relaxing benefits that can enhance your showering routine. Here are some of the key advantages:
- Increased Coverage: With two shower heads, you can enjoy a wider coverage and reduce the time spent under the water. The added coverage ensures that you are fully immersed and clean from head to toe.
- Efficient Rinsing: The dual shower head design allows for a more efficient rinsing process. Whether you have long hair or want to thoroughly rinse off soap or shampoo, the dual shower head ensures that no spot is missed.
- Relief from Muscle Tension: The adjustable water pressure and different spray patterns of a dual shower head can provide relief from muscle tension and promote relaxation. The massaging spray setting can help soothe sore muscles after a long day.
- Spa-Like Experience: Transform your shower into a spa-like experience with the dual shower head. The combination of different spray patterns, adjustable settings, and the ability to switch between shower heads creates a luxurious atmosphere that can help you unwind and destress.
So go ahead, take your showering routine to the next level and enjoy the dual shower head experience. Personalize and customize your shower to your liking while indulging in the relaxing benefits it offers. Upgrade your daily showers with a dual shower head and experience the pure bliss it brings!
Additional Tips For Maintaining Your Dual Shower Head
After successfully installing your dual shower head, it is important to keep it in optimal condition to ensure a consistently refreshing shower experience. Regular maintenance can help extend the lifespan of your shower head and prevent any potential issues. Here are some additional tips to help you effectively maintain your dual shower head:
Regularly Clean and Remove Mineral Deposits
To keep your dual shower head functioning at its best, it’s essential to regularly clean and remove mineral deposits that can accumulate over time. Hard water can cause mineral build-up, which can clog the nozzles and affect water flow. To clean your shower head, follow these simple steps:
- Start by turning off the water supply and unscrewing the shower head from the shower arm.
- Fill a bowl or bucket with equal parts white vinegar and water.
- Place the shower head in the mixture and let it soak for about 30 minutes.
- After soaking, use an old toothbrush or a small brush to scrub away any remaining mineral deposits. Pay extra attention to the nozzles.
- Rinse the shower head thoroughly with water to remove any vinegar residue.
- Screw the shower head back onto the shower arm and turn on the water to check if the flow has improved.
Check for Any Leaks or Drips
Periodically checking your dual shower head for any leaks or drips is important to avoid water wastage and prevent potential damage. Here’s how you can do a quick check:
- Turn on the water and inspect the connection between the shower arm and the shower head for any signs of leakage.
- If you notice any leaks, use an adjustable wrench to tighten the connections.
- Ensure that the rubber washers or O-rings are in good condition and replace them if necessary.
- If the problem persists, consider reaching out to a professional plumber for assistance.
Replace Worn Out or Damaged Parts
Over time, certain parts of your dual shower head may become worn out or damaged. It’s important to address these issues promptly to maintain optimal performance. Here are a few things you should keep an eye on:
- Check the rubber washers or O-rings for signs of wear and tear. If they are cracked or deteriorated, it’s time to replace them.
- Inspect the shower hose for any leaks or splits. If you find any, it’s best to replace the hose.
- If you notice reduced water flow or uneven spray patterns, it could indicate a clogged filter. Remove the filter and clean it thoroughly. If cleaning doesn’t solve the issue, consider replacing the filter.
- If any other parts of your dual shower head, such as the diverter valve or flow control lever, show signs of damage or malfunction, consult the manufacturer’s instructions or contact a professional for guidance.
By following these additional tips for maintaining your dual shower head, you can prolong its lifespan, enjoy a satisfactory shower experience, and potentially save on repair or replacement costs in the long run. Regular cleaning, checking for leaks, and replacing worn-out parts are simple but effective steps to keep your dual shower head in great condition.
Frequently Asked Questions
Can You Run Two Shower Heads One Valve?
Yes, you can run two shower heads with one valve. Simply connect the two shower heads to separate pipes, then use a diverter valve to control the water flow between them.
How Does A Dual Shower Head Work?
A dual shower head allows you to have two shower heads in one setup. Each shower head can be adjusted separately to control the water flow and pressure. It provides a more personalized and enjoyable shower experience.
Are Double Shower Heads Worth It?
Yes, double shower heads are worth it as they provide a luxurious and spa-like shower experience. They offer the convenience of multiple water streams and can be adjusted to suit individual preferences. With double shower heads, you can enjoy a more efficient and enjoyable showering experience.
Do Dual Shower Heads Use More Water?
Dual shower heads do not necessarily use more water. The amount of water depends on the flow rate and how long you shower. However, using both shower heads at the same time may result in a higher water consumption.
Conclusion
Installing a dual shower head is a simple yet effective way to enhance your showering experience. By following the step-by-step guide provided in this blog post, you can easily install a dual shower head without any professional help. With the dual shower head, you can enjoy a refreshing rainfall experience while also having the flexibility of a handheld shower.
So, go ahead and give it a try to transform your daily shower routine into a more luxurious and enjoyable one. Upgrade your shower today!