To install a trench drain in your driveway, follow these steps.
Benefits Of Installing A Trench Drain In Your Driveway
Are you tired of dealing with water accumulation in your driveway? Is the constant erosion causing damage to your property? Do you worry about slip and fall accidents due to slippery surfaces? If you answered yes to any of these questions, it’s time to consider installing a trench drain in your driveway. Not only will it alleviate these issues, but it will also provide several other benefits. Let’s explore them in detail.
Reduces Water Accumulation and Potential Damage
One of the primary advantages of installing a trench drain in your driveway is that it effectively reduces water accumulation during heavy rains or snowmelt. The trench drain acts as a valuable drainage solution, collecting and channeling water away from the surface of your driveway. This helps prevent water from pooling in low-lying areas, which can lead to long-term damage such as cracks or potholes in the asphalt or concrete. By keeping the surface free of standing water, you can extend the lifespan of your driveway, saving you time and money on costly repairs.
Prevents Erosion of the Driveway and Surrounding Area
Erosion can be a significant concern when it comes to driveways, particularly if they are located on sloped terrain. When water is not properly directed off the surface, it can cause the soil underneath to wash away, leading to unstable ground and potential damage to the driveway’s foundation. Additionally, the surrounding area, such as nearby landscaping or flower beds, may also suffer from erosion. By installing a trench drain, you can effectively prevent erosion by redirecting water away from these vulnerable areas. The drain captures the water and guides it towards a suitable drainage system, ensuring the integrity of your driveway and surrounding landscape.
Improves Safety by Reducing Slip and Fall Accidents
A wet or slick driveway can quickly become a hazard, especially when it goes unnoticed. Slip and fall accidents can occur, leading to injuries and potentially costly liability issues. By installing a trench drain, you can improve safety on your property by effectively removing water from the surface. The grated cover of the drain helps to prevent leaves, debris, and other slippery materials from accumulating on the driveway, further minimizing the risk of accidents. A dry and slip-resistant surface ensures the safety of both pedestrians and vehicles, providing peace of mind for you and your family.
As you can see, the benefits of installing a trench drain in your driveway are numerous. Not only does it reduce water accumulation and potential damage to your driveway, but it also prevents erosion and improves safety. By investing in a trench drain, you’re not only enhancing the functionality and durability of your driveway but also creating a safer environment for everyone. So why wait? Take the necessary steps to install a trench drain and reap the benefits for years to come.

Assessing Your Driveway For Trench Drain Installation
Before installing a trench drain in your driveway, it is crucial to assess the area and ensure that it is suitable for the installation. In this section, we will discuss the key factors to consider when assessing your driveway for trench drain installation, including determining the optimal location, evaluating the slope and grade, and identifying potential obstacles or underground utilities.
Determining the optimal location for the trench drain
The first step in the assessment process is to determine the optimal location for the trench drain. This location should be carefully chosen to ensure efficient water flow and proper drainage. Look for areas where water tends to accumulate or where there are low spots in your driveway. These are ideal locations for installing a trench drain to prevent water from pooling and causing damage.
Evaluating the slope and grade of the driveway
Next, you need to evaluate the slope and grade of your driveway to determine how water flows on the surface. A proper slope will ensure that water is directed towards the trench drain and away from your property. Use a level and a measuring tape to assess the existing slope of your driveway. Ideally, the slope should be at least 1/8 inch per foot for proper water drainage.
Identifying potential obstacles or underground utilities
When installing a trench drain in your driveway, it is essential to identify potential obstacles or underground utilities that may interfere with the installation process. Before digging, contact your local utility company to mark any underground lines. Additionally, look out for obstacles such as tree roots, rocks, or other obstructions that may need to be removed or worked around during the installation.
By carefully assessing your driveway for trench drain installation, you can ensure that the drain is placed in the optimal location, that the slope and grade are suitable for efficient water flow, and that any potential obstacles or underground utilities are identified and taken into account. This assessment is crucial to ensure a successful and long-lasting trench drain installation in your driveway.
Gathering The Necessary Tools And Materials
Before you begin the trench drain installation process in your driveway, it is important to gather all the necessary tools and materials. Having everything you need at hand will ensure a smooth and efficient installation. Here are the essential tools and materials you will need:
Trench drain kit or individual components
To install a trench drain in your driveway, you have the option to either use a trench drain kit that includes all the necessary components or purchase the individual components separately. A trench drain kit typically includes a pre-formed channel, grates, and end caps. Depending on your preference and the specific requirements of your driveway, you can choose either option.
Shovel or excavator
A shovel or an excavator is required to dig the trench in which the drain will be installed. If you have access to an excavator, it can save you a significant amount of time and effort during the excavation process. However, if an excavator is not available, a sturdy shovel will do the job.
Level and measuring tape
Before installing the drain channel, it is crucial to ensure that it is level and aligned correctly. A level and measuring tape will help you achieve accurate measurements and make adjustments as needed to ensure proper drainage. These tools will help you avoid any potential issues, such as pooling water or misalignment.
Concrete mix and trowel
Concrete is a vital component of the trench drain installation process, as it provides stability and longevity. You will need to mix the concrete according to the manufacturer’s instructions and then use a trowel to apply it to the trench. Make sure to spread the concrete evenly throughout the trench while ensuring it is level with the surrounding surface.
Having gathered all the necessary tools and materials, you are now ready to proceed with the next steps of installing a trench drain in your driveway.
Excavating The Trench For The Drain
When it comes to installing a trench drain in your driveway, one of the most critical steps is excavating the trench. This process involves marking the trench location, digging to the required depth and width, and ensuring the trench has a slight slope for proper drainage.
Marking the trench location using string or spray paint
The first step in excavating the trench is to accurately mark its location. This can be done using string or spray paint. Begin by visualizing and planning where you want the drain to be placed. Once you have decided on the best location, use a measuring tape to mark the points at the beginning and end of the trench. Then, run a string between these points or use spray paint to create a clear and visible line.
Excavating the trench to the required depth and width
With the trench location marked, it’s time to start digging. Using a shovel or an excavator, remove the top layer of soil within the marked area. Dig down to the required depth and width for your trench drain. The depth will depend on the specific drainage needs of your driveway, but typically ranges from 6 to 12 inches. As for the width, it should accommodate the size of the drain system you are installing. Be sure to check the manufacturer’s specifications for the correct width measurement.
It’s important to note that while digging, you should be mindful of any underground utilities, such as water or gas lines, that may be present in your driveway. Contact your local utility company beforehand to ensure you dig safely and avoid any unnecessary damage or accidents.
Ensuring the trench has a slight slope for proper drainage
Once you have excavated the trench to the required depth and width, it’s essential to ensure it has a slight slope for proper drainage. This slope should be directed away from your home or any other structures nearby. This will allow water to flow efficiently towards the drain and prevent pooling or flooding in your driveway.
To achieve the proper slope, use a level or a measuring tool to check the trench’s elevation. Aim for a slope of approximately 1/4 inch per foot. This means that for every foot of trench length, the height difference between the starting point and the endpoint should be 1/4 inch.
In conclusion, excavating the trench for your driveway’s trench drain is a fundamental step in the installation process. By accurately marking the trench location, digging to the required depth and width, and ensuring a slight slope for proper drainage, you are setting the foundation for an effective and functional drainage system that will keep your driveway dry and safe.
Installing The Trench Drain System
Preparing the base of the trench with crushed gravel
Before installing the trench drain system in your driveway, it’s crucial to prepare the base of the trench properly. This will ensure a stable foundation for the drain and promote efficient drainage. One of the recommended steps in the preparation process is to use crushed gravel.
Crushed gravel serves as a solid and durable base for the trench drain. It helps to disperse the weight and pressure exerted on the drain system, preventing potential damage. Here’s a step-by-step guide on how to prepare the base with crushed gravel:
- Excavate the area: Start by marking the outline of the trench with stakes and string. Then, use a shovel or excavator to dig out the soil along the marked lines, ensuring the trench is deep enough to accommodate the drain system.
- Remove any debris: Remove any rocks, roots, or any other debris that may hinder the proper installation of the trench drain system.
- Add the crushed gravel: Pour a layer of crushed gravel into the trench. The recommended thickness is about 4-6 inches, but it may vary based on the manufacturer’s instructions.
- Compact the gravel: Compact the gravel with a plate compactor or a hand tamper. This will ensure a solid and level base for the trench drain system.
By preparing the base of the trench with crushed gravel, you will create a sturdy foundation that can support the weight and provide long-lasting performance for your driveway trench drain system.
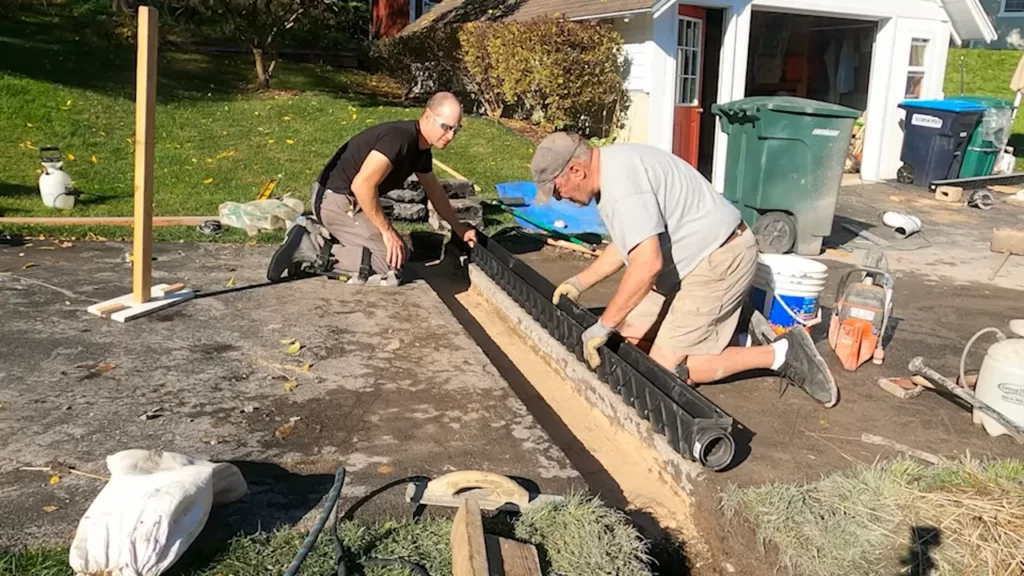
Assembling the trench drain system according to manufacturer instructions
Once you have prepared the base of the trench, it’s time to assemble the trench drain system itself. It’s crucial to follow the manufacturer’s instructions carefully to ensure proper installation. Here’s a general guide on how to assemble the trench drain system:
- Gather the materials: Collect all the components of the trench drain system, including the drain sections, end caps, grates, and any other accessories that may come with it.
- Inspect the components: Before assembling, inspect each component for any signs of damage or defects. If any issues are found, contact the manufacturer for a replacement.
- Connect the drain sections: Start by connecting the drain sections according to the manufacturer’s instructions. This may involve using connectors or couplings to securely join the sections together.
- Attach the end caps: Once the drain sections are connected, attach the end caps to both ends of the drain system. This will prevent any water or debris from entering the drain from the sides.
- Install the grates: Finally, install the grates on top of the drain sections. Depending on the design, this may involve sliding the grates into place or securing them with screws or clips.
Following the manufacturer’s instructions during the assembly process will ensure that the trench drain system is correctly put together, maximizing its effectiveness and functionality.
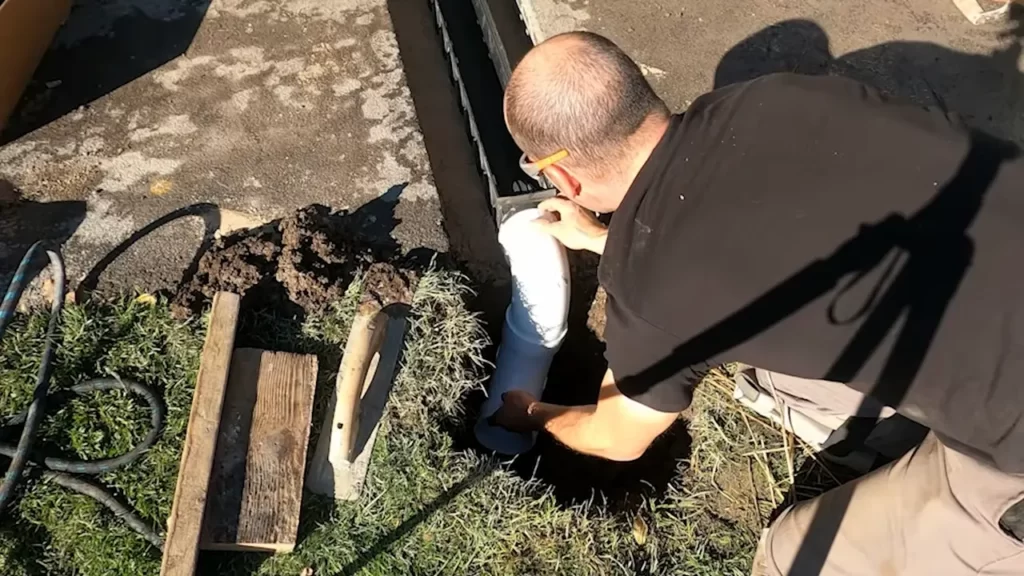
Ensuring proper alignment and connection of the drain sections
Proper alignment and connection of the drain sections are crucial for the trench drain system to function optimally. It ensures that there are no gaps or misalignments that could compromise the efficiency of the drain. Here are some key steps to follow:
- Check the alignment: Before finalizing the connections, carefully check the alignment of the drain sections. Ensure that they are straight, level, and aligned with the desired slope for effective water flow.
- Use connectors or couplings: Securely connect the drain sections using appropriate connectors or couplings. These components help create a tight seal between the sections, preventing leaks or dislodgment.
- Inspect the connections: Once the drain sections are connected, inspect the joints to ensure they are tightly secured. This will prevent any water from seeping through and keep the drain system functioning optimally.
By paying attention to the alignment and connection of the drain sections, you can guarantee a well-functioning trench drain system that effectively drains water away from your driveway and keeps it free from potential damage.
Securing And Backfilling The Trench Drain
Once you have successfully installed the trench drain in your driveway, it’s important to properly secure and backfill the drain to ensure its stability and functionality. This step-by-step guide will walk you through the process.
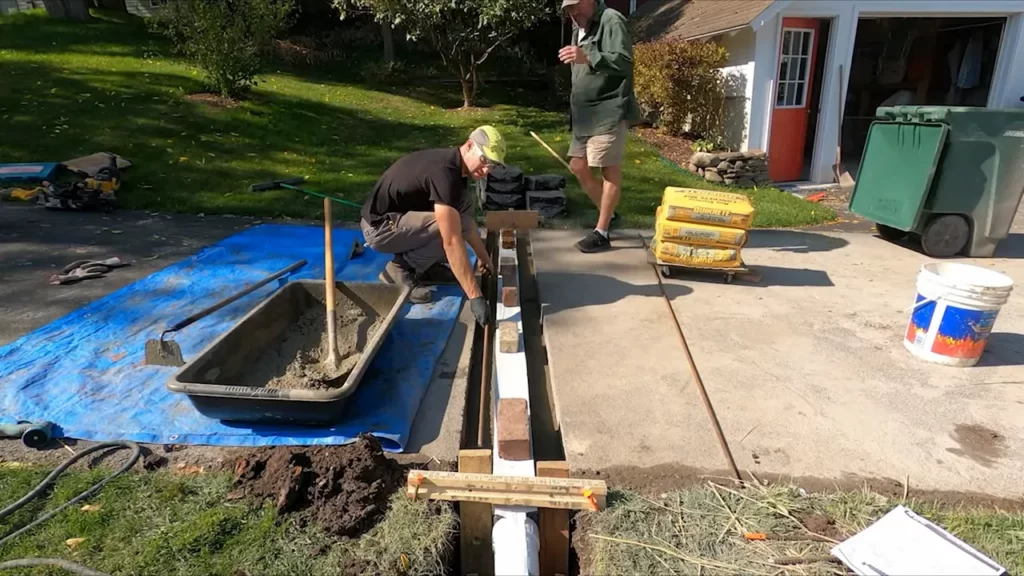
Placing concrete around the edges of the drain system for stability
In order to provide additional stability to the trench drain system, it is recommended to place concrete around the edges of the drain. Concrete acts as a strong and durable material that helps to secure the drain in place and prevent any shifting or movement.
To do this:
- Determine the width and depth of the concrete needed to adequately cover and secure the edges of the drain.
- Mix the concrete according to the manufacturer’s instructions.
- Using a trowel or similar tool, carefully spread the concrete along the edges of the drain, ensuring that it fully covers the trench and adheres to the drain system.
- Smooth the concrete surface using the trowel, removing any excess and ensuring a level finish.
- Allow the concrete to fully cure according to the manufacturer’s instructions before proceeding with the next steps.
Backfilling the trench with soil, compacting it as you go
After securing the edges of the drain with concrete, the next step is to backfill the trench with soil. It’s important to choose the right type of soil that is suitable for drainage purposes and can effectively support the drain system.
Here’s how you backfill the trench:
- Begin by adding a layer of soil at the bottom of the trench, ensuring it is evenly distributed.
- Compact the soil using a compactor or similar tool, applying pressure to create a firm and stable base.
- Continue adding soil in layers, compacting each layer as you go. This helps to prevent future settling of the backfill material.
- Ensure that the soil is level with the surrounding driveway surface.
- Once the trench is completely backfilled, thoroughly compact the entire area to further stabilize the drain system.
Testing the drain system for proper water flow
After securing and backfilling the trench drain, it’s crucial to test the system to ensure proper water flow. This step will help identify any obstructions or issues that need to be addressed before the project is considered complete.
Here are the steps to test the drain system:
- Slowly pour water into the drain to simulate rainfall or water runoff.
- Observe the flow of water through the drain system, ensuring it is flowing freely without any blockages or slowdowns.
- If any issues are detected, such as water pooling or inadequate drainage, address them accordingly before finalizing the project.
By following these steps and properly securing and backfilling the trench drain, you’ll ensure a stable and functional system that effectively drains water away from your driveway.
Regular Maintenance For Optimal Performance
Regular maintenance is crucial for ensuring the optimal performance of your trench drain in your driveway. With proper care and attention, you can prevent any potential issues and keep your drain system functioning efficiently for years to come. In this section, we will discuss three key aspects of regular maintenance that you should prioritize: clearing debris and sediment from the drain system, inspecting and cleaning the grates or covers, and checking for any signs of damage or blockages.
Clearing Debris and Sediment from the Drain System
To maintain the effectiveness of your trench drain, it is important to clear any accumulated debris and sediment. Over time, leaves, twigs, dirt, and other unwanted materials can obstruct the flow of water, leading to potential drainage issues. By following these steps, you can ensure the clear and unobstructed passage of water:
- Regularly sweep the area surrounding the trench drain, removing any visible debris that may have accumulated.
- Utilize a high-pressure hose or a drain auger to dislodge any stubborn debris that may be lurking within the drain.
- Ensure that the outlet pipes leading away from the trench drain are clear and free from any blockages.
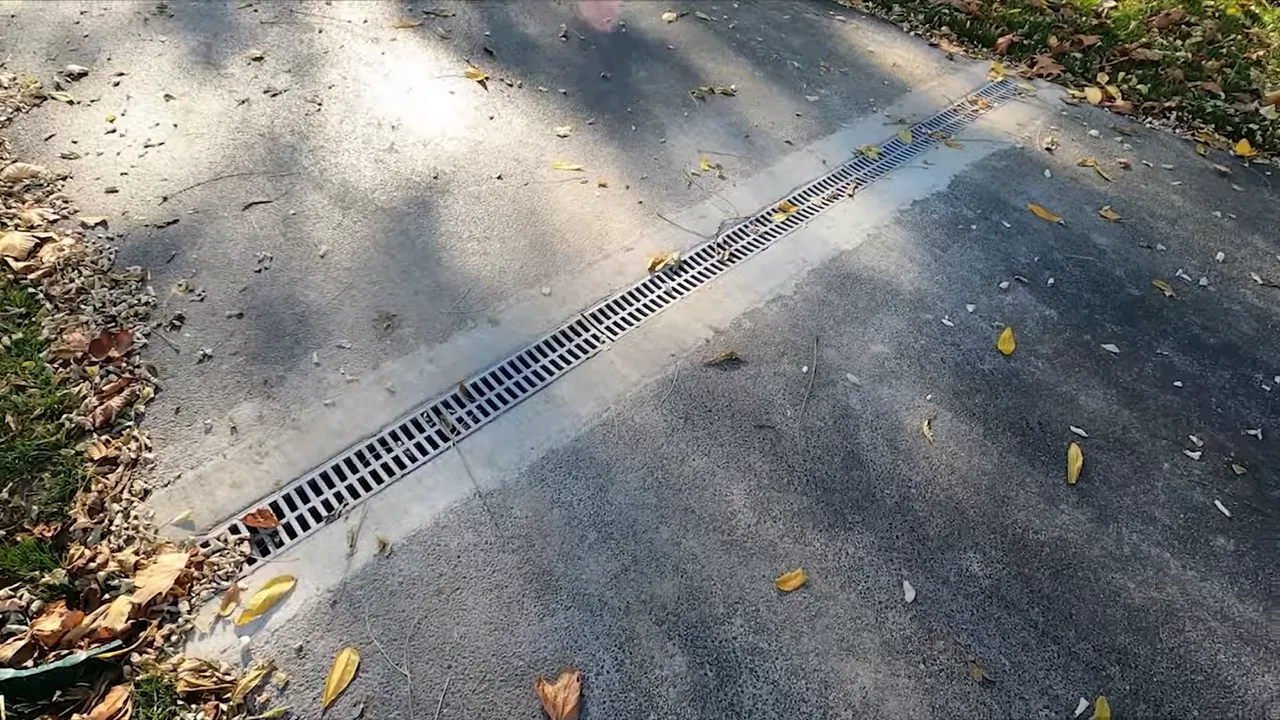
Inspecting and Cleaning the Grates or Covers
The grates or covers of your trench drain play a crucial role in preventing unwanted materials from entering the drain system. Routine inspection and cleaning of these components are essential to maintain their functionality. Here are a few steps to follow:
- Regularly inspect the grates or covers for any signs of damage, such as cracks or breaks.
- Use a wire brush or a soft cloth to remove any built-up dirt, debris, or sediment that may have accumulated on the grates.
- Consider applying a protective coating or sealant to prevent corrosion and prolong the lifespan of the grates or covers.
Checking for Any Signs of Damage or Blockages
Regularly checking for signs of damage or blockages is vital in maintaining the optimal performance of your trench drain. By staying vigilant and addressing any issues promptly, you can prevent costly repairs and ensure proper functioning of the drain system. Here’s what to look out for:
- Inspect the trench drain channel for any cracks, breaks, or signs of wear and tear.
- Check for any signs of blockages, such as slow drainage or pooling water.
- If you notice any issues, promptly unclog the drain system or seek professional assistance if necessary.
- Consider regular professional inspections to identify potential problems and address them before they escalate.
By following these regular maintenance practices, you can ensure that your trench drain in the driveway remains in optimal condition, effectively directing water away from your property and preventing any costly damage. Regularly clearing debris and sediment, inspecting and cleaning the grates or covers, and checking for any signs of damage or blockages will contribute to the longevity and efficiency of your trench drain, giving you the peace of mind you deserve.
Troubleshooting Common Issues With Trench Drains
Addressing Improper Water Flow or Pooling
One of the most common issues that can arise with trench drains in driveways is improper water flow or pooling. If your trench drain is not effectively redirecting water away from your driveway, it can lead to potential damage and safety hazards. Fortunately, there are several troubleshooting steps you can take to address this problem:
- Inspect the slope: Begin by checking the slope of your driveway. The trench drain should be installed with a slight slope, allowing water to flow naturally towards the drain. If the slope is not sufficient, consider adjusting the gradient or consulting a professional for assistance.
- Clear any debris: Debris, such as leaves, dirt, or gravel, can accumulate in the trench drain and obstruct the water flow. Regularly clear the drain of any debris and ensure that the grates are clean and free from any blockages.
- Verify the drain capacity: If water continues to pool despite clear drains and proper slope, it is essential to check the capacity of your trench drain system. Ensure that the drain channels and pipes are adequately sized to handle the expected volume of water. Consider upgrading to a larger drain system if necessary.
Repairing Cracks or Leaks in the Drain System
Cracks or leaks in your trench drain system can reduce its efficiency and lead to further damage. It is crucial to address these issues promptly to maintain the functionality of your driveway’s drainage. Follow these troubleshooting steps to repair cracks or leaks:
- Identify the source of the problem: Inspect the trench drain system carefully to locate any cracks or leaks. Start by examining the concrete or plastic channels, as well as the connections between the drain and pipes.
- Repair small cracks: For minor cracks, you can use a specialized concrete sealer or epoxy to fill in the damaged areas. Clean the crack thoroughly, apply the sealer or epoxy according to the manufacturer’s instructions, and allow sufficient drying time.
- Replace damaged components: If the cracks or leaks are extensive, it may be necessary to replace the damaged parts of the trench drain system. Contact a professional or consult the manufacturer’s guidelines for guidance on replacing the channels or pipes.
Dealing with Unexpected Obstructions or Damage
Despite proper installation and maintenance, unexpected obstructions or damage can occur in trench drains. It is crucial to address these issues promptly to prevent further complications. Here are some troubleshooting steps to help you handle unexpected obstructions or damage:
- Inspect for obstructions: Begin by visually inspecting the trench drain system for any visible obstructions. These can include debris, roots, or even small animals. Remove any obstructions carefully using gloves or tools, ensuring not to damage the drain components.
- Repair or replace damaged parts: If the trench drain system has sustained damage, such as a broken grate or a damaged channel, it is essential to repair or replace the affected parts. Follow the manufacturer’s guidelines or seek professional assistance to ensure proper repairs.
- Consider a professional assessment: If troubleshooting the issue on your own proves challenging, consider consulting a professional to assess the condition of your trench drain system. They can provide expert guidance and recommend appropriate solutions to address any unexpected obstructions or damage.
Frequently Asked Questions
How Do I Install A Trench Drain?
To install a trench drain, follow these steps: 1. Determine the location and size of the drain. 2. Excavate the trench according to the specifications. 3. Install the channel with proper slope and alignment. 4. Connect the channel to the outlet pipe or drainage system.
5. Backfill the trench and compact the soil.
Can You Install Trench Drain In Existing Concrete?
Yes, trench drains can be installed in existing concrete.
Does Trench Drain Have To Be In Concrete?
Trench drains do not have to be in concrete. They can be made from various materials such as polymer, steel, or fiberglass. The choice depends on the specific requirements and preferences of the project.
How Deep Can A Trench Drain Be?
A trench drain can be as deep as needed to effectively drain water, but it’s typically recommended to be between 1 to 2 feet deep.
Conclusion
Installing a trench drain in your driveway can greatly improve drainage and prevent water damage. By following the steps outlined in this blog post, you can successfully complete the installation process yourself. Remember to consider the specific needs of your driveway and choose the right materials and tools.
With proper maintenance, your new trench drain will effectively channel water away from your driveway, ensuring its longevity. Don’t let drainage issues ruin your driveway—take action today!