To install a shower door seal strip, start by measuring the length of the shower door track. Next, cut the seal strip to the appropriate length and slide it into the track.
Press firmly to ensure it is secure.
Choosing The Right Shower Door Seal Strip
Factors to Consider When Selecting a Shower Door Seal Strip
Choosing the right shower door seal strip is crucial for ensuring a watertight and secure enclosure that prevents leaks and maintains a clean and dry bathroom. There are several factors to consider when selecting a shower door seal strip:
- Material: The material of the seal strip plays a vital role in its effectiveness and longevity. Common materials include PVC, rubber, silicone, and vinyl. Each material has its own advantages and disadvantages, so it’s essential to consider factors such as durability, flexibility, and resistance to mold and mildew.
- Installation Method: Different shower door seal strips may require specific installation methods. Some may need to be glued or attached with adhesive, while others can simply be snapped or slid into place. Consider your preference and ability to install the seal strip when choosing the right one for your shower door.
- Style and Design: Shower door seal strips are available in a variety of styles and designs, including clear, opaque, or colored options. Choosing a seal strip that complements your bathroom decor can enhance the overall aesthetics of your shower enclosure.
- Budget: Set a budget for your shower door seal strip and explore options within that range. While it’s essential to prioritize quality and durability, you can find suitable seal strips that fit your budget without compromising on performance.
Common Types of Shower Door Seal Strips Available in the Market
When browsing the market for shower door seal strips, you’ll come across various types, each catering to different needs and door types. Here are some common types to consider:
| Type | Description |
|---|---|
| PVC Seal Strip | Affordable and widely available, PVC seal strips provide good flexibility and sealing properties. They are easy to install and maintain. |
| Rubber Seal Strip | With excellent water resistance and durability, rubber seal strips are perfect for heavy-duty applications. They offer a strong seal and are resistant to mold and mildew. |
| Silicone Seal Strip | Silicone seal strips are highly flexible, allowing them to fit snugly on any shape or size of shower door. They provide a watertight seal and are resistant to high temperatures and UV rays. |
| Vinyl Seal Strip | Commonly used in sliding shower doors, vinyl seal strips offer good durability and sealing properties. They are easy to install and maintain. |
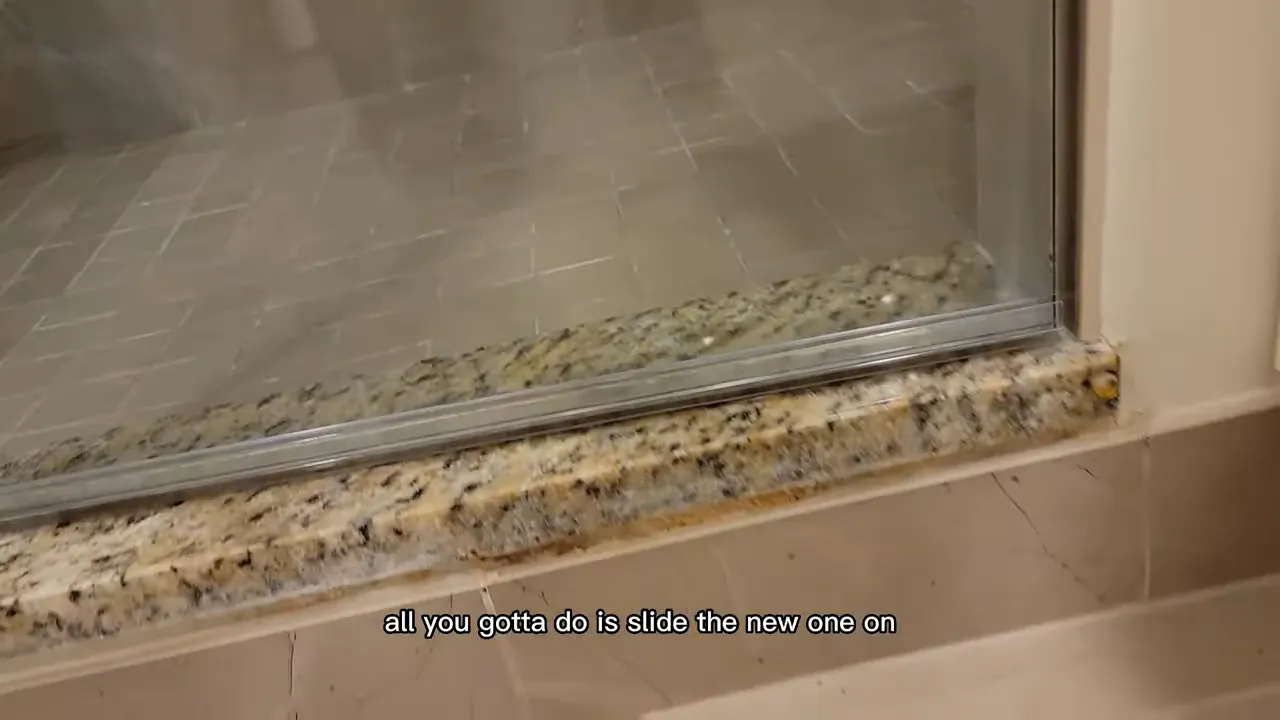
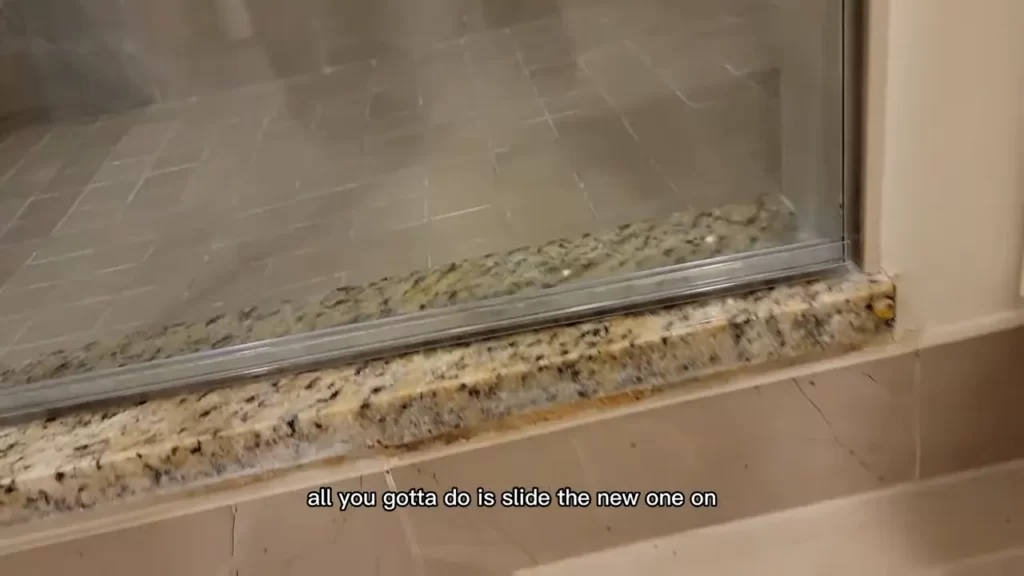
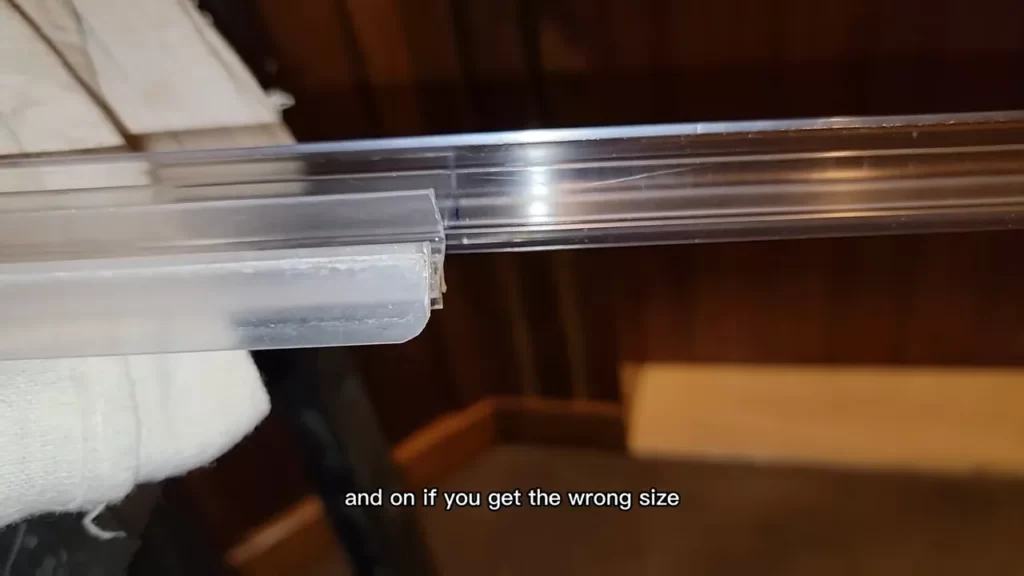
How to Determine the Ideal Size and Shape for Your Shower Door
Ensuring the ideal size and shape of your shower door seal strip is crucial for an effective barrier against water leaks. Here’s how you can determine the right dimensions:
- Measurements: Measure the length and height of your shower door carefully. Slight inaccuracies can result in an ill-fitting seal strip, leading to potential leaks.
- Shape: Most shower door seal strips come in straight lengths that can be trimmed to fit the door size. Ensure you select a strip with the appropriate shape for your shower door, such as straight, curved, or L-shaped.
- Flexibility: Consider the flexibility of the seal strip when determining the ideal size and shape. It should be able to conform to the contours of your shower door and provide a tight and secure seal.
By considering these factors and following the suggested guidelines, you’ll be well-equipped to choose the right shower door seal strip that meets your requirements and ensures a leak-free and enjoyable showering experience.
Tools And Materials Needed For Installation
When it comes to installing a shower door seal strip, having the right tools and materials is crucial. Without them, the installation process can be difficult and time-consuming. In this section, we will discuss the essential tools required for installing a shower door seal strip, the recommended materials for a successful installation, and optional accessories that can enhance the effectiveness of the strip. By gathering these tools and materials beforehand, you can ensure a smooth and hassle-free installation process.
Essential tools required for installing a shower door seal strip
Before you begin installing a shower door seal strip, it’s important to have the following essential tools at hand:
- A utility knife or scissors – for cutting the seal strip to the desired length.
- A measuring tape – to accurately measure the length of your shower door.
- A pencil or marker – for marking the cutting points on the seal strip.
- A screwdriver – for removing any old or damaged seal strip.
- A caulking gun and silicone adhesive – for securing the new seal strip in place.
- A clean cloth or sponge – for wiping away any excess adhesive.
Recommended materials for a successful installation
For a successful shower door seal strip installation, it is recommended to gather the following materials:
- A high-quality shower door seal strip – choose a durable and flexible material that is suitable for your specific shower door type.
- Cleaner or degreaser – to prepare the surface and remove any dirt or debris that may prevent proper adhesion.
- Masking tape – to create a straight line and protect surrounding areas during the installation process.
Optional accessories that can enhance the effectiveness of the seal strip
In addition to the essential tools and recommended materials, there are optional accessories that can enhance the effectiveness of the seal strip:
- Shower door bottom sweep – this accessory can be attached to the bottom of the door to provide extra water resistance.
- Shower door drip rail – a drip rail can be installed on the bottom of the door to redirect water back into the shower and prevent it from leaking onto the floor.
- Clear caulk or adhesive sealant – to seal any gaps between the seal strip and the shower door frame, ensuring a watertight seal.
Measuring And Preparing Your Shower Door
Before installing a shower door seal strip, it is crucial to properly measure your shower door and prepare the surface for installation. By following these step-by-step instructions, you can ensure a seamless installation and prolong the life of your shower door.
Step-by-step instructions to properly measure your shower door for the seal strip
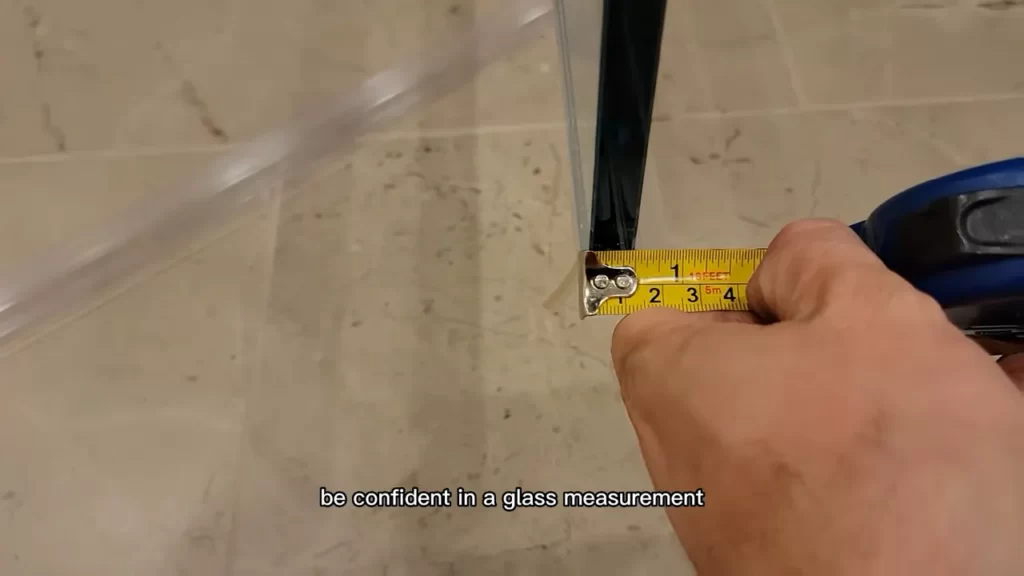
- Measure the length of the bottom edge of your shower door using a measuring tape. Make sure to measure from one end to the other, accurately capturing the dimensions.
- Note down the measurements and double-check them to ensure accuracy.
- If your shower door has any curves or uneven surfaces, take additional measurements at those points. You may need to cut the seal strip accordingly for a perfect fit.
Preparing the shower door surface for installation
Once you have measured your shower door, it’s time to prepare the surface for the seal strip installation. This is essential to ensure proper adhesion and prevent any potential leakage. Follow these steps to get your surface ready:
- Thoroughly clean the bottom edge of your shower door using a suitable cleansing agent. Remove any soap scum, dirt, or residue that may have accumulated over time. A clean surface will facilitate better adhesion of the seal strip.
- If there is any existing sealant or residue on the surface, remove it using a scraper or a putty knife. Be gentle yet thorough to avoid damaging the shower door.
- Once the surface is clean and free from any debris, wipe it dry with a clean cloth or towel.
With the shower door properly measured and the surface prepared, you are now ready to install the seal strip. Following these steps will help ensure a hassle-free installation and a watertight shower enclosure. Remember to refer to the manufacturer’s instructions specific to your shower door and seal strip for best results.
Applying The Adhesive
Applying the adhesive for your shower door seal strip is a crucial step to ensure a secure and long-lasting installation. Choosing the right adhesive, applying it evenly, and ensuring a strong bond between the seal strip and the shower door are essential for a leak-free and visually appealing shower enclosure. In this section, we will guide you through the process step by step, providing you with the necessary information to successfully apply the adhesive.
Choosing the right adhesive for your shower door seal strip
Choosing the right adhesive is the first step in ensuring a successful installation of your shower door seal strip. It is important to select an adhesive that is specifically designed for bonding seal strips to shower doors and is suitable for the materials involved. Here are a few popular adhesive options along with their benefits:
| Adhesive Type | Benefits |
|---|---|
| Epoxy | Durable and waterproof |
| Silicone-based | Flexible and resistant to mildew |
| Acrylic | Quick-drying and paintable |
Consider the specific requirements of your shower door and choose the adhesive that suits your needs best. It is always a good idea to read the manufacturer’s instructions and recommendations before making your final decision.
Proper techniques for applying the adhesive evenly
Once you have selected the appropriate adhesive, it is essential to apply it evenly to ensure a secure bond between the seal strip and the shower door. Here are some proper techniques to follow:
- Clean the area thoroughly: Before applying the adhesive, make sure the shower door and the seal strip area are clean and free from any dirt, debris, or residue. Use a mild detergent and warm water to remove any grime, and then dry the surface completely.
- Apply the adhesive in a thin, even layer: Depending on the adhesive type, you may need to use a small brush or a caulking gun to apply the adhesive. Start at one end of the seal strip and work your way to the other end, applying the adhesive in a thin, continuous layer. Avoid applying too much adhesive, as it can cause the seal strip to bulge or not fit properly.
- Smooth out the adhesive: Once the adhesive is applied, use a spatula or your finger to smooth out any uneven areas or excess adhesive. This will ensure a seamless and professional-looking finish.
Tips for ensuring a secure bond between the seal strip and the shower door
Ensuring a strong bond between the seal strip and the shower door is crucial for preventing leaks and maximizing the lifespan of your installation. Here are some tips to help you achieve a secure bond:
- Allow the adhesive to cure: Follow the manufacturer’s instructions for the recommended curing time of the adhesive. It is important to give the adhesive enough time to fully bond before subjecting it to water or other stresses.
- Avoid excessive moisture: Moisture can interfere with the adhesive’s bonding properties. Avoid using the shower for at least 24 hours after applying the adhesive to allow it to cure undisturbed.
- Regularly inspect the seal strip: Periodically check the seal strip for any signs of detachment or damage. If you notice any issues, promptly address them to maintain the integrity of the seal.
By following these tips and techniques, you can ensure a secure and successful installation of your shower door seal strip. Take the time to choose the right adhesive, apply it evenly, and ensure a strong bond, and you will enjoy a leak-free and durable shower enclosure for years to come.
Attaching The Seal Strip To The Door
Step-by-step guide on positioning the seal strip onto the shower door
Attaching the seal strip to the door is a crucial step to ensure a leak-free shower experience. By following a step-by-step guide, you can successfully position the seal strip onto your shower door. Here’s how:
- Begin by cleaning the shower door and the surrounding area. Remove any dirt, grime, or residue that may hinder the adhesive’s effectiveness.
- Measure the length of the shower door and cut the seal strip accordingly. It’s important to have a properly measured strip to ensure a snug fit.
- Next, peel off the protective backing from the adhesive side of the seal strip.
- Carefully position the adhesive side of the seal strip onto the edge of the shower door. Start from one end and slowly work your way to the other end.
- Press firmly along the entire length of the seal strip to ensure proper adhesion. Applying even pressure will help the strip adhere securely to the door.
- Repeat the above steps for any additional doors or sections that require a seal strip.
Best practices for securing the seal strip in place
While attaching the seal strip to the shower door, it’s important to follow some best practices to ensure it remains secure. Here are a few tips to help you:
- Check the manufacturer’s instructions for any specific recommendations or guidelines.
- Ensure that the seal strip is aligned evenly along the entire length of the shower door.
- Press firmly against the seal strip to ensure strong adhesive contact with the door.
- Allow sufficient time for the adhesive to cure and bond with the door surface before using the shower.
- Regularly inspect the seal strip for any signs of wear or damage. Replace it if necessary to maintain its effectiveness.
Dealing with any excess or overlapping seal strip material
After attaching the seal strip to the shower door, you may encounter situations where there is excess or overlapping material. To address this, consider the following:
- If there is excess material at one end, trim it with a sharp utility knife. Make sure to cut it cleanly and evenly.
- If you have overlapping seal strip material, carefully trim one side to create a seamless transition.
- Ensure that the trimmed edges are smooth and securely attached to the door to prevent any gaps or leaks.
- Dispose of any discarded material properly, following local waste disposal guidelines.
By following these guidelines, you can effectively attach the seal strip to your shower door, ensuring a tight seal that prevents water leakage and enhances your showering experience.
Testing And Adjusting The Seal
Testing and Adjusting the Seal
Properly testing and adjusting the shower door seal strip is crucial to ensure it provides an effective, watertight seal. After installing the seal strip, it is essential to test its effectiveness and troubleshoot any common issues that may arise. Additionally, adjusting the seal strip for optimal performance will help prevent any future leaks or gaps. In this section, we will outline the steps to properly test the effectiveness of the seal strip installation, troubleshoot common issues, and adjust the seal strip for optimal performance.
How to Properly Test the Effectiveness of the Seal Strip Installation
To ensure that the shower door seal strip is properly installed and provides an effective seal, follow these steps for testing its effectiveness:
1. Close the Shower Door: Firstly, close the shower door securely to create a sealed environment. Make sure it is fully closed, leaving no gaps.
2. Run Water: Next, turn on the shower and let the water run at a moderate pressure. Allow the water to flow along the seal and observe if any water seeps through or leaks out.
3. Inspect for Leaks: Carefully examine the entire length of the seal strip, checking for areas where water may be leaking. Pay close attention to the corners and edges, as these are common areas for leaks to occur.
4. Repeat the Process: If any leaks are found, repeat the testing process after making adjustments and ensuring the seal strip is securely in place.
Troubleshooting Common Issues When the Seal Doesn’t Provide a Tight Seal
In some cases, the seal strip may not provide a tight seal, resulting in water leaking from the shower area. Here are some common issues and troubleshooting steps to consider:
1. Inadequate Installation: Ensure that the seal strip is installed correctly and securely. Check for any gaps or spaces between the strip and the shower door.
2. Damaged Seal Strip: Inspect the seal strip for any signs of damage, such as cracks, tears, or misalignment. If damaged, replace the seal strip with a new one.
3. Improper Measurements: Verify that the seal strip is the correct size and length for your shower door. If it is too short or too long, it may not provide a tight seal.
4. Misaligned Shower Door: Check if the shower door is properly aligned. If it is misaligned, adjust the door accordingly to ensure a proper fit with the seal strip.
Adjusting the Seal Strip for Optimal Performance
To adjust the seal strip for optimal performance, follow these steps:
1. Positioning: Ensure that the seal strip is positioned correctly along the bottom edge of the shower door. It should be aligned with the door and make contact with the shower enclosure.
2. Secure Attachment: Check if the seal strip is securely attached to the door. If it is loose or not completely adhered, reattach it firmly to ensure a tight seal.
3. Flexibility: Assess the flexibility of the seal strip. It should have enough flexibility to create a snug fit against the shower enclosure while allowing the door to open and close smoothly.
4. Test Again: After making any adjustments, repeat the testing process to check if the seal strip now provides a tight, watertight seal.
By following these tips for testing and adjusting the shower door seal strip, you can ensure that your installation is effective, troubleshoot any issues, and optimize its performance for a leak-free showering experience.
Cleaning And Preventing Mold Or Mildew
When it comes to maintaining a clean and hygienic bathroom, the shower door seal strip plays a crucial role. Not only does it prevent water from seeping out of the shower area, but it also keeps mold and mildew at bay. Cleaning and preventing mold or mildew growth on the seal strip is essential to ensure its longevity and effectiveness. In this section, we will discuss the recommended cleaning methods, provide tips to prevent mold or mildew growth, and highlight regular maintenance practices to extend the lifespan of the seal strip.
Recommended cleaning methods for the shower door seal strip
Keeping the shower door seal strip clean is vital to prevent the accumulation of dirt, soap scum, and mold. Here are some recommended cleaning methods:
- Mix a solution of warm water and mild soap in a bucket.
- Dampen a clean cloth or sponge with the soapy water.
- Gently scrub the seal strip, paying special attention to any stubborn stains or mold growth.
- Rinse the seal strip thoroughly with clean water.
- Dry the seal strip with a clean towel or allow it to air dry.
By following these cleaning methods on a regular basis, you can maintain a clean and mold-free shower door seal strip.
Tips for preventing mold or mildew growth on the seal strip
Mold and mildew thrive in damp and humid environments, making the shower area an ideal breeding ground. However, with proper preventive measures, you can minimize the growth of mold or mildew on the seal strip. Here are some useful tips:
- After showering, ensure proper ventilation by running the bathroom fan or opening a window to reduce moisture levels.
- Wipe down the seal strip after each use to remove any excess water.
- Avoid using harsh chemical cleaners, as they can damage the seal strip and promote mold growth.
- Regularly inspect the seal strip for signs of mold or mildew and address them promptly.
- Consider using a mold-resistant shower curtain or liner to further prevent mold or mildew growth.
By implementing these preventive measures, you can significantly reduce the chances of mold or mildew affecting the shower door seal strip.
Regular maintenance practices to extend the lifespan of the seal strip
In addition to regular cleaning and mold prevention, proper maintenance is essential to extend the lifespan of the shower door seal strip. Here are some maintenance practices to follow:
- Inspect the seal strip regularly for any signs of wear, such as cracks or tears, and replace it if necessary.
- Avoid using abrasive materials or tools when cleaning the seal strip, as they can cause damage.
- Apply a silicone-based spray or lubricant to the seal strip to keep it flexible and resistant to mold growth.
- Periodically check the seal strip’s alignment and make necessary adjustments to ensure a tight seal.
By incorporating these regular maintenance practices into your routine, you can ensure the shower door seal strip remains in optimal condition for an extended period.
In conclusion, cleaning and preventing mold or mildew growth on the shower door seal strip is crucial for a clean and hygienic bathroom environment. By following the recommended cleaning methods, implementing preventive tips, and conducting regular maintenance, you can extend the lifespan of the seal strip and maintain its effectiveness in keeping your shower area free from water leaks and mold.
Regular Inspection And Replacement
Regular Inspection and Replacement
Regular inspection and replacement of the shower door seal strip are crucial for maintaining the functionality and aesthetics of your bathroom. Over time, the seal strip can wear out due to constant exposure to water, humidity, and cleaning chemicals. This can lead to water leaks, mold growth, and damage to the surrounding areas. By conducting regular inspections and promptly replacing the seal strip when necessary, you can prevent these issues and ensure a watertight and well-maintained shower space.
Why regular inspections are crucial for maintaining the seal strip
Regular inspections are essential for maintaining the seal strip as they allow you to identify any signs of wear, damage, or degradation. By checking the condition of the seal strip periodically, you can spot potential problems early on and take the necessary steps to address them. This proactive approach can help you avoid costly repairs and ensure that your shower remains free from water leaks that could lead to structural damage over time. Additionally, regular inspections can help prolong the lifespan of the seal strip and maintain the overall integrity of your shower door.
Signs that indicate it’s time to replace the shower door seal strip
Knowing the signs that indicate it’s time to replace the shower door seal strip is essential for maintaining a watertight shower. Here are some telltale signs to look out for:
1. Visible cracks or tears: Inspect the seal strip along the edge of your shower door for any visible cracks or tears. These can allow water to seep through and lead to leakage.
2. Mold or mildew growth: If you notice mold or mildew starting to form on or around the seal strip, it may be a sign that it has deteriorated and needs replacement. Mold can cause health issues and further damage to your bathroom if left unaddressed.
3. Difficulty in closing the door: If you find it increasingly difficult to close your shower door smoothly, it could indicate that the seal strip has worn down and lost its elasticity. This can prevent the door from creating a tight seal.
4. Water leaks: Water leaks are the most obvious sign that your seal strip needs replacement. If you notice water seeping out from the bottom of the shower door or pooling on the floor outside the shower, it’s time to replace the seal strip.
Step-by-step instructions for replacing the seal strip when necessary
When it comes to replacing the seal strip on your shower door, following a step-by-step process is crucial to ensure a proper installation. Here’s a simple guide to help you through the process:
1. Measure and purchase the correct seal strip: Measure the length of your shower door and purchase a seal strip of the appropriate size and material. This will ensure a snug fit and effective seal.
2. Remove the old seal strip: Gently peel off the old seal strip from the shower door. Use a flathead screwdriver or a putty knife to loosen any adhesive or caulk that may be holding it in place.
3. Clean the surface: Thoroughly clean the area where the old seal strip was attached. Remove any residue or debris using a mild detergent and water solution.
4. Apply the new seal strip: Cut the new seal strip to the required length if necessary. Starting from one end of the shower door, carefully press the adhesive side of the strip onto the door, following the desired contour. Apply firm pressure along the entire length to ensure a secure bond.
5. Trim any excess: Use a utility knife or scissors to trim any excess seal strip that extends beyond the edge of the shower door. This will give your installation a neat and finished appearance.
6. Allow time for drying: Give the new seal strip sufficient time to dry and adhere properly before using your shower. Refer to the manufacturer’s instructions for specific drying times.
Regularly inspecting and promptly replacing the shower door seal strip when necessary is essential for maintaining a watertight shower and preventing water leaks and damage. By following these simple steps, you can ensure a properly sealed shower door and prolong the lifespan of your seal strip, keeping your bathroom in top shape.
Frequently Asked Questions
How Do You Install A Shower Door Side Seal Strip?
To install a shower door side seal strip, follow these steps: 1. Measure the length needed for the strip. 2. Cut the strip to the measured length. 3. Ensure the shower door and the area where the strip will be installed are clean and dry.
4. Peel off the adhesive backing from the strip. 5. Press the strip firmly onto the edge of the shower door.
How Do You Install A Shower Screen Strip?
To install a shower screen strip: 1. Measure the length needed for the strip. 2. Clean the area where the strip will be installed. 3. Apply adhesive evenly on the strip. 4. Press the strip firmly onto the shower screen. 5.
Allow the adhesive to dry completely before using the shower.
What Is The Strip At The Bottom Of A Shower Door Called?
The strip at the bottom of a shower door is called a shower door sweep.
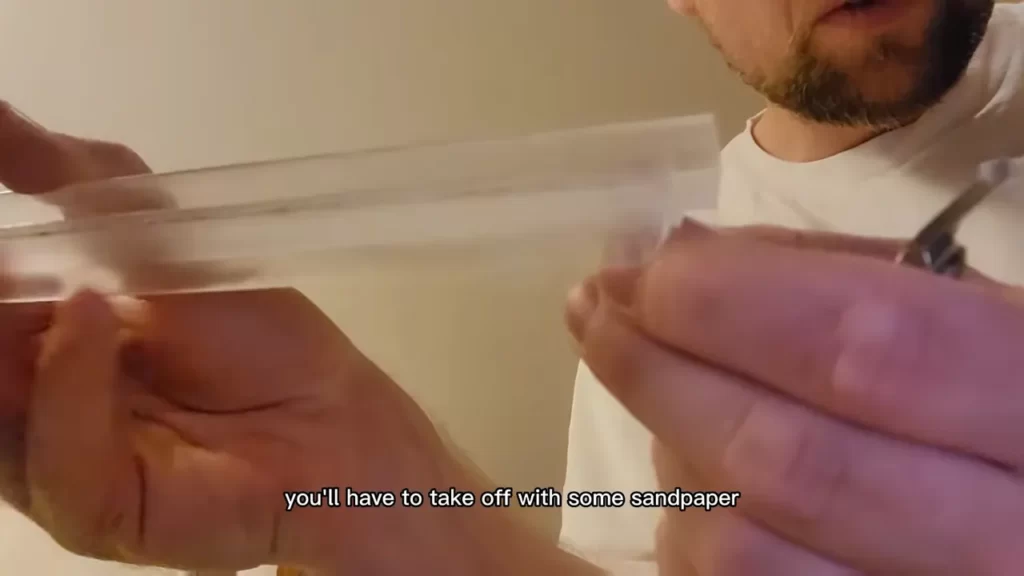
How Do You Cut The Bottom Seal On A Frameless Shower Door?
To cut the bottom seal on a frameless shower door, follow these steps: 1. Measure and mark the desired length on the seal. 2. Use a sharp utility knife or glass cutter to score the seal along the marked line. 3.
Apply steady pressure to the score line to break the seal cleanly. 4. Smooth the newly cut edge with sandpaper if needed. 5. Install the newly cut seal onto the shower door for a perfect fit.
Conclusion
Sealing your shower door is a crucial step in preventing leaks and ensuring a clean, dry bathroom. By following the simple steps outlined in this guide, you can easily install a shower door seal strip. Remember, regular maintenance and inspections are key to preserving the effectiveness of the seal over time.
Stay diligent, and enjoy a leak-free shower experience for years to come.